Strawberry Poke Cake (From Scratch)
🎁 FREE E-BOOK: 12 Sweet Favorites — reader-loved desserts in one beautiful recipe book.
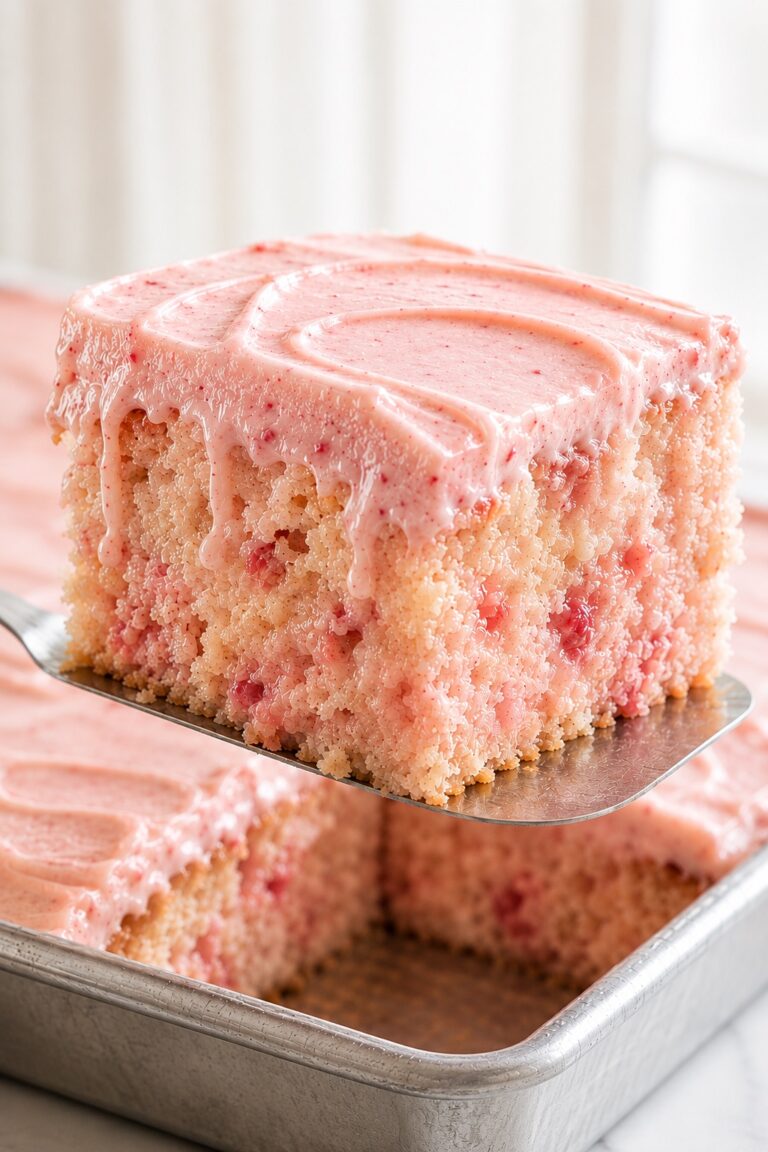
Cold vanilla cake, vivid ruby strawberry ribbons, soft white cream, and fresh berries make this strawberry poke cake as striking in the pan as it is on the plate. Each chilled slice keeps pale cake between the strawberry channels, so the crumb tastes moist and fruity without becoming one uniformly wet layer.

This is the nostalgic red-and-white party cake many bakers recognize, given a more polished homemade finish. The white cake is mixed from scratch, the strawberry gelatin is poured evenly throughout, and the vanilla topping is real whipped cream stabilized just enough to stay billowy when sliced.
The detail worth remembering is the arrangement of 96 narrow holes in an 8 × 12 grid, followed by three measured gelatin pours. This even pattern helps prevent the two most common extremes: a center with dry white patches and edges that collect too much liquid.
Plan on about 45 minutes of active preparation and a little over 5 hours from start to serving. Most of that time is hands-off cooling and chilling, and those quiet stages are what allow the cake, strawberry ribbons, and whipped cream to settle into clean cold slices.
Strawberry Poke Cake at a Glance
This is a chilled 9 × 13-inch white vanilla cake with strawberry-gelatin ribbons, homemade stabilized whipped cream, and fresh strawberries, cut into 15 rectangular servings.
- Yield: 15 chilled dessert servings, cut in a 3 × 5 grid
- Active time: About 45 minutes
- Bake time: 28–33 minutes
- Total time: About 5 hours 5–10 minutes, including cooling and chilling
- Texture: Fine white crumb, soft strawberry channels, billowy cream, and fresh berries
- Best planning option: Bake, poke, and soak the cake the day before, then finish it on serving day
This is the classic strawberry-gelatin poke cake made with a scratch white cake and homemade whipped cream. It is not a pudding-filled, milk-soaked, cheesecake, crunch, or fresh-sauce-only cake. If you want fresh berries layered with cake rather than gelatin ribbons, try this Strawberry Shortcake Recipe instead.
Why This Strawberry Poke Cake Works
The scratch cake is sturdy enough to absorb a generous strawberry soak while remaining easy to lift, top, and cut cleanly after chilling.
- A fine, supportive crumb: Reverse creaming coats the flour with fat before the liquid is added, creating an even texture that can hold the soak.
- Softness when cold: Butter supplies flavor, while neutral oil helps the cake remain tender at refrigerator temperature.
- Defined strawberry ribbons: Ninety-six narrow holes spread the gelatin throughout the pan without creating wide, rubbery plugs.
- Measured moisture: Three 1/2-cup (120 ml) pours give the crumb time to absorb the gelatin and make it easy to redirect liquid away from a pooling edge.
- A lighter homemade topping: A small amount of unflavored gelatin supports whipped cream without adding the density or tang of pudding or cream cheese.
- A clean fresh finish: Thoroughly dried strawberries are added close to serving, which protects the white cream from watery pink streaks.
Why You’ll Love Making This Strawberry Poke Cake
This recipe is especially useful when you want a colorful celebration dessert that serves a group but can be assembled in calm, separate stages.
- It bakes and serves from one 9 × 13-inch pan, making transport and cleanup straightforward.
- The red-and-white cross-section looks festive without complicated piping or layer-cake assembly.
- The soaked cake and whipped-cream topping can both be completed ahead.
- Only about 45 minutes are active; the refrigerator handles most of the elapsed time.
- A 3 × 5 cutting grid gives you 15 predictable party portions.
- The decoration is as simple as an abundant layer of fresh sliced strawberries.
Recipe Science: How Cake Crumb, Poke Geometry, Gelatin, and Cold Cream Shape Every Slice
Four linked mechanisms determine whether a strawberry poke cake becomes tender and ribboned or ends up wet, gummy, and difficult to slice.
Reverse creaming creates a fine, supportive crumb. Coating the flour with butter and oil before most of the liquid is added limits excessive gluten development and distributes the fat evenly. The technique is also used in King Arthur Baking’s tender white cake recipe. In this cake, it produces a crumb that can absorb the gelatin soak while remaining sliceable.
Narrow holes preserve supporting cake between the ribbons. A wide spoon handle removes too much crumb and can leave gelatin cylinders. A smooth 1/4-inch (6 mm) tool creates channels that carry strawberry color downward while leaving pale cake around each one.
Fully dissolved gelatin stays fluid long enough to spread evenly. The regular 3-ounce package, 1 cup boiling water, 1/2 cup cold water, and minimum 3-hour chill preserve the recognizable format documented in JELL-O’s classic gelatin poke cake method. Pouring in measured passes, pausing briefly, and rotating the pan helps the liquid reach the center and edges evenly.
Stabilized cream needs two different temperature conditions. The heavy cream stays cold so it whips efficiently, but the bloomed gelatin must be briefly warmed until clear and then incorporated while still fluid. If peak stages are unfamiliar, this guide to how to make whipped cream gives a closer look at the difference between soft, medium, and overwhipped cream.
| Detail | Target | Why it matters | What you should see |
|---|---|---|---|
| Hole spacing | 96 holes, 8 × 12 grid, 1/4 inch (6 mm) wide | Distributes color while preserving white crumb | Narrow, clean vertical channels |
| Hole depth | Stop 1/4 inch (6 mm) above the pan base | Reduces liquid collection at the bottom | No tool contact with the pan base |
| Gelatin pours | Three passes of about 1/2 cup (120 ml) | Prevents one flooded area and dry zones elsewhere | Damp halos around holes, no deep pools |
| Pause and rotation | Pause about 30 seconds and rotate between passes | Allows absorption before more liquid arrives | Even moisture from center to edges |
Ingredients for a Moist, Sliceable Strawberry Poke Cake
The recipe has four components: a white vanilla cake, a strawberry gelatin soak, stabilized vanilla whipped cream, and a fresh strawberry finish.

Ingredient List
Pay close attention to the amounts, temperatures, and preparation details below, especially for the butter, egg whites, milk, gelatin, cream, and strawberries.
White vanilla cake
- 2 1/2 cups cake flour (300 g), spooned and leveled
- 1 1/2 cups granulated sugar (300 g)
- 1 tablespoon baking powder (12 g)
- 1/2 teaspoon fine sea salt (3 g)
- 1/2 cup unsalted butter (113 g), softened to 65–68°F (18–20°C) and cut into tablespoons
- 1/3 cup neutral oil (80 ml), such as canola, grapeseed, or neutral avocado oil
- 5 large egg whites (150 g), at 68–72°F (20–22°C)
- 1 cup whole milk (240 ml), at 68–72°F (20–22°C)
- 1 tablespoon pure vanilla extract (15 ml)
Strawberry gelatin soak
- 1 package regular strawberry-flavored gelatin dessert mix, 3 ounces (85 g); do not use sugar-free mix
- 1 cup boiling water (240 ml)
- 1/2 cup cold water (120 ml)
Stabilized vanilla whipped cream
- 1 tablespoon cold water (15 ml)
- 1 teaspoon unflavored powdered gelatin (3 g)
- 2 cups cold heavy whipping cream (480 ml), 36–40% milk fat
- 1/2 cup powdered sugar (60 g)
- 2 teaspoons pure vanilla extract (10 ml)
Fresh strawberry finish
- 1 pound fresh strawberries (454 g), rinsed before hulling, dried thoroughly, hulled, and sliced 1/8–1/4 inch (3–6 mm) thick
Ingredient Notes for a Soft Cake and Stable Topping
A few ingredient details help the cake absorb the strawberry gelatin evenly and keep the whipped topping smooth.
- Cake flour: Its lower protein level creates a finer, more tender crumb than all-purpose flour.
- Butter temperature: Properly softened butter should indent easily but remain matte. Shiny, oily butter is too warm for even reverse creaming.
- Neutral oil: Choose an oil with no assertive flavor; it helps the refrigerated cake stay softer.
- Egg whites and milk: Bringing both to 68–72°F (20–22°C) helps the batter combine evenly.
- Regular strawberry gelatin: Use one regular 3-ounce (85 g) package. Sugar-free products have different concentrations and sweeteners and are not direct swaps.
- Heavy whipping cream: A 36–40% milk-fat cream gives the topping enough body to hold medium-stiff peaks.
- Fresh strawberries: Wash before hulling, dry completely, and do not sugar or macerate them for this finish.

Kitchen Tools Needed
The right pan, poke tool, pouring jug, and mixer attachments help produce an even crumb, distinct strawberry ribbons, smooth cream, and neatly shaped slices.
- Measure and mix: Digital kitchen scale, US measuring cups and spoons, large and medium mixing bowls, balloon whisk, and flexible spatula.
- Build the batter: Stand mixer with paddle and whisk attachments, or a strong electric hand mixer with standard beaters and a separate whisk attachment.
- Bake and cool: Conventional oven with a centered rack, one light-colored 9 × 13 × 2-inch metal cake pan (23 × 33 × 5 cm), and a wire cooling rack.
- Poke and pour: A straight 1/4-inch (6 mm) smooth skewer, chopstick, or equivalent tool marked for safe depth, plus a 2-cup heat-safe liquid measuring jug with a pour spout.
- Finish and portion: Small microwave-safe bowl or small saucepan, offset spatula, long sharp knife, ruler, and thin serving spatula.

Before You Begin: Set Up for Clean Strawberry Ribbons
Confirm these conditions before mixing so you do not have to improvise while the batter, warm cake, or fluid gelatin is waiting.
- Use one light-colored 9 × 13 × 2-inch metal pan; glass, ceramic, and dark metal are not timing-equivalent here.
- Fully preheat a conventional oven to 350°F (175°C) with the rack centered.
- Bring the butter, egg whites, and milk to their specified temperatures.
- Mark the 1/4-inch (6 mm) poke tool so it stops about 1/4 inch (6 mm) above the pan base.
- Clear a refrigerator shelf for the uncovered 9 × 13-inch pan.
- Wash and dry the strawberries thoroughly, then keep them cold until the final decoration stage.
Plan Your Strawberry Poke Cake: Same-Day and Overnight Schedules
For same-day serving, begin about 5 hours 10 minutes before dessert; for the easiest schedule, bake, poke, and soak the cake the day before.
| Moment or window | What to prepare | Why it must happen then | Hold or storage |
|---|---|---|---|
| T−5:10 | Preheat, prepare the pan, and begin the batter | Oven and temperature-sensitive ingredients must be ready before mixing | Not applicable |
| T−4:50 | Bake the cake | The crumb must set before it can accept the soak | In the prepared pan |
| T−4:20 | Cool for 20 minutes | The crumb settles while remaining warm | Pan on a wire rack |
| T−4:00 | Poke and complete the three-pass pour | The warm settled cake and fluid gelatin are both ready | Refrigerate promptly |
| T−3:50 | Begin the minimum 3-hour set | The soak must absorb and the cake must become fully cold | 30 minutes uncovered, then covered at 40°F (4°C) or below |
| T−0:50 | Make and spread the stabilized cream | The cake must be cold with no free liquid | Refrigerated |
| T−0:40 | Begin the 30-minute topping set | The cream stabilizer needs time before cutting | Refrigerated |
| T−0:10 to T | Add dry berries, mark the 3 × 5 grid, cut, and serve | Late decoration limits bleeding and protects clean slices | Keep chilled until serving |
| Day before | Bake, poke, soak, and chill | Separates cake work from serving-day finishing | Cover after the first 30 minutes; refrigerate up to 24 hours |
| Serving day | Add stabilized cream | Can be completed before the final rush | Cover without touching the cream; refrigerate up to 24 hours |
| Final 2 hours | Add dry sliced strawberries | Protects the white cream from excess moisture | Refrigerate until serving |
What to Expect from a Strawberry Gelatin Poke Cake
A successful cake looks pale, damp, and unfinished at several points before chilling transforms it into the final clean-slicing dessert.
- The baked cake should be pale gold, not deeply browned.
- After the gelatin pour, damp halos around the holes are normal; deep standing pools are not.
- The red channels should become soft, moist ribbons inside the crumb rather than firm stand-alone gelatin cylinders.
- The cake must be fully cold and show no free liquid before the whipped cream is spread.
How to Make Strawberry Poke Cake, Step by Step
Follow the sequence from temperature setup through chilled service, using the appearance of each stage, not time alone, as the signal to continue.
Prepare the Pan and Temperature-Sensitive Ingredients
Center the oven rack and preheat a conventional oven to 350°F (175°C) for at least 20 minutes. Lightly grease the bottom and sides of the 9 × 13 × 2-inch light-colored metal pan; do not line it because the cake will be soaked, chilled, cut, and served from the pan.
Bring the butter to 65–68°F (18–20°C) and the egg whites and milk to 68–72°F (20–22°C).
What you should see: The butter indents under gentle pressure but remains matte rather than shiny or greasy.
Build the White Cake Batter by Reverse Creaming
In the mixer bowl fitted with the paddle, combine the cake flour, granulated sugar, baking powder, and salt on low speed for 30 seconds. Add the softened butter one tablespoon at a time, then stream in the neutral oil. Mix on low for 60–90 seconds and scrape the bowl.
Whisk the egg whites, milk, and vanilla together. Add one-third of the liquid and beat on medium for 60 seconds. Scrape the bowl, then add the remaining liquid in two additions, mixing on low for 15 seconds and medium for 20 seconds after each. Stop as soon as the batter is smooth and uniform.

What you should see: Before the liquid, the dry mixture resembles evenly damp fine sand with no large butter pieces. The finished batter is pale, cohesive, moderately thick, and free of flour pockets or greasy clumps.

Bake Until Pale, Springy, and Structurally Set
Transfer all the batter to the prepared pan, level it into the corners, and tap the pan once gently to release only large air pockets. Bake for 28–33 minutes, beginning the first check at 28 minutes.
Cool the cake in its pan on a wire rack for exactly 20 minutes before poking. At that point the crumb is warm and settled, but it is neither piping hot nor fully cold.
What you should see: The surface is pale gold, the center springs back after a light touch, and a tester carries a few moist crumbs but no wet batter.

Create the 96-Hole Grid
Use the straight 1/4-inch (6 mm) smooth tool to make 96 vertical holes in an 8 × 12 grid. Keep the rows about 1 inch (2.5 cm) apart, position the outer holes about 1/2 inch (1.3 cm) from the pan walls, and stop about 1/4 inch (6 mm) above the pan base.
Insert and remove the tool straight up and down. Do not stir, twist, or widen each opening.
What you should see: Eight tidy rows by twelve columns of narrow, evenly spaced holes, without torn craters, dense clusters, or openings that expose the pan.

Pour the Strawberry Gelatin in Three Passes
Put the regular strawberry gelatin mix in the heat-safe jug, add 1 cup (240 ml) boiling water, and stir continuously for 2 full minutes until no granules remain. Stir in 1/2 cup (120 ml) cold water.
While the gelatin is fully fluid and warm but no longer vigorously steaming, approximately 120–135°F (49–57°C), pour it in three slow passes of about 1/2 cup (120 ml) each. Aim along the hole rows, rotate the pan, and pause about 30 seconds between passes. If liquid collects at one edge, stop pouring there and redirect the next pass toward drier center rows.

What you should see: The surface is damp around the holes but has no deep standing pools, undissolved granules, or a single uniformly flooded edge.

Chill Until the Gelatin Is Fully Absorbed
Transfer the pan promptly to the refrigerator. Chill uncovered for 30 minutes, then cover without touching the surface and continue chilling for at least 2 1/2 hours, for a minimum total soak-and-set time of 3 hours.
What you should see: The surface is completely cold, no free liquid moves when the pan is gently tilted, and touching beside a red channel does not leave a wet smear on a clean fingertip.

Make the Stabilized Vanilla Whipped Cream
Put 1 tablespoon (15 ml) cold water in a small bowl and sprinkle the unflavored gelatin evenly over it. Let it bloom for 5 minutes, then warm it only until clear and liquid, about 5–10 seconds in a microwave or briefly over barely simmering water. Do not boil. Cool for 2–3 minutes while keeping it fluid.
In a cold mixer bowl fitted with the whisk, beat the cold cream, powdered sugar, and vanilla on medium until soft peaks form. Reduce the mixer to low and drizzle the fluid gelatin down the side of the bowl, away from the whisk. Increase to medium-high and stop at medium-stiff peaks.

What you should see: The bloomed gelatin becomes clear and pourable, and the finished cream holds a defined curl while remaining smooth and easy to spread, without looking loose, grainy, or butter-like.

Top, Decorate, and Cut 15 Clean Slices
Spread all the whipped cream over the cold cake in an even layer about 1/2 inch (1.3 cm) deep. Refrigerate for at least 30 minutes so the stabilizer can set.

Add the thoroughly dried sliced strawberries no more than 2 hours before serving, arranging them in a generous single layer without pressing juice into the cream.

Mark five equal columns along the 13-inch side and three equal rows along the 9-inch side. Cut straight down with a long sharp knife, wiping it clean between cuts, then lift each portion with a thin serving spatula.

What you should see: A level white topping, dry glossy berries, and 15 chilled pieces with upright sides, distinct red ribbons, and visible white crumb between them.
Strawberry Poke Cake Doneness: How to Know Every Layer Is Ready
Readiness is a sequence: the baked crumb must be structurally set, the soak must disappear into the cold cake, and the cream must hold before cutting begins.
The Cake Is Fully Baked
Begin checking at 28 minutes. A pale-gold surface, springy center, and moist crumbs on the tester indicate a tender but stable crumb. Wet batter means the cake needs more time; a completely dry tester with dark, firm edges suggests the cake has baked too far and may absorb less evenly.
The Soak Is Fully Absorbed
The cake is ready for topping only when it is cold, no liquid shifts as the pan moves, no pools remain, and the crumb beside a channel does not leave a wet red smear. The channels should be distinct, with supporting white crumb still visible around them.
The Cream and Slice Are Ready
The cream should form smooth medium-stiff peaks before spreading and should complete its 30-minute refrigerator set before you cut the cake. A ready slice stands upright and shows red ribbons, pale crumb, and no wet bottom.
One lesson I have learned with chilled, cream-topped cakes is that the final layer rewards patience: if the cake is even slightly warm, the cream can soften and slide. Letting the cake become fully cold gives the topping a clean surface and makes the finished slices much easier to serve.

Expert Tips for Even Strawberry Ribbons and Smooth Cream
These small details improve distribution and texture because each one addresses a point where heat, liquid, or timing can shift the result.
- Use light-colored metal for predictable baking. It moderates edge browning, helping the center set before the perimeter becomes dry.
- Treat ingredient temperatures as method steps. Matte softened butter and room-temperature whites and milk combine more evenly than ingredients at opposing temperatures.
- Mark the poke tool before you start. A visible depth stop helps you create channels without puncturing all the way to the pan.
- Keep every hole narrow. Straight insertion leaves supporting cake between channels; stirring the tool creates gelatin plugs and weakens the crumb.
- Rotate after each measured pour. Changing the pan orientation exposes dry rows and makes edge pooling easier to see before it becomes severe.
- Redirect instead of trying to soak a stubborn spot repeatedly. When one edge looks wet, move the next pass to a drier center lane and allow absorption to continue during chilling.
- Keep the cream stabilizer fluid. Gelatin that starts setting before it reaches the cream can create tiny elastic threads instead of invisible support.
- Stop whipping while the cream still looks satin-smooth. Medium-stiff peaks spread cleanly; grainy cream is already moving toward overwhipping.
- Decorate late with dry fruit. This preserves the clean white surface and keeps berry juice from thinning the topping.
- Chill before every precision cut. Cold structure and a wiped knife reveal the ribbons rather than dragging them through the cream.
Strawberry Poke Cake Common Mistakes: Why It Turns Soggy, Gummy, or Watery
When the finished cake looks wrong, the visible symptom usually points back to a specific earlier stage; some problems can be limited, while structural gumminess and oversized gelatin plugs cannot be fully repaired.
| Mistake or symptom | What happens | Why it happens | Prevention or realistic fix |
|---|---|---|---|
| Underbaked cake | The soaked center becomes gummy | Wet batter never formed enough structure | Use spring-back and moist-crumb cues; there is no reliable repair after soaking |
| Soaking a piping-hot cake | The crumb compresses or turns pasty | The cake has not settled | Cool in the pan for 20 minutes before poking |
| Holes reach the pan base | A sticky wet layer forms below | Liquid travels directly to the bottom | Mark the tool and stop 1/4 inch above the base; extend chilling if noticed later |
| Holes are too wide or stirred | Red plugs feel rubbery and slices weaken | Too much crumb was displaced | Use a 1/4-inch tool straight up and down; there is no meaningful repair after setting |
| Grid is uneven | Some bites are dry and others overly wet | Channels cluster in only part of the pan | Use the complete 8 × 12 pattern before pouring |
| Gelatin is not fully dissolved | Granules remain in the channels | The boiling-water stage was too short | Stir continuously for 2 full minutes; strain only if noticed before pouring |
| One fast pour | Edges flood while the center stays dry | The liquid follows the easiest path | Use three measured passes with 30-second pauses and rotation |
| Liquid pools at an edge | The perimeter becomes wetter than the center | Pouring continues where liquid already collects | Stop at that edge and redirect toward dry center rows |
| Cake is topped before fully cold | The cream softens, slips, or weeps | Warmth weakens the whipped layer | Wait for a cold, dry surface; rechill before cutting |
| Stabilizer is boiled or partly set | The cream loses smoothness or contains threads | Gelatin was overheated or cooled too long | Warm only until clear; incorporate while fluid |
| Cream is underwhipped or overwhipped | It slumps or becomes grainy | The endpoint was missed | Stop at smooth medium-stiff peaks; early graininess may improve with 1–2 tablespoons cold cream |
| Strawberries are wet or sugared | The topping turns pink and watery | Fruit releases moisture into the cream | Remove wet fruit, blot gently, and replace with dry unsugared slices |
| Final chill is too short | Slices smear and lose their sides | The topping stabilizer has not set | Refrigerate at least 30 minutes before the remaining cuts |
| Knife is warm or dirty | Red and white layers drag across each other | Residue builds on the blade | Use a sharp cool knife and wipe it clean after every cut |
Beautiful Ways to Serve Strawberry Poke Cake
Serve the cake fully chilled and decorate close to the serving window so its ruby channels, white topping, and fresh berries remain distinct.
Showcase the Ruby Strawberry Ribbons
Place one upright slice on a clean white dessert plate with the cross-section facing outward. A few fresh strawberry slices beside the cake are enough; the internal ribbons should remain the visual focus.
Build a Bright Summer Party Tray
Keep the cake in its white-topped 3 × 5 grid, add the berries shortly before guests arrive, and return the pan to the refrigerator between servings. The regular geometry makes the tray look abundant without crowded decoration.
Dress It for Birthdays and Celebrations
Arrange the strawberry slices in orderly rows or small fans over the cream. A restrained scattering of white-chocolate curls can add celebration detail, but keep it light enough that the fresh strawberry identity remains obvious.
Pair It with a Fresh Cookout Dessert Table
Balance the creamy chilled cake with a juicy, less creamy option such as this Watermelon Fruit Salad. The contrast gives guests a bright fruit choice while keeping the whole table summery and colorful.
How to Make Ahead and Store Strawberry Poke Cake
Make-ahead success comes from holding the soaked cake, whipped cream, and fresh berries on their own best schedules rather than treating the assembled dessert as one component.
Make the Soaked Cake Ahead
Bake, poke, and soak the cake up to 24 hours before topping. Refrigerate it uncovered for the first 30 minutes, then cover the pan without touching the surface and keep it cold.
Add Cream and Strawberries at the Right Time
Spread the stabilized whipped cream up to 24 hours before serving and cover the pan without touching the topping. Add thoroughly dried sliced strawberries within 2 hours of serving; if they were prepared earlier, keep them covered and cold separately, then blot again before decorating.
Refrigerate Leftovers Safely
Keep the cake covered at 40°F (4°C) or below and use a conservative 3-day quality window. Under FoodSafety.gov refrigeration guidance, perishable food should not remain at room temperature for more than 2 hours total, or more than 1 hour when the temperature is above 90°F (32°C). Berry bleeding and surface moisture may increase before the end of the quality window.

Why Freezing and Reheating Are Not Recommended
The fully assembled cake has no published freezer-quality promise: fresh strawberries can weep, whipped cream may lose smoothness, and the soaked crumb can change after thawing. This dessert is meant to be served chilled, so reheating and microwave instructions do not apply.
Safe Ingredient Choices and Swaps That Change the Cake
Two ingredient choices work without changing the method. Most alternative flours, gelatin products, fillings, toppings, and pans change the cake enough to require different amounts or instructions.
Direct Ingredient Options
Use canola, grapeseed, or a genuinely neutral avocado oil for the 1/3 cup (80 ml) oil. Pasteurized carton egg whites may be weighed to 150 g if the ingredient list contains only egg whites and the label permits baking; color and rise can vary slightly by product.
Not Direct One-for-One Swaps
All-purpose flour, sugar-free strawberry gelatin, fresh strawberry purée or sauce, cream cheese, mascarpone, instant pudding, commercial whipped topping, dairy-free milk or cream, gluten-free flour, egg replacers, and reduced-sugar versions are not direct equivalents. Each can change protein, absorption, set, moisture, density, or the cake’s defining strawberry-gelatin character.
Pan and Scaling Boundary
This recipe is written for one batch in a light-colored 9 × 13 × 2-inch metal pan. Glass, ceramic, dark metal, round pans, cupcakes, half batches, and doubled batches need different bake times, hole spacing, topping amounts, or yields. Do not double the recipe in the same pan.
Keep the Strawberry Dessert Inspiration Going
Choose your next bake by following the part of this dessert you most want to repeat: bright strawberry flavor, a cool creamy finish, or an easy-to-share party format.
Bake Another Strawberry Dessert
Choose this path when strawberry flavor matters most, but you want a different cake, cupcake, or pie structure.
- Strawberry Sheet Cake keeps the one-pan party format but carries strawberry flavor throughout the cake instead of in gelatin ribbons.
- Strawberry Cake moves the berry flavor into a fully strawberry-focused layer-cake direction.
- Strawberry Cupcakes turns the same fresh-fruit mood into individual celebration portions.
- Strawberry Pie shifts the fruit focus into a glossy sliceable pie with a completely different crust-and-filling texture.
Try a Cool and Creamy Finish
Choose this path when the cold, creamy serving experience is what you want to explore in a new form.
- Strawberry Cheesecake keeps strawberries central while moving toward a richer, tangier chilled dessert.
- Strawberry Ice Cream offers the coldest and most fruit-forward warm-weather option.
- Lemon Posset trades cake for a bright, silky make-ahead cream dessert.
- Panna Cotta continues the elegant chilled-dessert theme with a smooth, delicate set.
Choose Your Next Party-Ready Cake Project
Choose this path when you are planning another birthday, buffet, or celebration and want a bake designed for sharing.
- Chocolate Poke Cake keeps the poke-cake format while shifting the flavor toward deep chocolate.
- Funfetti Cake brings a colorful celebration-first cake to the same kind of party table.
- How to Make Cake Pops turns cake into portable individual treats for birthdays and buffets.
- Angel Food Cake offers a lighter white-cake project that pairs naturally with fresh berries.
Why This Strawberry Poke Cake Belongs in Your Recipe Box
Keep this recipe for the structure it brings to a familiar party cake, not only for its red-and-white appearance.
- Even strawberry ribbons: The 8 × 12 hole pattern helps distribute the gelatin while preserving plenty of white crumb.
- Scratch-cake foundation: The white crumb remains soft and sliceable when chilled.
- Homemade finish: Stabilized whipped cream stays light without the weight of pudding or cream cheese.
- Party-size portions: The 3 × 5 grid gives you 15 predictable pieces for gatherings.
- Make-ahead ease: The cake, topping, and fresh strawberries can be prepared on separate schedules.
- Clear visual cues: Each important stage shows you when to continue.
A Final Note on Strawberry Poke Cake
This strawberry poke cake keeps the familiar gelatin ribbons that make the dessert instantly recognizable while adding the flavor and texture of scratch cake and real whipped cream.
The measured poke-and-pour method is what makes this version dependable. A clear grid, consistent depth, measured volume, and short pauses make the most uncertain part of the recipe easier to repeat.
Give the cake its full cooling, soaking, and chilling time. Those rests allow the strawberry gelatin to settle into distinct ribbons and help every cold slice hold its shape.

Strawberry Poke Cake
A from-scratch white vanilla sheet cake with even strawberry-gelatin ribbons, stabilized vanilla whipped cream, and fresh strawberries, served fully chilled in clean party-size slices.
Ingredients
White Vanilla Cake
- 2 1/2 cups cake flour (300 g), spooned and leveled
- 1 1/2 cups granulated sugar (300 g)
- 1 tablespoon baking powder (12 g)
- 1/2 teaspoon fine sea salt (3 g)
- 1/2 cup unsalted butter (113 g), softened to 65–68°F (18–20°C) and cut into tablespoons
- 1/3 cup neutral oil (80 ml), such as canola, grapeseed, or neutral avocado oil
- 5 large egg whites (150 g), at 68–72°F (20–22°C)
- 1 cup whole milk (240 ml), at 68–72°F (20–22°C)
- 1 tablespoon pure vanilla extract (15 ml)
Strawberry Gelatin Soak
- 1 package regular strawberry-flavored gelatin dessert mix, 3 ounces (85 g); do not use sugar-free mix
- 1 cup boiling water (240 ml)
- 1/2 cup cold water (120 ml)
Stabilized Vanilla Whipped Cream
- 1 tablespoon cold water (15 ml)
- 1 teaspoon unflavored powdered gelatin (3 g)
- 2 cups cold heavy whipping cream (480 ml), 36–40% milk fat
- 1/2 cup powdered sugar (60 g)
- 2 teaspoons pure vanilla extract (10 ml)
Fresh Strawberry Finish
- 1 pound fresh strawberries (454 g), rinsed before hulling, dried thoroughly, hulled, and sliced 1/8–1/4 inch (3–6 mm) thick
Instructions
- Prepare the pan and ingredients. Center an oven rack and preheat a conventional oven to 350°F (175°C) for at least 20 minutes. Lightly grease the bottom and sides of one light-colored 9 × 13 × 2-inch metal pan; do not line it. Bring the butter to 65–68°F (18–20°C) and the egg whites and milk to 68–72°F (20–22°C). The butter should indent easily but remain matte, not shiny or oily.
- Reverse-cream the dry ingredients and fats. In a mixer bowl fitted with the paddle, mix the cake flour, granulated sugar, baking powder, and salt on low for 30 seconds. Add the butter one tablespoon at a time, then stream in the oil. Mix on low for 60–90 seconds and scrape the bowl. The mixture should resemble evenly damp fine sand with no large butter pieces or dry flour pockets.
- Finish the batter and bake. Whisk the egg whites, milk, and 1 tablespoon vanilla together. Add one-third to the flour mixture and beat on medium for 60 seconds; scrape. Add the remainder in two additions, mixing each on low for 15 seconds and medium for 20 seconds. Stop when the batter is smooth, pale, and cohesive. Spread it in the pan, tap once gently, and bake for 28–33 minutes, checking at 28 minutes. The cake is ready when the pale-gold center springs back and a tester shows moist crumbs but no wet batter. Cool in the pan on a wire rack for 20 minutes.
- Make the 96-hole poke grid. With a straight 1/4-inch (6 mm) smooth tool, make 96 vertical holes in an 8 × 12 grid, about 1 inch (2.5 cm) apart and about 1/2 inch (1.3 cm) from the pan walls. Stop about 1/4 inch (6 mm) above the pan base. Insert straight down without stirring or widening the holes; they should remain narrow and clean.
- Dissolve and pour the strawberry gelatin. Put the regular 3-ounce (85 g) strawberry gelatin mix in the heat-safe jug. Add 1 cup (240 ml) boiling water and stir continuously for 2 full minutes until no granules remain; stir in 1/2 cup (120 ml) cold water. Pour immediately while fluid and warm but no longer vigorously steaming, in three slow passes of about 1/2 cup (120 ml) each. Rotate the pan and pause about 30 seconds between passes, aiming along the hole rows. The surface may be damp around the holes but should have no deep standing pools; redirect away from any wet edge.
- Chill until fully absorbed. Refrigerate promptly, uncovered for 30 minutes. Cover without touching the surface and chill for at least another 2 1/2 hours, for a minimum 3-hour soak-and-set. The cake must be cold, with no free liquid and no wet red smear beside a channel, before topping.
- Make the stabilized whipped cream. Put 1 tablespoon (15 ml) cold water in a small bowl and sprinkle the unflavored gelatin evenly over it. Bloom for 5 minutes. Warm only until clear and liquid, about 5–10 seconds in a microwave or briefly over barely simmering water; do not boil. Cool for 2–3 minutes while keeping it fluid. Beat the cold heavy cream, powdered sugar, and 2 teaspoons vanilla on medium to soft peaks. On low, drizzle the liquid gelatin down the side of the bowl, avoiding the whisk; increase to medium-high and stop at smooth medium-stiff peaks.
- Top, chill, decorate, and serve. Spread all the whipped cream over the fully cold cake in an even layer about 1/2 inch (1.3 cm) deep. Refrigerate for at least 30 minutes. Add the thoroughly dried sliced strawberries no more than 2 hours before serving. Mark five equal columns along the 13-inch side and three rows along the 9-inch side; cut straight down with a long sharp knife, wiping it between cuts, to make 15 pieces. Serve fully chilled. A correct slice stands upright with narrow red ribbons, visible white crumb, smooth white cream, and no wet bottom.
Notes
Pan: Use the listed light-colored metal pan. Glass, ceramic, dark metal, convection, alternate pan shapes, cupcakes, half batches, and doubled batches require different timing, spacing, topping amounts, or yields.
Strawberry gelatin: Use a regular 3-ounce (85 g) strawberry gelatin mix. Sugar-free mix and fresh strawberry sauce are not direct swaps.
Poking and pouring: Do not line the pan, poke through to its base, widen the holes, or pour all the gelatin in one fast pass.
Whipped cream: Use cold 36–40% milk-fat heavy cream and incorporate the stabilizer while it is clear, cool enough not to melt the cream, and still fluid.
Fresh strawberries: Add only dry, unsugared strawberries within 2 hours of serving.
Scaling: Keep the recipe at 15 servings and use the listed US and metric amounts. Changing the serving count does not safely adjust the pan, hole grid, bake time, gelatin pours, or technique.
Make ahead: Bake, poke, and soak the cake up to 24 hours before topping. Chill uncovered for the first 30 minutes, then cover without touching the surface and refrigerate.
Finishing ahead: Add the stabilized whipped cream up to 24 hours before serving. Add dry sliced strawberries within 2 hours of serving.
Storage: Keep the cake covered at 40°F (4°C) or below and use a conservative 3-day quality window.
Food safety: Do not leave the cake at room temperature for more than 2 hours total, or more than 1 hour above 90°F (32°C).
Freezing and reheating: Freezing the fully assembled cake is not recommended. Reheating does not apply; serve chilled.
Nutrition Information:
Yield: 15 Serving Size: 1 squareAmount Per Serving: Calories: 420Total Fat: 23gSaturated Fat: 12gCholesterol: 55mgSodium: 220mgCarbohydrates: 49gFiber: 1gSugar: 32gProtein: 5g
Nutrition information is provided as an estimate only and may vary based on specific ingredients, brands, and portion sizes used. This information should not be considered medical or nutritional advice.
12 Sweet Favorites — Yours, Free 🍰
Tiramisù, no-bake cheesecake, the perfect chocolate chip cookie & 9 more reader-loved desserts — gathered into one beautiful free recipe book. From my kitchen to yours.
No spam, just sweet things. Unsubscribe anytime.