How to Make Whipped Cream (Light, Fluffy & Perfect Every Time)
🎁 FREE E-BOOK: 12 Sweet Favorites — reader-loved desserts in one beautiful recipe book.

There’s something effortlessly luxurious about real whipped cream. Light, airy, and softly billowy, it transforms even the simplest desserts into something that feels special. Whether it’s spooned over fresh fruit, layered onto cakes, or melting gently into hot chocolate, homemade whipped cream has a freshness and softness that store-bought versions simply can’t match.
This whipped cream recipe is all about simplicity and control. With just a few basic ingredients and a few minutes of mixing, you get a smooth, stable texture that holds its shape beautifully while staying soft and delicate.
Once you make it from scratch, it quickly becomes one of those essentials you come back to again and again.
What Is Whipped Cream?
Whipped cream is heavy cream that has been aerated by whipping, incorporating air into the fat structure to create a light, fluffy texture. When properly whipped, it forms soft or stiff peaks depending on how long it’s mixed, making it versatile for both topping and decorating desserts.
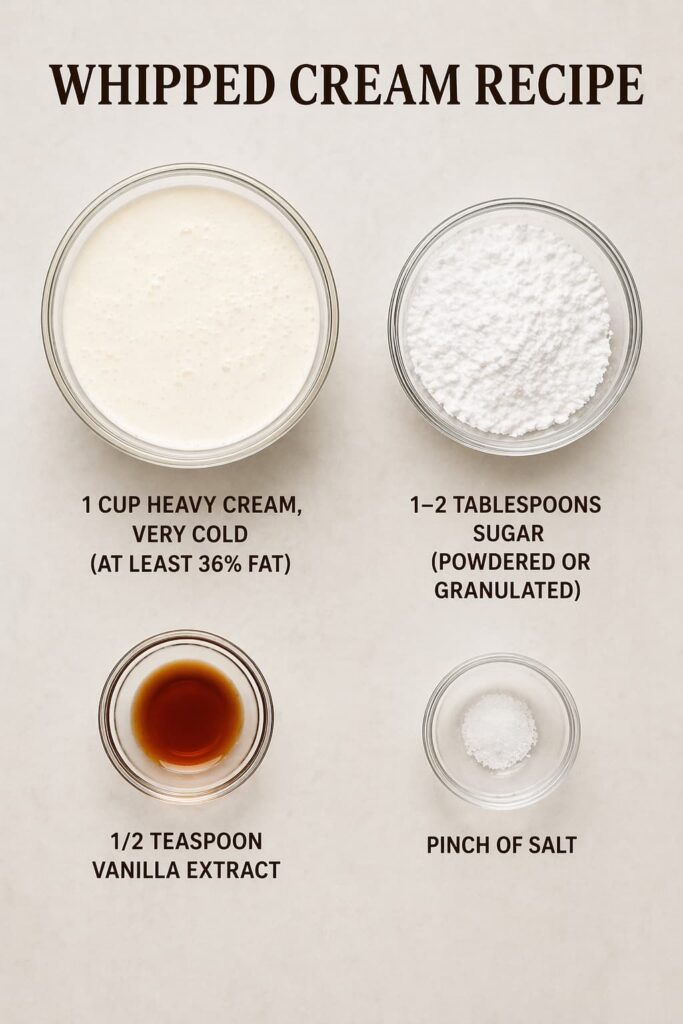
Ingredients
- 1 cup (240 ml) heavy cream, very cold (at least 36% fat)
- 1–2 tablespoons sugar (powdered or granulated)
- ½ teaspoon vanilla extract
- Pinch of salt

Pro Tip: If your cream isn’t cold, your whipped cream will be sad and runny. Chill your bowl and beaters in the freezer for 10 minutes before starting.
Ingredient Notes
- Heavy cream: The fat content is essential for structure. Lower-fat creams won’t whip properly.
- Sugar: Powdered sugar dissolves more easily and gives a smoother texture.
- Vanilla: Optional, but adds warmth and depth.
- Salt: Just a tiny pinch enhances the overall flavor.
Step 1: Choose Your Weapon (Aka Mixing Method)
You’ve got options when it comes to whipping cream. Let’s break ‘em down:
Option 1: Electric Mixer (The Lazy Genius Method)
- Best for: People who value their time (and arm strength).
- How long? 2-3 minutes.

Option 2: Whisk + Elbow Grease (The “I Forgot My Mixer” Method)
- Best for: Those who enjoy a mild arm workout (or want to feel like a 19th-century baker).
- How long? 5-7 minutes (depending on how fast you whisk).

Option 3: Mason Jar (The “Look Ma, No Tools!” Method)
- Best for: Emergency whipped cream situations (or showing off at brunch).
- How long? Shake vigorously for 3-5 minutes.

Step 2: Whip It Good (The Actual Process)
Now, the fun part. Here’s how to turn liquid cream into cloud-like perfection:
- Pour 1 cup of cold heavy cream into your chilled bowl.
- Add 1-2 tablespoons of sugar (adjust to taste).
- Splash in ½ teaspoon of vanilla extract and a tiny pinch of salt.
- Start mixing on low speed, then gradually increase to medium-high.
- Watch closely, first, it’ll get bubbly, then slightly thick, then… BAM, soft peaks!
- Stop mixing when you see stiff peaks (unless you want butter, more on that later).
FYI: Over-whipping is the #1 mistake here. The second you see smooth, firm peaks, stop. Otherwise, you’ll end up with sweetened butter (which, okay, isn’t the worst mistake).

Step 3: Customize Your Whipped Cream
Plain whipped cream is great, but why stop there? Here are some easy upgrades:
- Chocolate Whipped Cream: Add 1 tbsp cocoa powder + extra sugar.

- Boozy Whipped Cream: Swap vanilla for 1 tbsp bourbon, Kahlúa, or Bailey’s.

- Citrus Zest: Fold in lemon or orange zest for a bright kick.

- Cinnamon Spice: Add ½ tsp cinnamon for a cozy twist.

Troubleshooting: Common Whipped Cream Fails
Even pros mess up sometimes. Here’s how to fix (or avoid) common issues:
Problem: Runny Whipped Cream
Cause: Cream wasn’t cold enough, or you under-whipped.
Fix: Chill everything (cream, bowl, beaters) and whip again.
Problem: Grainy or Clumpy Texture
Cause: Over-whipping (hello, butter!).
Fix: Sadly, no going back, but hey, now you have sweet butter for toast!
Problem: Bland Taste
Cause: Not enough sugar or vanilla.
Fix: Gently fold in more sugar (powdered dissolves better).
Expert Tips
- Always use very cold cream for best results
- Don’t rush high speed immediately — build up gradually
- Use powdered sugar for a smoother finish
- Stop mixing slightly earlier than you think — it thickens quickly at the end
- If slightly overwhipped, gently fold in a tablespoon of liquid cream to smooth it out
How to Store Whipped Cream

Whipped cream is best fresh, but if you must store it:
- Fridge: Keep in an airtight container for up to 24 hours (it’ll deflate a bit).
- Freezer: Not recommended, it’ll turn icy and weird.
Pro Tip: Stabilize it with a bit of cornstarch or gelatin if you need it to last longer.
Final Thoughts: Why Homemade Whipped Cream Wins
Let’s be real, once you’ve had the real deal, canned stuff just tastes like sweetened air. Homemade whipped cream is:
✅ Fresher (no weird preservatives)
✅ Customizable (boozy, chocolatey, citrusy, you name it)
✅ Impressive (people will think you’re a baking genius)

So, next time you’re topping a pie, hot cocoa, or just eating it straight from the bowl (again, no judgment), skip the aerosol can and whip up the good stuff.
Now go forth and whip with confidence! 🎉
12 Sweet Favourites — Yours, Free 🍰
Tiramisù, no-bake cheesecake, the perfect chocolate chip cookie & 9 more reader-loved desserts — gathered into one beautiful free recipe book. From my kitchen to yours.
No spam, just sweet things. Unsubscribe anytime.


3 Comments
Comments are closed.