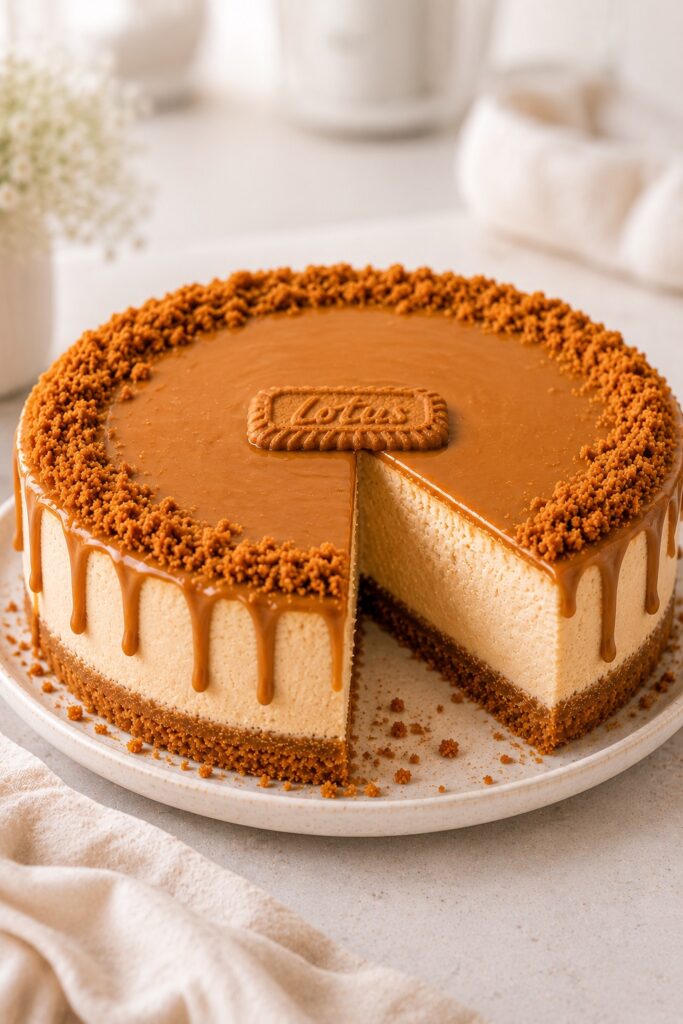
Biscoff Cheesecake
🎁 FREE E-BOOK:12 Sweet Favorites — reader-loved desserts in one beautiful recipe book.
There is something about a creamy Biscoff cheesecake that instantly feels comforting and luxurious at the same time. The buttery cookie flavor, the rich caramelized spice notes, and the silky cheesecake filling create the kind of dessert people stop talking mid-bite for. It tastes familiar, cozy, slightly nostalgic, and somehow elegant all at once.
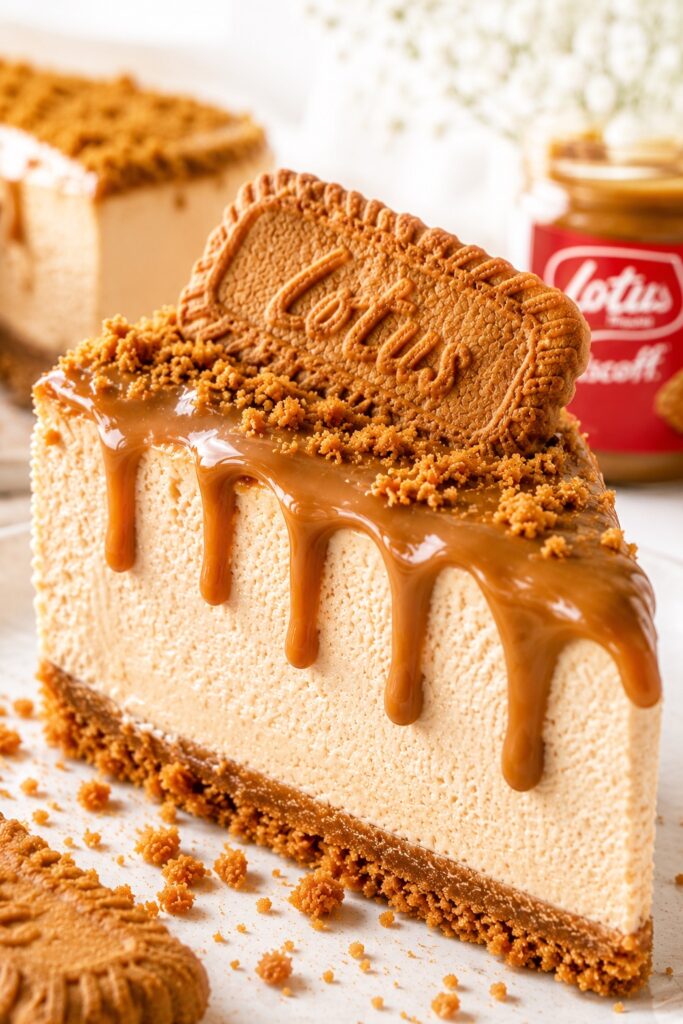
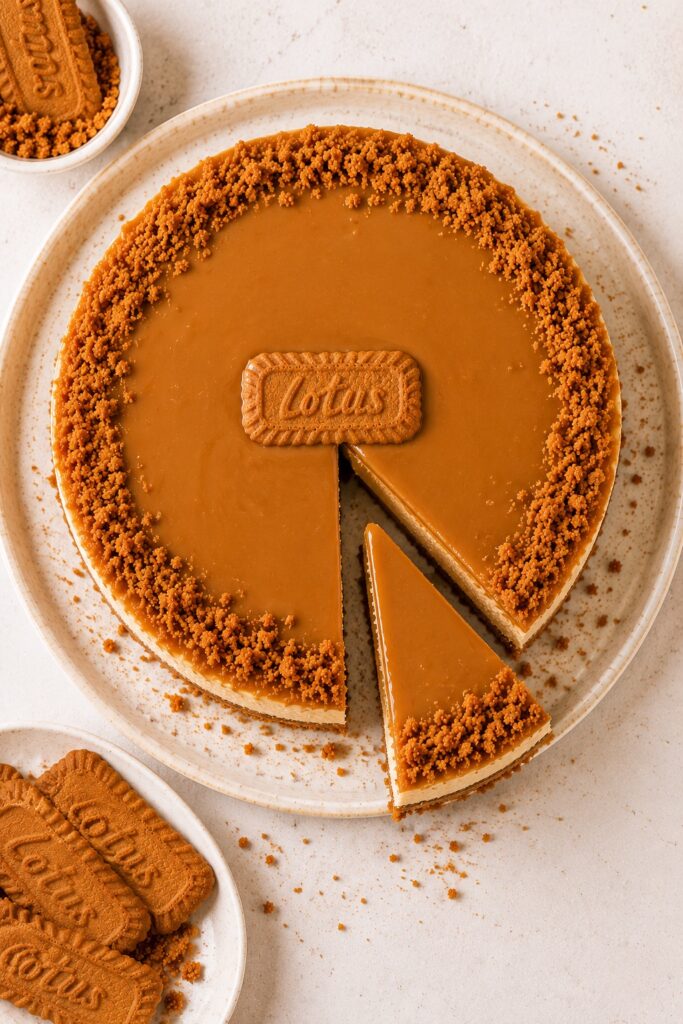
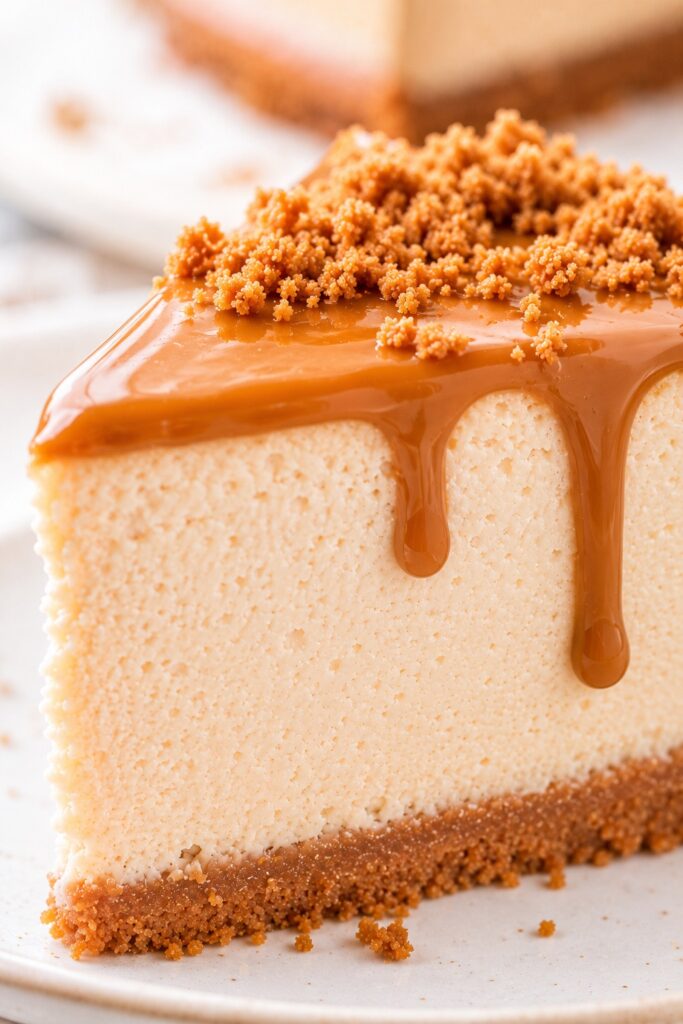
This Biscoff cheesecake recipe combines a crisp Lotus Biscoff cookie crust with a smooth baked cheesecake filling and a glossy melted cookie butter topping that slowly drips over the edges in the most irresistible way. The texture is rich without feeling heavy, and every layer brings a different kind of softness and crunch.
This is also the kind of dessert people love saving for later because it looks impressive but is surprisingly approachable to make at home. The flavor alone feels bakery-level, but the process is straightforward and forgiving once you understand a few simple cheesecake cues.
The first time I made this recipe, I slightly overbaked it because I waited for the center to look completely firm. Cheesecake does not work like regular cake. The magic happens when the center still has a gentle wobble. Once I learned that, the texture became dramatically creamier every single time.
If you love desserts that feel rich, cozy, creamy, and visually beautiful on the table, this Biscoff cheesecake is one of those recipes worth making again and again.
What Is Biscoff Cheesecake?
Biscoff cheesecake is a creamy baked cheesecake flavored with Lotus Biscoff cookie butter and often layered with crushed Biscoff cookies. It typically includes a cookie crust made from Biscoff biscuits, a smooth cream cheese filling, and a melted Biscoff spread topping.
The flavor profile is warm, caramelized, buttery, and lightly spiced, with notes similar to cinnamon cookies and brown sugar. Compared to classic cheesecake, Biscoff cheesecake feels deeper, toastier, and slightly more indulgent while still keeping the creamy tangy balance cheesecake is known for.
Because of its visual appeal and rich texture, Biscoff cheesecake is especially beautiful for holidays, dinner parties, birthdays, and cozy dessert tables.
Quick Recipe Overview
| Texture | Creamy, silky, rich with a crisp cookie crust |
| Flavor | Caramelized cookie butter with warm spice notes |
| Difficulty | Intermediate but beginner-friendly |
| Time | About 1 hour baking plus chilling time |
| Servings | 12 slices |
| Method | Baked cheesecake |
| Best For | Holidays, celebrations, make-ahead desserts |
In short: This Biscoff cheesecake delivers bakery-style flavor with a creamy center, crunchy cookie crust, and rich cookie butter topping that makes every slice feel special.
Why This Recipe Works
Cheesecake is all about balance, and this recipe is carefully built around texture control and moisture retention.
The cream cheese provides structure and richness, while the sour cream softens the filling and adds moisture. Without that extra dairy balance, cheesecake can feel dense or overly heavy.
The eggs help the filling set gently during baking. Too many eggs create a firmer, almost custard-like texture, while too few can leave the center unstable. This ratio keeps the cheesecake creamy while still sliceable.
Biscoff spread contains fat and sugar that melt beautifully into the batter, which helps create that silky mouthfeel people love in good cheesecake. It also slightly softens the structure compared to plain cheesecake.
One of the biggest texture secrets is slow residual heat. Cheesecake continues cooking after leaving the oven. That is why the center should still wobble slightly when removed. Waiting for a fully firm center almost always leads to overbaking.
Another important detail is crust compression. Pressing the crust too hard can make it dense and difficult to cut. A lightly packed crust stays crisp while still holding together beautifully.
Why You’ll Love This Biscoff Cheesecake Recipe
- Rich, creamy cheesecake with deep caramel cookie flavor
- Crisp Biscoff crust adds the perfect contrast
- Beautiful glossy topping that looks bakery-quality
- Excellent make-ahead dessert for gatherings
- Easy to decorate with cookies and drizzles
- Slices cleanly after chilling overnight
- Perfect for cozy fall and winter desserts, but delicious year-round
Save this recipe for birthdays, holiday dessert tables, dinner parties, or those moments when you want a dessert that feels extra special without requiring complicated techniques.
Why Cheesecake Texture Changes So Easily
Cheesecake behaves differently from regular cake because it relies more on proteins and emulsified fat than flour structure.
As the cheesecake bakes, the egg proteins slowly tighten and set the filling. If the temperature rises too aggressively, the proteins contract too quickly and squeeze out moisture. That is what causes cracks and dry texture.
The water bath helps moderate heat around the pan, creating gentler baking conditions and more even texture. It also reduces rapid edge cooking, which keeps the center creamy.
Another interesting detail is sugar behavior. Sugar does more than sweeten cheesecake. It also slows protein tightening slightly, helping create a softer texture.
Biscoff spread contributes oils and emulsified fats that naturally enhance smoothness. That is why the filling tastes almost mousse-like once chilled properly.
A cheesecake that looks slightly underdone in the center when leaving the oven often becomes the creamiest cheesecake the next day.
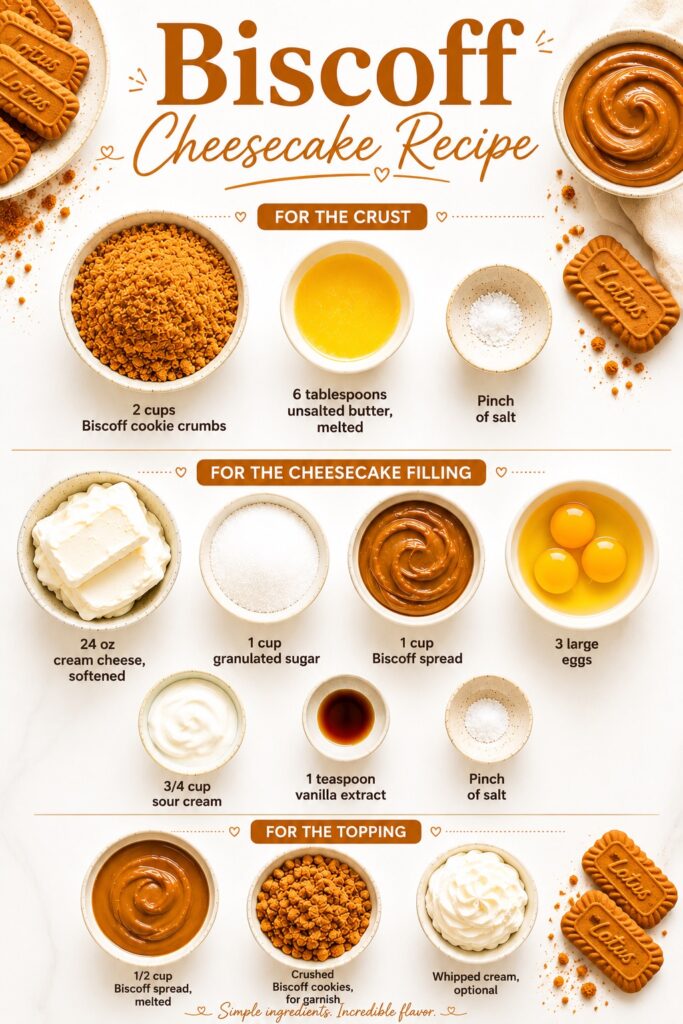
Ingredients for Biscoff Cheesecake
For the Crust
- 2 cups Biscoff cookie crumbs
- 6 tablespoons unsalted butter, melted
- Pinch of salt
For the Cheesecake Filling
- 24 oz cream cheese, softened
- 1 cup granulated sugar
- 1 cup Biscoff spread
- 3 large eggs
- 3/4 cup sour cream
- 1 teaspoon vanilla extract
- Pinch of salt
For the Topping
- 1/2 cup Biscoff spread, melted
- Crushed Biscoff cookies, for garnish
- Whipped cream, optional
Ingredient Notes
Cream Cheese
Full-fat cream cheese creates the richest texture and most stable structure. Lower-fat versions contain more water and can produce a looser filling.
Sour Cream
Sour cream softens the density of the cheesecake while adding slight tanginess. It also helps smooth out the sweetness from the cookie butter.
Biscoff Spread
Biscoff spread melts directly into the batter and contributes flavor, fat, and silky texture. Slightly warming it before mixing helps prevent lumps.
Eggs
Eggs should be added one at a time and mixed gently. Overmixing after adding eggs incorporates excess air, which can increase cracking.
Biscoff Cookies
Their caramelized spice flavor makes the crust naturally more flavorful than graham crackers. They also stay crisp surprisingly well after chilling.
A small but important insight: letting the crust cool for a few minutes before adding filling helps maintain a cleaner crust layer instead of blending into the batter.
Equipment You’ll Need
- 9-inch springform pan
- Mixing bowls
- Electric mixer
- Rubber spatula
- Roasting pan for water bath
- Measuring cups and spoons
A springform pan makes cheesecake removal dramatically easier. Wrapping the outside with foil before the water bath helps reduce leaks and protects the crust texture.
How to Make Biscoff Cheesecake
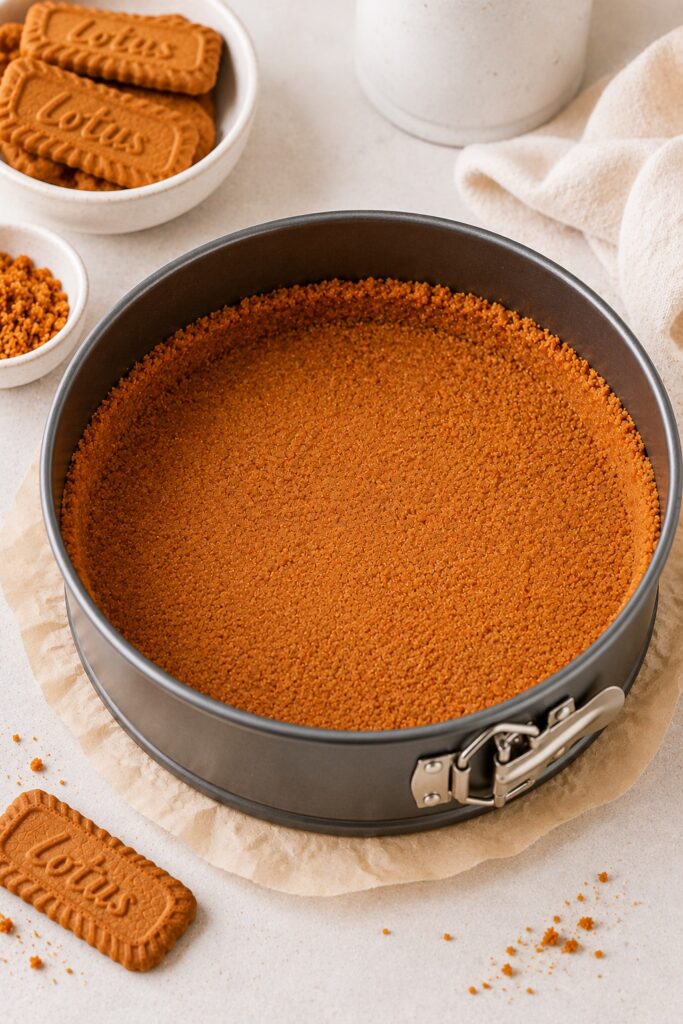
1. Prepare the crust
Preheat the oven to 325°F.
Mix the Biscoff cookie crumbs, melted butter, and salt until the texture resembles wet sand. Press the mixture into the bottom of a 9-inch springform pan.
Bake for 10 minutes, until lightly fragrant and slightly deeper in color around the edges.
Let cool slightly.
Tip: Press the crust firmly enough to hold together, but not so hard that it becomes dense and difficult to slice later.
2. Make the cheesecake filling
In a large bowl, beat the softened cream cheese until smooth and creamy.
Add the sugar and mix until fully combined. Blend in the Biscoff spread until silky and evenly incorporated.
Add the eggs one at a time, mixing on low speed after each addition. Fold in the sour cream, vanilla, and salt.
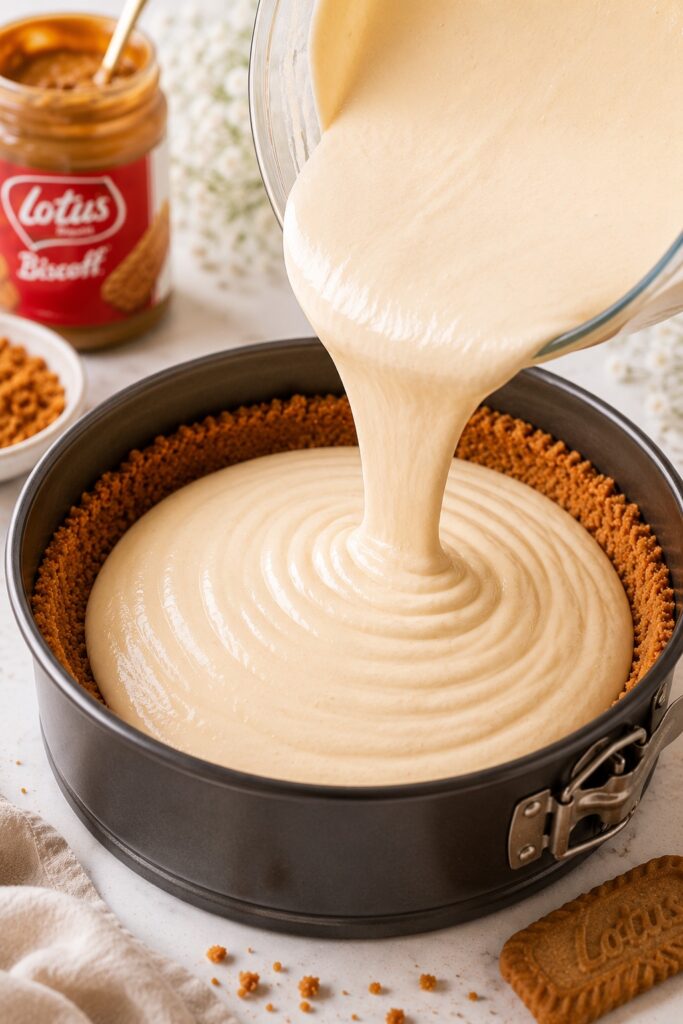
The batter should look glossy, thick, and smooth without large bubbles.
If your batter has tiny lumps, do not panic. Slight warmth from room-temperature ingredients usually smooths everything out after a minute or two of gentle mixing.
3. Prepare the water bath
Wrap the springform pan tightly with foil.
Pour the cheesecake filling over the crust and smooth the top.
Place the pan into a large roasting pan and pour hot water around it until it reaches about halfway up the cheesecake pan.
The water helps regulate heat and prevents harsh edge baking.
4. Bake the cheesecake
Bake for 55–70 minutes.
The edges should look set while the center still jiggles slightly when gently shaken.
The top may puff slightly but should not brown heavily.
Turn off the oven, crack the door open, and let the cheesecake rest inside for 1 hour.
This slow cooling process helps reduce cracking.
Visual Doneness Cues
- Edges look lightly puffed and set
- Center still has a soft wobble
- Surface appears matte rather than wet
- No aggressive bubbling around the edges
- Crust smells toasted and caramelized
- Cheesecake firms significantly after chilling
5. Chill completely
Remove the cheesecake from the oven and cool at room temperature.
Refrigerate for at least 6 hours, preferably overnight.
The texture becomes dramatically creamier after a full chill.
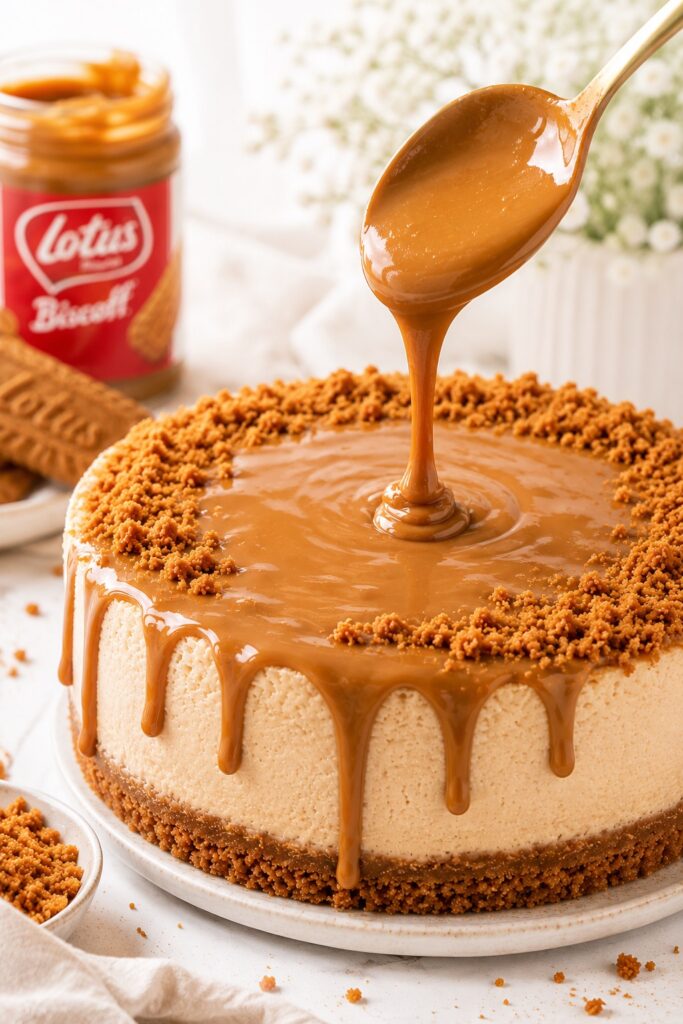
6. Add the topping
Warm the Biscoff spread until pourable but not hot.
Spread it gently over the chilled cheesecake and top with crushed cookies or whipped cream.
The glossy topping should slowly settle over the surface without running too quickly.
Save this moment for serving photos because the texture and shine look incredible under natural light.
Texture and Behavior Guide
| Stage | What You Should See |
| Crust mixture | Wet sand texture |
| Batter | Thick, glossy, smooth |
| Mid-bake | Slight puffing around the edges |
| Proper doneness | Set edges with a jiggly center |
| Fully chilled | Dense yet creamy slices |
Expert Tips for Best Results
- Use fully room-temperature ingredients for smoother batter.
- Mix on low speed once the eggs are added.
- Avoid opening the oven repeatedly during baking.
- Chill overnight for the cleanest slices.
- Run a knife around the edge before chilling completely.
- Slightly warm the knife before slicing for cleaner cuts.
- If cracks appear, the topping hides them beautifully anyway.
One deeper insight: cheesecake texture improves dramatically after resting because the fats and proteins continue stabilizing in the refrigerator.

Common Mistakes
| Mistake | Effect | Correction |
| Overbaking | Dry or crumbly texture | Remove when the center still has a gentle wobble |
| Cold cream cheese | Lumpy batter | Soften cream cheese fully before mixing |
| Overmixing eggs | More air bubbles and cracking | Mix on low speed only until combined |
| Skipping chill time | Loose slices | Chill at least 6 hours, preferably overnight |
| No water bath | Uneven texture and cracks | Use a gentle water bath for creamier results |
If the cheesecake cracks slightly, it usually still tastes incredible. Cheesecake is surprisingly forgiving once topped and chilled.
Biscoff Cheesecake Comparison Guide
| Version | Texture | Flavor |
| Biscoff Cheesecake | Creamy and caramelized | Warm cookie butter notes |
| Classic Cheesecake | Tangy and rich | Neutral vanilla cream cheese |
| No-Bake Biscoff Cheesecake | Lighter and mousse-like | Sweeter and softer |
| Chocolate Biscoff Cheesecake | Denser and richer | Deep chocolate-cookie flavor |
How to Serve Biscoff Cheesecake
Serve chilled with extra melted Biscoff spread drizzled over the top and a few crushed cookies for texture.

For an elegant dessert plate, add whipped cream swirls and a warm coffee alongside each slice. The contrast between cold creamy cheesecake and hot coffee is unbelievably good.
This cheesecake is especially beautiful for holiday dessert tables, cozy fall gatherings, birthday desserts, coffee nights with friends, and make-ahead entertaining.
Save this recipe for those moments when you want a dessert that feels bakery-worthy but still comforting and homemade.
A small serving trick: letting slices sit at room temperature for 10 minutes before serving softens the texture slightly and enhances the cookie butter flavor.
Storage and Make Ahead
- Store covered in the refrigerator for up to 5 days.
- Best texture develops after overnight chilling.
- Freeze slices individually for up to 2 months.
- Thaw overnight in the refrigerator.
- Add topping after thawing for the best appearance.
This is one of those desserts that actually tastes better the next day.
Variations
Chocolate Biscoff Cheesecake
Add melted dark chocolate to the filling for a richer flavor.
Mini Biscoff Cheesecakes
Bake in muffin tins for individual servings.
No-Bake Biscoff Cheesecake
Use whipped cream and gelatin for a softer mousse-style texture.
Espresso Biscoff Cheesecake
Add espresso powder for deeper caramel flavor.
Salted Caramel Biscoff Cheesecake
Drizzle salted caramel over the topping for extra richness.
Once you master the base recipe, this cheesecake becomes incredibly versatile.
Frequently Asked Questions
Can I make Biscoff cheesecake ahead of time?
Yes. In fact, it tastes even better after chilling overnight. The texture becomes smoother, firmer, and easier to slice.
Why did my cheesecake crack?
Cheesecake usually cracks from overbaking, rapid temperature changes, or overmixing after adding the eggs. A gentle water bath and slow cooling help prevent this.
Can I freeze Biscoff cheesecake?
Yes. Freeze slices tightly wrapped for up to 2 months. Thaw overnight in the refrigerator before serving.
Do I need a water bath?
Technically no, but it creates a much creamier and more even texture. It also helps reduce cracking.
Can I use graham crackers instead of Biscoff cookies?
Yes, although the flavor will be less caramelized and spiced. For the strongest Biscoff flavor, use Biscoff cookies in the crust.
Why is my cheesecake still jiggly?
A slight wobble is normal. Cheesecake firms as it cools and chills, so the center should not look completely solid when it comes out of the oven.
Can I make this without sour cream?
Greek yogurt can work as a substitute, though the flavor may be slightly tangier and the texture may be a little less rich.
More Cheesecake and Cozy Dessert Recipes You May Also Love
If you love the creamy, cookie-butter richness of this Biscoff cheesecake, you may also love other cheesecake-inspired desserts with that same indulgent, save-worthy texture. Try New York Cheesecake Recipe for a classic bakery-style cheesecake, Oreo Cheesecake Recipe for a cookies-and-cream version, or Turtle Cheesecake if you love caramel, chocolate, and rich dessert layers.
For fruitier cheesecake ideas, Strawberry Cheesecake, Cherry Cheesecake Recipe, and Blueberry Cheesecake are perfect when you want something creamy with a bright fruit topping. If you prefer easy bars or party-style desserts, Pumpkin Cheesecake Bars, Pecan Pie Cheesecake, and Strawberry Cheesecake Banana Pudding are beautiful next recipes to save.
Quick picks: For the closest classic cheesecake texture, try New York Cheesecake Recipe. For another cookie-based creamy dessert, go with Oreo Cheesecake Recipe. For a fruit-forward cheesecake moment, Strawberry Cheesecake is the best next choice.
Recipe Summary
This Biscoff cheesecake recipe combines a crisp cookie crust, creamy cheesecake filling, and glossy cookie butter topping into one rich and comforting dessert. The balanced texture, caramelized flavor, and bakery-style presentation make it ideal for holidays, celebrations, or cozy weekends at home.
With its silky filling, warm spiced cookie flavor, and make-ahead convenience, this is the kind of cheesecake recipe people save, repeat, and crave long after the last slice disappears.

Final Thoughts
Some desserts are impressive for a moment. Others become part of your permanent recipe collection because they consistently deliver comfort, beauty, and flavor every single time.
That is exactly what makes this Biscoff cheesecake special.
It feels luxurious without being complicated. It looks elegant while still tasting deeply homemade. And once you understand the gentle wobble, slow cooling, and overnight chill, the process becomes surprisingly relaxing.
There is also something incredibly satisfying about slicing through those creamy layers and hearing the slight crunch from the cookie crust underneath. It is the kind of dessert that makes people pause after the first bite and quietly go back for another forkful.
And honestly, those are usually the recipes worth keeping forever.

Biscoff Cheesecake
This creamy Biscoff cheesecake features a buttery Lotus Biscoff cookie crust, rich baked cheesecake filling, and glossy cookie butter topping. It is smooth, rich, cozy, and perfect for holidays, celebrations, or make-ahead dessert tables.
Ingredients
For the Crust
- 2 cups Biscoff cookie crumbs
- 6 tablespoons unsalted butter, melted
- Pinch of salt
For the Cheesecake Filling
- 24 oz cream cheese, softened
- 1 cup granulated sugar
- 1 cup Biscoff spread
- 3 large eggs
- 3/4 cup sour cream
- 1 teaspoon vanilla extract
- Pinch of salt
For the Topping
- 1/2 cup Biscoff spread, melted
- Crushed Biscoff cookies, for garnish
- Whipped cream, optional
Instructions
- Preheat the oven to 325°F. Lightly grease a 9-inch springform pan and wrap the outside tightly with aluminum foil.
- In a bowl, mix the Biscoff cookie crumbs, melted butter, and salt until combined and the texture resembles wet sand.
- Press the crust mixture evenly into the bottom of the springform pan. Bake for 10 minutes, then let cool slightly.
- In a large mixing bowl, beat the softened cream cheese until smooth and creamy.
- Add the sugar and mix until fully combined. Blend in the Biscoff spread until smooth.
- Add the eggs one at a time, mixing on low speed after each addition until just incorporated.
- Fold in the sour cream, vanilla extract, and salt until the batter is smooth and glossy.
- Pour the cheesecake filling over the crust and smooth the top with a spatula.
- Place the springform pan into a large roasting pan. Pour hot water into the roasting pan until it reaches halfway up the sides of the cheesecake pan.
- Bake for 55–70 minutes, or until the edges are set and the center still has a slight wobble.
- Turn off the oven, crack the oven door slightly, and let the cheesecake cool inside the oven for 1 hour.
- Remove the cheesecake from the oven and cool completely at room temperature.
- Refrigerate for at least 6 hours, preferably overnight, until fully chilled and set.
- Spread the melted Biscoff spread over the chilled cheesecake and garnish with crushed Biscoff cookies and whipped cream if desired.
- Slice and serve chilled.
Notes
- Room-temperature ingredients create the smoothest cheesecake texture.
- Do not overmix after adding the eggs to reduce cracking.
- The center should still jiggle slightly when removed from the oven.
- Cheesecake texture improves significantly after chilling overnight.
- Warm a knife slightly before slicing for cleaner cuts.
Nutrition Information:
Yield: 12 slices Serving Size: 1 sliceAmount Per Serving: Calories: 620Total Fat: 43gSaturated Fat: 24gCholesterol: 145mgSodium: 380mgCarbohydrates: 48gFiber: 1gSugar: 34gProtein: 8g
Nutrition information is estimated and may vary based on ingredients and portion sizes.
12 Sweet Favourites — Yours, Free 🍰
Tiramisù, no-bake cheesecake, the perfect chocolate chip cookie & 9 more reader-loved desserts — gathered into one beautiful free recipe book. From my kitchen to yours.
No spam, just sweet things. Unsubscribe anytime.