Peanut Butter Spider Cookies
🎁 FREE E-BOOK: 12 Sweet Favorites — reader-loved desserts in one beautiful recipe book.
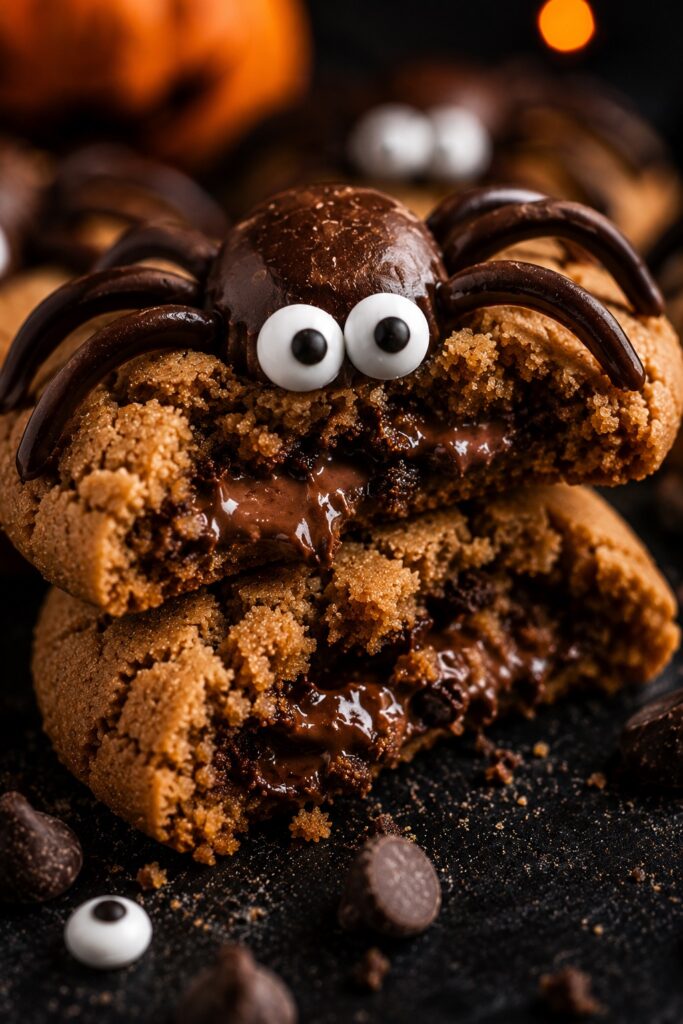
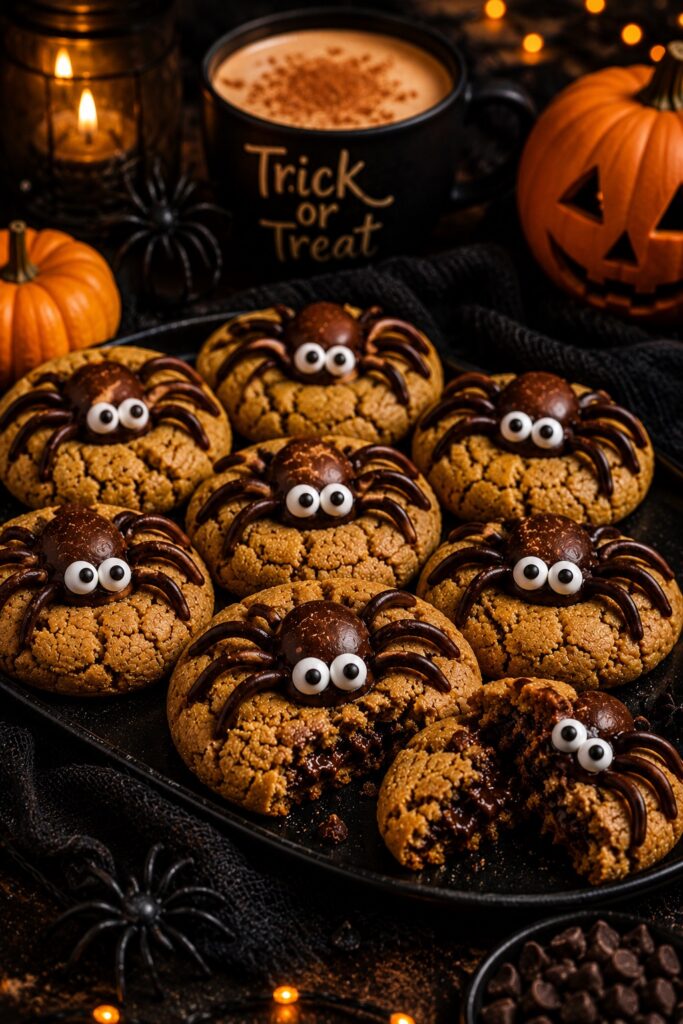
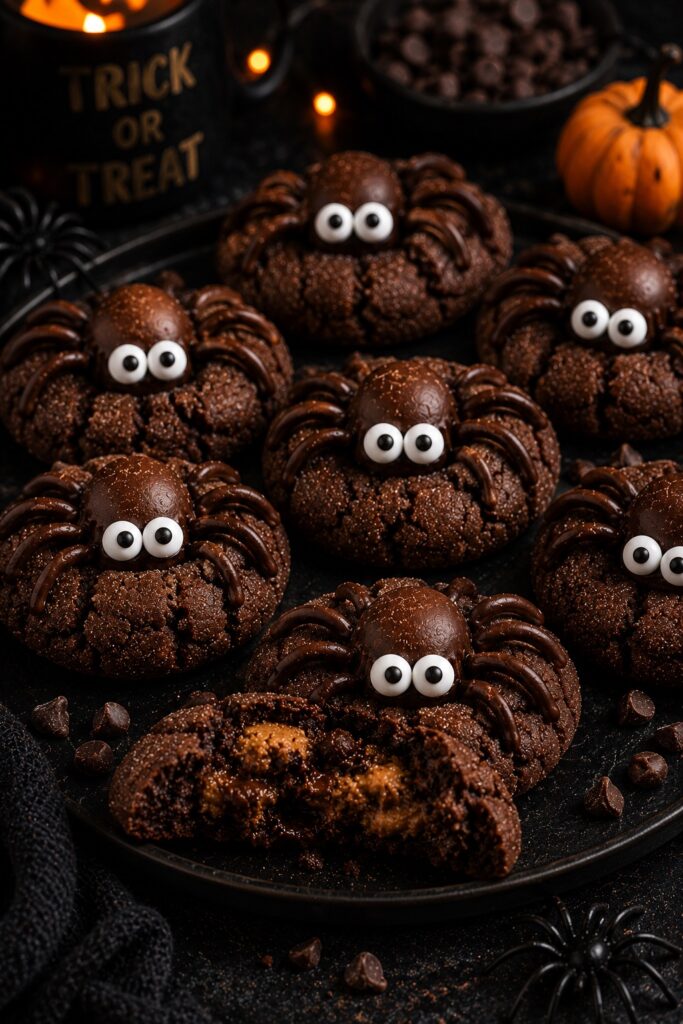
There is something instantly nostalgic about peanut butter spider cookies. The soft peanut butter cookie base, the glossy chocolate center, and those playful chocolate spider legs make them feel cozy, homemade, and just a little dramatic in the best Halloween way.
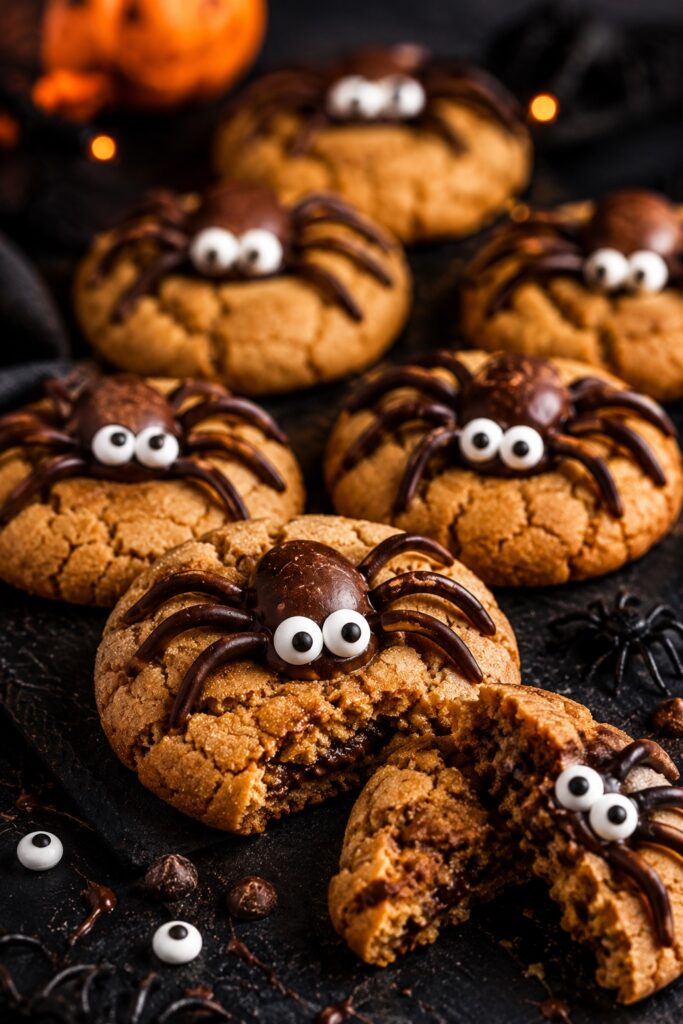
These cookies are the kind of treat people save immediately because they look impressive while still being incredibly approachable to make at home. The peanut butter dough bakes into soft, tender cookies with lightly crisp edges, while the chocolate candy center melts just enough to create that classic bakery-style finish everyone loves.
What makes peanut butter spider cookies so special is the balance between cute presentation and genuinely good flavor. Some themed desserts look fun but taste forgettable. These cookies deliver both: rich peanut butter flavor, creamy chocolate, soft centers, and a texture that stays tender for days.
They also work beautifully for Halloween parties, fall dessert tables, classroom treats, cozy movie nights, and Pinterest-worthy baking weekends. Save this recipe for October baking days when you want something festive without making complicated decorated cookies.
What Are Peanut Butter Spider Cookies?
Peanut butter spider cookies are soft peanut butter cookies topped with chocolate candy pieces and decorated with melted chocolate spider legs to resemble little spiders. They are especially popular during Halloween because they combine classic peanut butter blossom-style cookies with playful seasonal decoration.
The cookie base is usually made with creamy peanut butter for a soft, chewy texture and balanced sweetness. After baking, a chocolate candy is pressed into the center while the cookies are still warm. Melted chocolate is then piped to create spider legs, and small candy eyes can be added for decoration.
The result is a dessert that feels festive, nostalgic, easy to share, and visually memorable while still tasting like a classic homemade peanut butter cookie.
Quick Recipe Overview
| Texture | Soft centers with lightly crisp edges |
|---|---|
| Flavor | Rich peanut butter with creamy chocolate |
| Difficulty | Easy |
| Time | About 40 minutes |
| Servings | 24 cookies |
| Method | Baked cookies with simple decorating |
| Best For | Halloween parties, dessert trays, kids baking days |
In short: These peanut butter spider cookies combine soft peanut butter cookies with chocolate candy centers and simple spider decorations for an easy Halloween dessert that looks adorable and tastes genuinely delicious.
Why This Recipe Works
These cookies work because the dough is built around balance rather than excessive sweetness. Peanut butter naturally adds fat and structure, which helps create cookies that stay soft without becoming cakey.
The brown sugar contributes moisture and chewiness, while granulated sugar helps the edges develop slight crispness. That contrast is what gives the cookies their classic bakery-style texture.
The chocolate candy center also matters more than people realize. Pressing it into the cookie while warm allows the chocolate to soften slightly without fully melting, creating that creamy center texture people love.
One small but important detail: slightly underbaking the cookies keeps the centers soft even after cooling. The residual heat finishes the baking process naturally on the tray.
Why You’ll Love This Recipe
- Soft and chewy peanut butter cookie texture
- Fun Halloween presentation without complicated decorating
- Rich chocolate and peanut butter combination
- Perfect for parties, bake sales, and themed dessert trays
- Easy recipe that kids can help decorate
- Great make-ahead Halloween dessert
- Beautiful Pinterest-style presentation with minimal effort
Baking Science: Why These Cookies Stay Soft
Peanut butter changes cookie behavior quite a bit compared to standard butter-based doughs. Because peanut butter contains both fat and protein, it creates cookies that feel rich and tender while still holding their shape.
Brown sugar plays another important role here. Its moisture content helps the cookies stay soft longer, especially after cooling. That is why these cookies still taste good the next day instead of becoming dry.
The egg helps emulsify the fat and sugars together, creating a smoother dough and more even texture throughout the cookie. Meanwhile, baking soda encourages gentle spreading and helps develop those lightly golden edges.
One subtle baking detail many people overlook: warm cookies continue cooking internally after leaving the oven. Pulling them out when the centers still look slightly soft helps preserve that chewy texture instead of creating dry cookies.
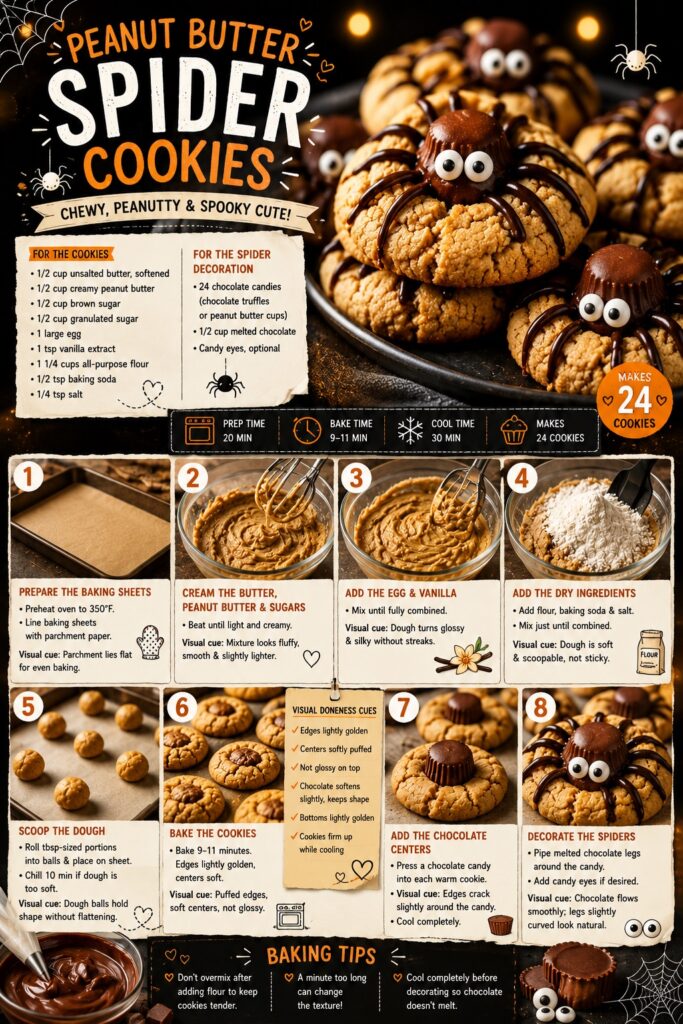
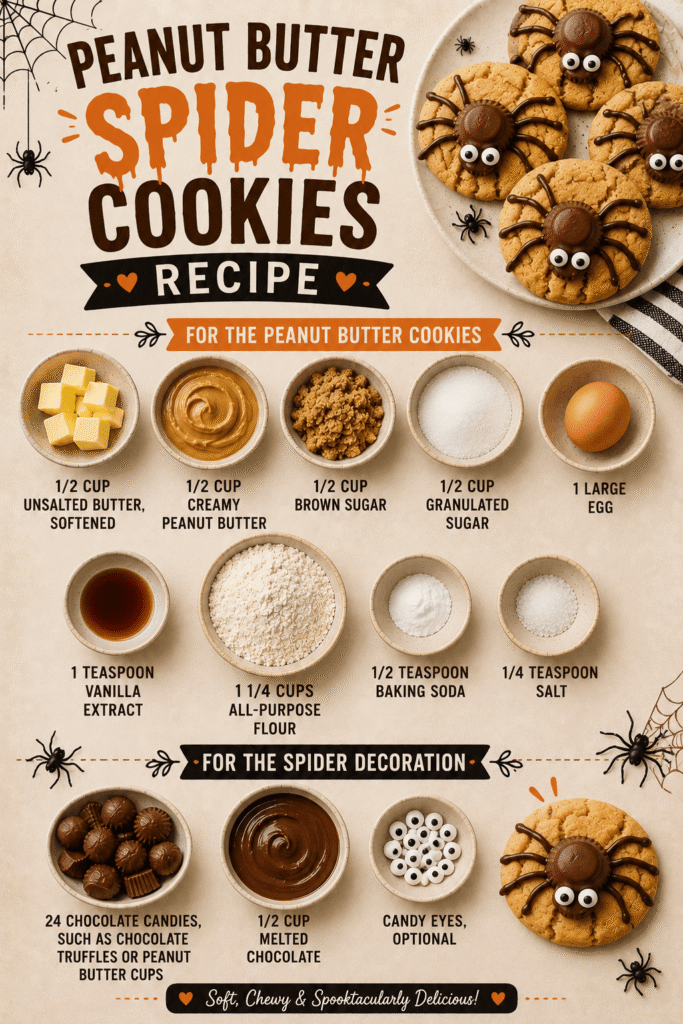
Ingredients
For the Peanut Butter Cookies
- 1/2 cup unsalted butter, softened
- 1/2 cup creamy peanut butter
- 1/2 cup brown sugar
- 1/2 cup granulated sugar
- 1 large egg
- 1 teaspoon vanilla extract
- 1 1/4 cups all-purpose flour
- 1/2 teaspoon baking soda
- 1/4 teaspoon salt
For the Spider Decoration
- 24 chocolate candies, such as chocolate truffles or peanut butter cups
- 1/2 cup melted chocolate
- Candy eyes, optional
Ingredient Intelligence
Peanut Butter
Creamy peanut butter works best because it creates a smoother dough and more predictable spread. Natural peanut butter can separate and sometimes create oily or crumbly cookies.
Brown Sugar
Brown sugar helps the cookies stay soft because it retains moisture better than white sugar. It also gives the cookies a warmer flavor that pairs beautifully with peanut butter.
Flour
The flour provides structure, but too much can quickly create dry cookies. If your dough feels overly stiff, it is usually a sign the flour was packed too tightly while measuring.
Chocolate Candies
Using chilled chocolate candies helps them hold their shape better when pressed into the warm cookies.
One small real-life baking observation: if the candies become overly soft while decorating, placing the tray in the refrigerator for 5 minutes makes everything easier again.
Equipment You’ll Need
- Mixing bowls
- Electric mixer or sturdy whisk
- Baking sheet
- Parchment paper
- Cookie scoop or spoon
- Cooling rack
- Small piping bag or zip-top bag for melted chocolate
A cookie scoop is especially helpful here because evenly sized dough balls bake more consistently and create a cleaner spider-cookie appearance.
How to Make Peanut Butter Spider Cookies
1. Prepare the baking sheets
Preheat the oven to 350°F. Line baking sheets with parchment paper.
Visual cue: The parchment should lie flat so the cookies spread evenly instead of tilting during baking.
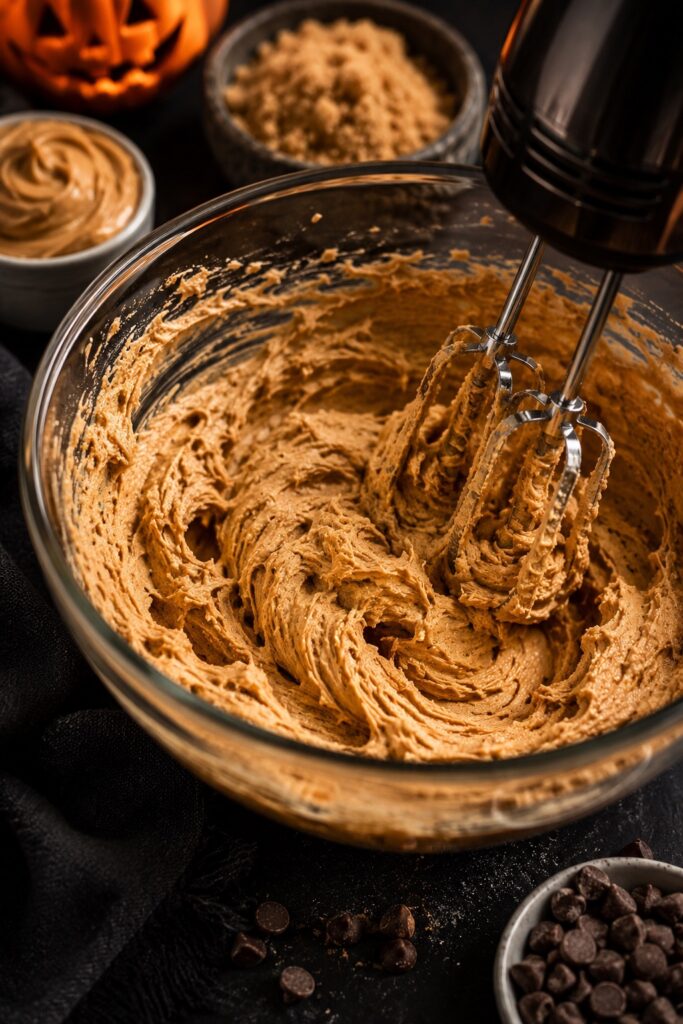
2. Cream the butter, peanut butter, and sugars
In a large bowl, beat the butter, peanut butter, brown sugar, and granulated sugar until light and creamy.
Visual cue: The mixture should look fluffy, smooth, and slightly lighter in color.
Baking tip: Scrape the sides of the bowl halfway through mixing so no dense butter pockets remain.
3. Add the egg and vanilla
Mix in the egg and vanilla extract until fully combined.
Visual cue: The dough should become glossy and silky without separated streaks.
One small human moment: if the mixture briefly looks curdled, keep mixing. It usually smooths out after a few seconds.
4. Add the dry ingredients
Add the flour, baking soda, and salt. Mix just until combined.
Visual cue: The dough should feel soft and scoopable but not sticky like cake batter.
Baking tip: Overmixing after adding flour can make the cookies tougher instead of tender.
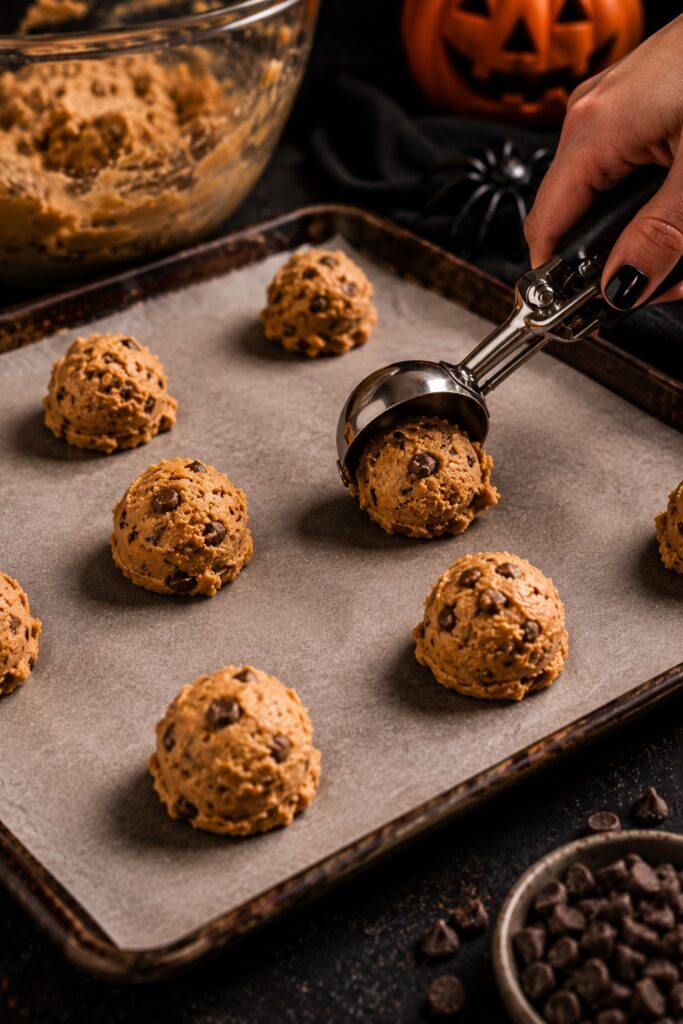
5. Scoop the dough
Roll tablespoon-sized portions into balls and place them on the baking sheet.
Visual cue: The dough balls should hold their shape easily without flattening excessively.
If your kitchen is warm and the dough feels too soft, refrigerate it for 10 minutes before baking.
6. Bake the cookies
Bake for 9–11 minutes until the edges are lightly golden and the centers still look soft.
Visual cue: The cookies should appear puffed with set edges while the center remains slightly underdone.
This is one of those recipes where a minute too long can noticeably change the texture.
Visual Doneness Cues
- Edges look lightly golden
- Centers appear softly puffed
- Cookies no longer look glossy on top
- Chocolate softens slightly but keeps shape
- Bottoms are lightly golden, not dark brown
- Cookies firm up gently while cooling
7. Add the chocolate centers
Immediately press a chocolate candy into the center of each warm cookie.
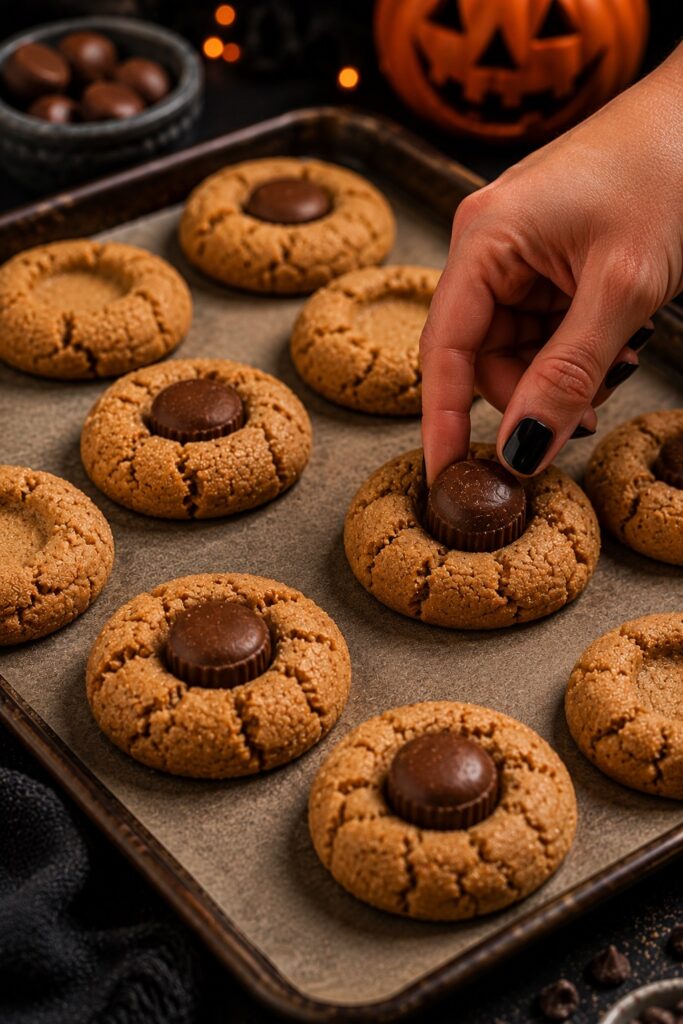
Visual cue: The cookie edges may crack slightly around the candy, which actually gives them a more homemade bakery-style appearance.
Allow the cookies to cool completely.
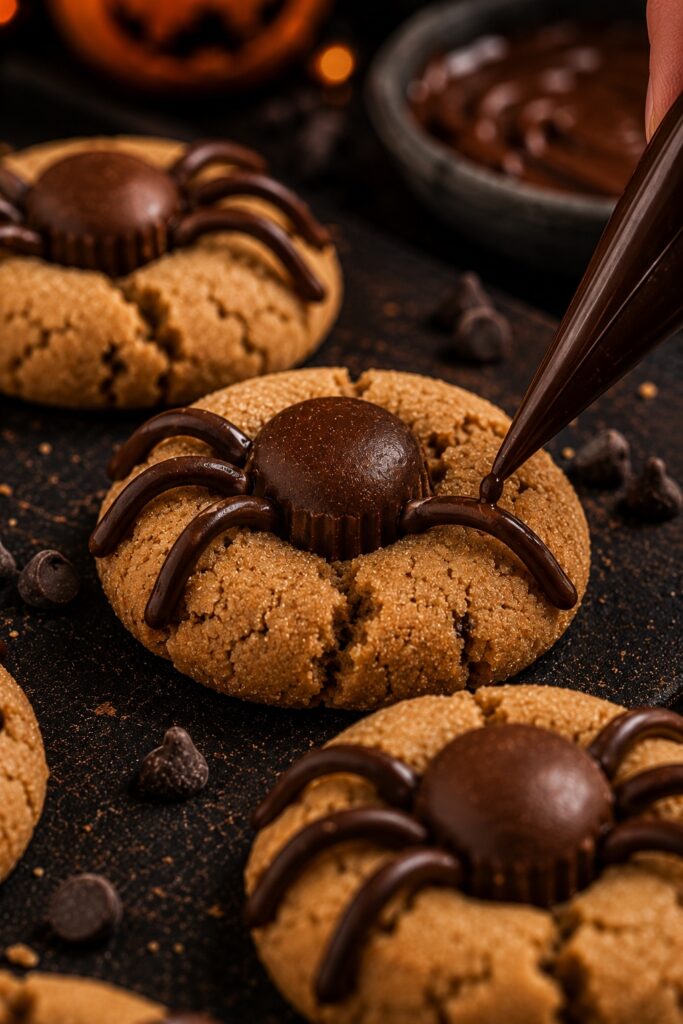
8. Decorate the spiders
Pipe melted chocolate legs around each candy center to create spider legs. Add candy eyes if desired.
Visual cue: The melted chocolate should be fluid enough to pipe clean lines but not so hot that it runs everywhere.
Slightly curved spider legs usually look more natural and visually appealing than perfectly straight lines.
Texture & Behavior Guide
| Stage | What You Should See |
|---|---|
| Mixed dough | Thick, soft, scoopable dough |
| Before baking | Smooth dough balls holding shape |
| Mid-bake | Cookies spreading slightly with puffed centers |
| Finished cookies | Set edges with soft centers |
| Fully cooled | Tender, chewy texture with creamy chocolate center |
Expert Tips for Best Results
- Use room temperature butter for smoother mixing.
- Slightly underbake the cookies for softer centers.
- Chill the chocolate candies before decorating so they hold their shape better.
- Use parchment paper for more even cookie bottoms.
- Let the cookies cool before piping the spider legs.
- Measure flour lightly to avoid dry, dense dough.
- If the decorating chocolate thickens, microwave it briefly until smooth again.
A deeper baking insight: peanut butter cookies continue drying slightly as they cool, which is why pulling them early creates a much better final texture.
Common Mistakes
| Mistake | Effect | Correction |
|---|---|---|
| Overbaking | Dry, crumbly cookies | Remove cookies when the centers still look soft. |
| Too much flour | Dense dough and less spread | Spoon and level the flour instead of packing it. |
| Decorating while too hot | Chocolate decorations melt and slide | Let cookies cool before piping the legs. |
| Using oily natural peanut butter | Greasy or uneven texture | Use creamy shelf-stable peanut butter for best results. |
| Pressing candies too hard | Cookies crack too much | Press gently while cookies are still warm. |
Comparison Guide
- Classic peanut butter spider cookies: Soft and chewy with balanced peanut butter and chocolate flavor. Best for Halloween parties.
- Crunchy peanut butter version: Slightly crispier with more nutty texture. Best for peanut lovers.
- Mini spider cookies: Bite-sized and party-friendly. Best for dessert platters.
- Dark chocolate version: Richer and less sweet. Best for adult Halloween parties.
How to Serve Peanut Butter Spider Cookies
These cookies look especially beautiful served on dark trays, wooden dessert boards, or layered Halloween platters with warm fall colors nearby. The glossy chocolate centers and playful spider legs immediately stand out on a dessert table.
For cozy serving ideas, pair them with hot chocolate, coffee, chai lattes, cold milk, or vanilla ice cream.
Save this recipe for Halloween movie nights, school parties, spooky dessert tables, and cozy fall baking weekends.
They also photograph beautifully stacked on parchment paper with soft natural light and a few scattered chocolate candies nearby.
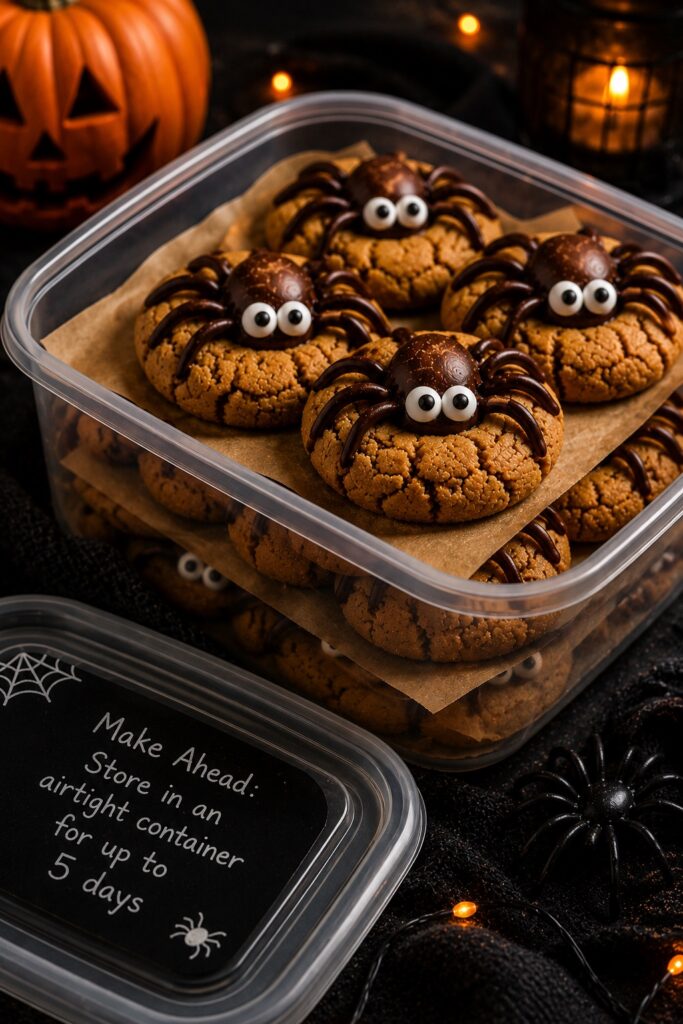
Storage & Make Ahead
Store the cookies in an airtight container at room temperature for up to 4 days.
For longer storage, refrigerate them for up to 1 week.
The dough can also be made ahead and refrigerated for 24 hours before baking. In fact, slightly chilled dough often creates thicker cookies with deeper flavor.
You can freeze the baked cookies for up to 2 months. Allow them to thaw at room temperature before serving.
Variations
Chocolate Peanut Butter Spider Cookies
Add cocoa powder to the dough for a richer chocolate-peanut butter flavor.
Mini Halloween Spider Cookies
Use smaller dough balls and mini chocolate candies for bite-sized party cookies.
Crunchy Peanut Butter Version
Swap creamy peanut butter for crunchy peanut butter for added texture.
Reese’s Spider Cookies
Use miniature peanut butter cups instead of chocolate truffles for an extra peanut butter layer.
Salted Chocolate Version
Finish with a tiny sprinkle of flaky sea salt for a more balanced sweet-salty flavor.
FAQ
Can I make peanut butter spider cookies ahead of time?
Yes. These cookies hold their texture very well for several days, making them perfect for party prep.
Can I freeze the dough?
Yes. Scoop the dough into balls first, freeze them on a tray, then transfer to a freezer bag.
Why did my cookies spread too much?
Usually the butter was too warm or the flour measurement was too light.
Can I use natural peanut butter?
You can, but the texture may become more oily or crumbly depending on the brand.
Do I need candy eyes?
No. The spider legs alone create the effect beautifully.
How do I keep the chocolate decorations neat?
Allow the cookies to cool completely before piping melted chocolate.
Can kids help decorate these?
Absolutely. This is one of those fun Halloween baking recipes where imperfect decorating actually makes the cookies look more charming.
More Halloween Cookies and Cozy Fall Desserts You’ll Love
If you love the playful chocolate-peanut butter feel of these peanut butter spider cookies, you might also enjoy Peanut Butter Blossom Cookies for that same soft cookie and chocolate center combination, or Peanut Butter Chip Chocolate Cookies for a cozy chocolate-studded cookie tray.
For more Halloween-friendly chocolate desserts, try Dirt Cake, Dirt Pudding, or Brownie Bites. They all bring that fun, party-ready dessert table energy while still feeling easy, nostalgic, and homemade.
If you want to build a full fall dessert spread, pair these cookies with Pumpkin Chocolate Chip Cookies or Pumpkin Dump Cake for a warm, cozy Halloween baking board with chocolate, peanut butter, and pumpkin flavors all together.
Recipe Summary
These peanut butter spider cookies combine soft peanut butter cookies with creamy chocolate centers and playful spider decorations for an easy Halloween dessert everyone remembers. The cookies stay soft, rich, and chewy while still looking festive enough for parties and seasonal dessert tables.
With simple ingredients, approachable steps, and bakery-style texture, this recipe delivers both visual charm and genuinely delicious flavor.
Final Thoughts
Some Halloween desserts are mostly about appearance, but these peanut butter spider cookies are the kind people actually keep reaching for long after the photos are taken. The soft peanut butter texture, creamy chocolate center, and playful spider decoration create that perfect mix of nostalgic, cozy, and fun.
This is the kind of recipe that becomes part of yearly traditions because it feels approachable, festive, and consistently reliable. Whether you are baking with kids, building a Halloween dessert board, or simply craving something cozy and chocolatey on a fall evening, these cookies bring that homemade comfort people always come back to.

Peanut Butter Spider Cookies
These Peanut Butter Spider Cookies are soft, chewy, and filled with rich peanut butter flavor and creamy chocolate centers. Decorated with chocolate spider legs, they make the perfect easy Halloween cookie recipe for parties, dessert trays, movie nights, and cozy fall baking days.
Ingredients
For the Peanut Butter Cookies
- 1/2 cup unsalted butter, softened
- 1/2 cup creamy peanut butter
- 1/2 cup brown sugar
- 1/2 cup granulated sugar
- 1 large egg
- 1 teaspoon vanilla extract
- 1 1/4 cups all-purpose flour
- 1/2 teaspoon baking soda
- 1/4 teaspoon salt
For the Spider Decoration
- 24 chocolate candies, such as chocolate truffles or miniature peanut butter cups
- 1/2 cup melted chocolate
- Candy eyes, optional
Instructions
- Preheat the oven to 350°F and line baking sheets with parchment paper.
- In a large mixing bowl, beat the butter, peanut butter, brown sugar, and granulated sugar until light and creamy.
- Add the egg and vanilla extract and mix until fully combined.
- Add the flour, baking soda, and salt. Mix just until a soft dough forms.
- Scoop tablespoon-sized portions of dough, roll into balls, and place on the prepared baking sheets.
- Bake for 9–11 minutes, or until the edges are lightly golden and the centers still look soft.
- Immediately press one chocolate candy into the center of each warm cookie.
- Let the cookies cool completely.
- Transfer melted chocolate to a piping bag or zip-top bag with a small corner snipped off. Pipe spider legs around each chocolate center.
- Add candy eyes if desired and allow the chocolate decorations to set before serving.
Notes
- Slightly underbaking the cookies helps keep the centers soft and chewy.
- Creamy peanut butter works best for smooth texture and even spreading.
- If the dough becomes too soft, refrigerate it for 10 minutes before baking.
- Chilling the chocolate candies before using helps them hold their shape better.
- Store cookies in an airtight container at room temperature for up to 4 days.
Nutrition Information:
Yield: 24 cookies Serving Size: 1 cookieAmount Per Serving: Calories: 180Total Fat: 10gSaturated Fat: 4gCholesterol: 20mgSodium: 95mgCarbohydrates: 20gFiber: 1gSugar: 13gProtein: 4g
Nutrition information is estimated and may vary based on ingredients and portion sizes.
12 Sweet Favourites — Yours, Free 🍰
Tiramisù, no-bake cheesecake, the perfect chocolate chip cookie & 9 more reader-loved desserts — gathered into one beautiful free recipe book. From my kitchen to yours.
No spam, just sweet things. Unsubscribe anytime.