Fruit Roll Ups (Easy Homemade Fruit Leather)
Fruit roll ups are one of those snacks that instantly bring back a sense of fun. They’re soft, chewy, fruity, and somehow both playful and comforting at the same time. But making them at home gives them a completely different feel — fresher, more flavorful, and much more real than anything from a box.

This Fruit Roll Ups recipe turns simple fruit into a naturally sweet homemade fruit leather with a soft, flexible texture and concentrated fruit flavor. There are no artificial colors, no hard-to-pronounce ingredients, and no mystery syrupy finish — just real fruit slowly dried until it becomes glossy, chewy, and easy to roll.
Once you try making fruit roll ups this way, it’s hard to go back to store-bought — the texture is softer, and the flavor feels cleaner, brighter, and more naturally concentrated.
What makes homemade fruit roll ups so satisfying is not just the taste, but the transformation. Fresh fruit starts out juicy and delicate, then slowly becomes dense, bendable, and rich in flavor. It feels simple, but it has that quiet kind of kitchen magic that makes a recipe memorable — similar to how fresh fruit can be transformed into something just as simple and satisfying like this Fruit Salad.
They’re especially useful if you want a snack that feels wholesome, lunchbox-friendly, budget-friendly, and genuinely enjoyable to eat. And once you make a batch successfully, it becomes one of those recipes you start thinking about in terms of endless variations.
This homemade fruit roll ups recipe is also naturally no-bake (aside from gentle drying), making it one of the easiest ways to turn fresh fruit into a wholesome, kid-friendly snack — much like these simple Energy Balls that are perfect for everyday snack prep.
Once you try making fruit roll ups this way, it’s hard to go back to store-bought — the texture is softer, the flavor is brighter, and it actually tastes like real fruit.
What Are Fruit Roll Ups?
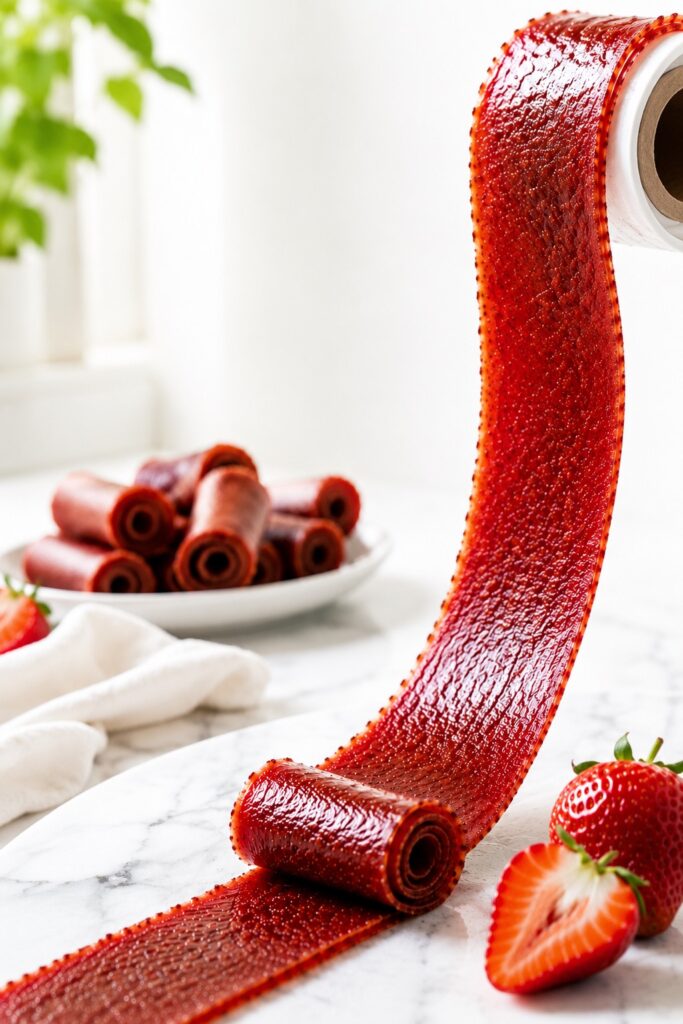
Fruit roll ups, also called fruit leather, are made by blending fruit into a smooth puree and drying it slowly until most of the moisture evaporates. What remains is a thin, flexible sheet of concentrated fruit that can be peeled, cut, and rolled into strips.
Homemade fruit roll ups are typically softer, fruitier, and less aggressively sweet than store-bought versions. They can be made with fresh or frozen fruit and usually need only a few ingredients, depending on the natural sweetness and acidity of the fruit you use.
Fruit Roll Ups at a Glance
Here’s a quick overview of what to expect in terms of texture, flavor, and preparation:
| Category | Details |
|---|---|
| Texture | Soft, chewy, flexible, slightly tacky |
| Flavor | Bright, fruity, naturally sweet |
| Difficulty | Easy |
| Time | 15 minutes prep + 3–6 hours drying |
| Yield | 8 strips |
| Method | Oven or dehydrator |
| Best For | Lunchboxes, snack prep, healthy treats |
In short: These homemade fruit roll ups are soft, chewy, naturally sweet, and incredibly easy to make using real fruit and low, slow drying.
Why You’ll Love These Homemade Fruit Roll Ups
- Made with real fruit: No artificial flavors or colors — just pure fruit transformed into a naturally sweet snack.
- Soft, chewy texture: Flexible and easy to roll, with that classic fruit leather feel.
- Perfect for snack prep: Great for lunchboxes, road trips, or quick homemade snacks.
- Customizable flavors: Mix fruits, adjust sweetness, and create endless variations.
- Budget-friendly: A smart way to use ripe or leftover fruit without waste.
These homemade fruit roll ups are the kind of snack that feels simple, practical, and surprisingly satisfying — easy enough for everyday prep, but fun enough to feel special.
")
Why This Recipe Works
This recipe works because it focuses on the three things that matter most in fruit leather: smooth puree, even thickness, and low-temperature drying. When those three elements are right, the texture becomes beautifully chewy instead of sticky, brittle, or patchy.
- A smooth puree creates an even, pleasant bite without fibrous bits or wet fruit chunks.
- Thin, even spreading helps the sheet dry consistently so the edges do not become crisp while the center stays wet.
- Low, slow drying preserves fruit flavor better and gives the roll ups that soft, bendable finish instead of a cooked or browned one.
One small but important insight: fruit leather is much more about moisture control than baking. You are not really baking it in the usual sense — you are gently removing water until the fruit becomes concentrated and structured.
The Science Behind Fruit Roll Ups
Even though this is a simple recipe, there’s useful kitchen science behind the texture.
As the puree dries, water evaporates slowly and the fruit’s natural sugars become more concentrated. This is what deepens the flavor and creates that classic chewy texture. At the same time, natural pectin and fruit fiber help the puree hold together as a flexible sheet instead of drying into crumbs.
Fruits with a good balance of fiber and pectin — like apples, berries, peaches, mango, and apricots — usually produce the best texture. Very watery fruits can still work, but they may take longer to dry or need a little more care to spread evenly.
| Fruit Behavior | What It Means |
|---|---|
| High natural pectin | Better structure and flexibility |
| High sugar content | Sweeter flavor and softer chew |
| High water content | Longer drying time |
| Higher acidity | Brighter, fresher flavor |
From experience: slightly overripe fruit often makes the best fruit roll ups because the flavor is fuller and the sweetness is already developed naturally.
The final texture is shaped by the balance of fruit sugars, fiber, and moisture loss, which is why different fruits dry at slightly different speeds and produce slightly different chew. That’s why even small differences in fruit type or thickness can noticeably change the final result.
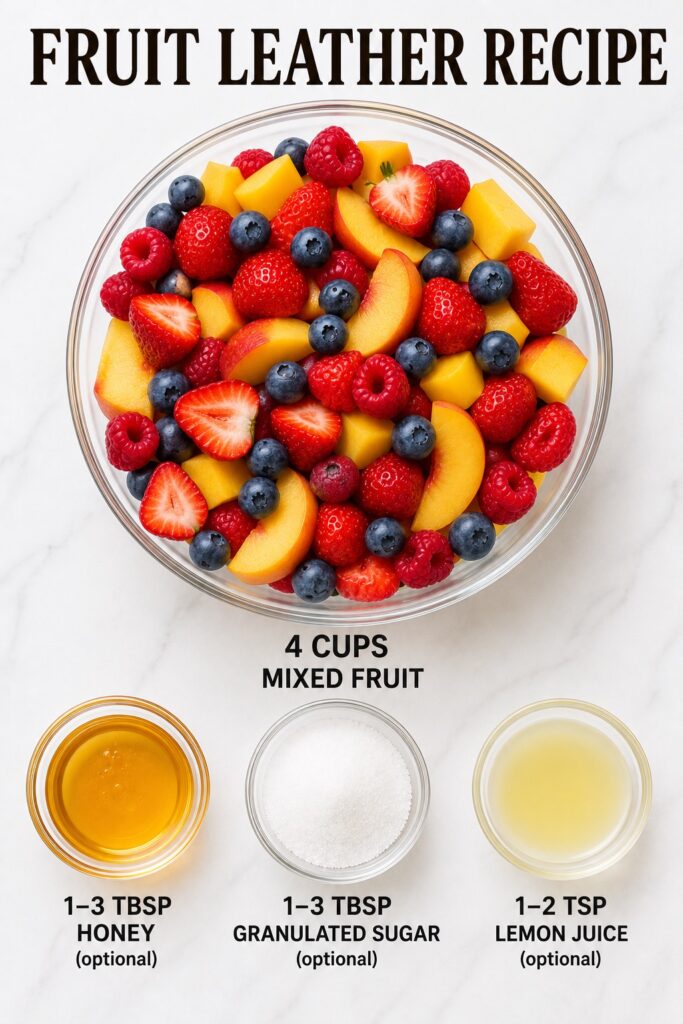
Ingredients
- 4 cups fruit, fresh or thawed frozen
- 1 to 3 tablespoons honey or granulated sugar, optional
- 1 to 2 teaspoons lemon juice, optional
")
Ingredient Intelligence (What Makes Fruit Roll Ups Work)
Fruit: This is the foundation of the recipe, so ripeness matters. Sweet, flavorful fruit produces a better final texture and reduces the need for extra sweetener. Strawberries, raspberries, mango, peaches, apples, apricots, and mixed berries all work well. If you enjoy fruit-forward desserts, recipes like Baked Apples use that same idea of letting natural fruit flavor shine.
Honey or sugar: Some fruit does not need it at all. If the fruit tastes flat, tart, or a little dull before drying, a small amount of sweetener helps round out the flavor. Drying intensifies sweetness, so it is best to add lightly and taste first.
Lemon juice: This is optional, but useful. It brightens the fruit, balances sweetness, and can help lighter-colored fruit keep a fresher flavor profile.
Kitchen note: if the puree tastes only “okay” before drying, it usually will not magically taste amazing afterward. It should already taste vibrant before it goes into the oven.
Key insight: fruit roll ups depend more on fruit quality than most recipes. Because the ingredient list is so simple, the final flavor is directly tied to how ripe, sweet, and balanced the fruit is before drying.
Micro observation: blending time affects texture more than people expect. A smoother puree creates a more even, flexible fruit leather, while a slightly textured puree gives a more rustic, thicker bite.
Equipment You’ll Need
- Blender or food processor
- Baking sheet or dehydrator tray
- Parchment paper or a silicone baking mat
- Offset spatula or spoon for spreading
- Pizza cutter or sharp knife for cutting strips
If you are using the oven, a silicone baking mat often gives the easiest release. Parchment paper also works well, but it helps if it is good-quality parchment and the fruit leather is fully dried before peeling.
How to Make Fruit Roll Ups
1. Preheat the oven.
Set your oven to 170°F to 175°F (75–80°C). If your oven runs hot, use the lowest setting available. You’re drying the fruit slowly, not baking it.
2. Prepare the fruit.
Wash, peel, hull, or pit the fruit as needed. If using frozen fruit, thaw it fully and drain off excess liquid so the puree isn’t too watery.
3. Blend until completely smooth.
Add the fruit to a blender or food processor and blend until silky with no visible chunks. A smoother puree creates a more even, flexible texture after drying.

4. Taste and adjust.
Taste the puree before spreading. It should taste bright, fruity, and slightly stronger than you expect — flavors soften slightly during drying. Add a little honey or lemon juice if needed.
5. Prepare the tray.
Line a baking sheet with parchment paper or a silicone baking mat for easy release.
6. Spread the puree evenly.
Pour the puree onto the tray and spread it into an even layer about 1/8 inch (3 mm) thick. Smooth out any thicker spots in the center — uneven thickness leads to uneven drying.

7. Dry slowly.
Place in the oven and dry for 3 to 6 hours. The fruit leather is ready when:
- the surface looks matte (not glossy)
- the center is no longer wet or sticky
- it peels away cleanly but still bends easily
")
8. Cool completely.
Let the fruit leather cool fully on the tray. It will firm up slightly as it cools.
9. Cut and roll.
Cut into strips using a knife or pizza cutter. Roll each strip (with parchment if needed) into a spiral for easy storage and that classic fruit roll up look.
The first time I made fruit leather, I spread the center too thick because it looked “more generous.” The edges dried quickly, but the middle stayed sticky for hours. Ever since then, I trust a thin, even layer — it makes all the difference.

Visual Doneness Cues
Fruit roll ups don’t change dramatically in appearance as they dry, which is why many people feel unsure the first time they make them. The key is to focus on small texture and surface changes rather than color alone.
- Matte surface, not glossy: The top should look dry and slightly satin-like. If it still looks shiny or wet, it needs more time.
- Dry center (most important): Lightly touch the middle — it should feel dry and slightly tacky, not sticky or smeared.
- No wet spots: Any darker, softer-looking areas usually mean there’s still moisture trapped underneath.
- Peels cleanly: Lift a corner gently — it should come away from the parchment or mat without sticking or tearing.
- Flexible, not brittle: The sheet should bend easily without cracking. If it snaps or breaks, it has been over-dried.
- Slightly deeper color: The color will usually look a bit more concentrated and darker than the original puree.
Quick test: If you can peel it off, bend it without cracking, and the center feels dry — it’s ready.
Small but important detail: The edges often dry faster than the center. If the edges feel done but the middle is still slightly sticky, let it dry longer — the center is what determines doneness.
")
Fruit Roll Ups Texture & Behavior Guide
| If You See This | What It Means | What To Do |
|---|---|---|
| Wet center | Under-dried | Continue drying and check every 20–30 minutes |
| Crisp edges | Uneven thickness or heat too high | Spread more evenly and lower temperature |
| Sticky all over | Too much moisture remains | Dry longer at low heat |
| Cracking or brittle | Over-dried | Remove earlier next time |
| Soft and bendable | Perfect texture | Cool, cut, and roll |
")
Expert Tips for Better Homemade Fruit Roll Ups
- Blend longer than you think you need to. A very smooth puree gives a more polished final texture.
- Keep the layer even. Thickness affects drying more than almost anything else in this recipe.
- Do not rush the temperature. Higher heat may seem faster, but it often creates dry edges and a sticky center.
- Use fruit that already tastes good. Drying intensifies flavor, but it does not fix bland fruit.
- Check the center first. The middle is almost always the last part to finish drying.
- Let it cool before peeling. Warm fruit leather can feel softer and stickier than it really is.
- Store with parchment. This keeps the strips from sticking together and makes them easier to grab.
Common Mistakes & How to Fix Them
Fruit roll ups are simple, but small details can affect the final texture. Here’s how to quickly identify and fix the most common issues:
| What You See | What It Means | Why It Happens | How to Fix It |
|---|---|---|---|
| Sticky center | Under-dried | Layer too thick or not enough drying time | Return to the oven and dry longer, checking every 20–30 minutes |
| Crispy or dry edges | Over-dried edges | Uneven thickness or oven running too hot | Spread more evenly next time and keep temperature low |
| Cracking or breaking | Over-dried | Left in the oven too long | Remove earlier next time; aim for flexible, not brittle |
| Still wet after hours | Too much moisture | Watery fruit or thick layer | Continue drying and make the layer thinner next time |
| Uneven texture (dry + sticky areas) | Uneven drying | Puree spread inconsistently | Smooth into an even layer before drying |
| Flat or dull flavor | Lack of balance | Fruit not ripe enough or missing acidity | Add a small amount of lemon juice or sweetener before drying |
Quick tip: If something feels “off,” it’s usually either thickness or drying time. Those two factors control almost everything in fruit roll ups.
Real kitchen note: Most issues come from spreading the puree too thick in the center. It’s very tempting, but a thinner, even layer gives a much better and more consistent result.
Homemade vs. Store-Bought Fruit Roll Ups
| Homemade Fruit Roll Ups | Store-Bought Versions |
|---|---|
| Made with real fruit | Often made with concentrates, syrups, and additives |
| Flavor depends on the fruit you choose | Flavor is more uniform and often more artificial |
| Soft, naturally chewy texture | Can be waxier or more candy-like |
| Customizable sweetness | Usually sweeter by default |
Best Fruits for Homemade Fruit Leather
Many fruits work, but some are especially reliable because they balance sweetness, acidity, and structure well.
- Strawberries
- Raspberries
- Mango
- Peaches
- Apples
- Apricots
- Blueberries
- Mixed berries
You can also combine fruits for better flavor layering. Strawberry-banana, mango-peach, blueberry-apple, and raspberry-peach are all lovely options.
The easiest fruits for beginners are strawberries, mango, applesauce-based blends, and mixed berries because they puree smoothly and dry with a more reliable texture. Very watery fruits can work too, but they often need longer drying and more careful spreading.
Flavor Variations
- Strawberry Banana: soft, sweet, and very kid-friendly
- Mango Pineapple: tropical and naturally bright
- Apple Cinnamon: cozy and slightly autumnal
- Mixed Berry: vibrant, tart-sweet, and deeply fruity
- Peach Raspberry: soft floral sweetness with a bright finish
How to Serve Fruit Roll Ups
Homemade fruit roll ups are wonderfully flexible as a snack. They can be served simply rolled into strips, cut into squares, or packed into lunchboxes for an easy fruity bite. They also work beautifully as part of a snack board with sliced fruit, yogurt, nuts, or crackers — or paired with simple baked treats like Oatmeal Chocolate Chip Cookies for a more filling snack spread.
For kids, they feel fun and familiar. For adults, they have that nostalgic homemade charm that makes them oddly hard to stop eating. They are especially nice for road trips, school snacks, light afternoon snacks, or simple make-ahead snack prep.

Keep this recipe in mind for back-to-school season, summer fruit days, or whenever you want a simple homemade snack that feels just a little more special.
It’s the kind of simple homemade snack that fits easily into everyday life and still feels satisfying every time you make it.
Storage & Make Ahead
Once fully dried and cooled, fruit roll ups store well.
- At room temperature: up to 1 week in an airtight container
- In the refrigerator: up to 2 weeks
- In the freezer: up to 2 months
")
For best results, keep each strip attached to parchment or place parchment between layers to prevent sticking. Humidity can soften the texture over time, so airtight storage matters more than people often expect.
Frequently Asked Questions
Can I use frozen fruit?
Yes. Thaw it fully first and drain any excess liquid so the puree is not overly watery.
Do I need to add sugar?
No. If the fruit is ripe and flavorful, you may not need any sweetener at all.
Why are my fruit roll ups still sticky?
They likely need more drying time, especially in the center. Stickiness usually means there is still too much moisture left.
Can I make fruit roll ups without a dehydrator?
Yes. A low oven works very well for homemade fruit leather.
How thin should I spread the puree?
Around 1/8 inch thick is a good starting point. The most important thing is keeping the thickness even.
Can I mix different fruits together?
Absolutely. Fruit blends often create better flavor complexity than a single fruit alone.
How do I know when they are done?
The surface should be dry, the center should no longer feel wet, and the sheet should peel cleanly while staying flexible.
More Easy Homemade Snacks & Sweet Treats You’ll Love
If you enjoy simple recipes like these homemade fruit roll ups, there are several other treats on the blog that follow that same idea — easy to make, practical for everyday life, and made with ingredients that feel more real and satisfying than store-bought options.
Quick picks: For another fruit-forward option, try this fresh Fruit Salad. If you want something cozy and snackable, Banana Bread is always a classic. For a more energy-friendly homemade snack, these Energy Balls are a great next choice.
Fruit-Based Homemade Treats
- Fruit Salad – fresh, colorful, and easy when you want another simple fruit-based option
- Fruit Pizza Bites – fun, fruity, and especially good for kid-friendly treats or snack boards
- Baked Apples – soft, naturally sweet, and perfect when you want a warm fruit dessert instead
Snackable Homemade Favorites
- Banana Bread – cozy, reliable, and perfect for everyday snacking
- Healthy Banana Bread – a lighter option with the same homemade comfort
- Oatmeal Chocolate Chip Cookies – soft, hearty, and great for grab-and-go treats
Simple Make-Ahead Treats
- Energy Balls – easy to prep ahead and ideal for quick snacks during the week
- Vanilla Pudding – smooth, simple, and made for those moments when you want an easy homemade sweet
Recipe Recap
This Fruit Roll Ups Recipe is an easy homemade fruit leather made with blended fruit, optional sweetener, and low, slow drying. The result is soft, chewy, naturally sweet, and perfect for snack prep, lunchboxes, or a fun homemade treat that uses real fruit in a simple, practical way.
Final Thoughts
Homemade fruit roll ups are one of those recipes that quietly change the way you think about simple snacks. What starts as a few pieces of fruit turns into something soft, chewy, and surprisingly satisfying — all with minimal effort and no unnecessary ingredients.
There’s something especially rewarding about seeing that transformation happen. The texture, the flavor, the simplicity of the process — it all comes together in a way that feels both practical and a little bit special at the same time.
Once you get the texture right, this becomes one of those small, reliable recipes you return to without thinking twice. It fits into everyday life easily, works with whatever fruit you have on hand, and always delivers something that feels better than store-bought.
And that’s what makes it worth keeping — a simple homemade snack that feels good to make, easy to enjoy, and just familiar enough to come back to again and again.

Fruit Roll Ups Recipe (Homemade Fruit Leather)
Soft, chewy homemade fruit roll ups made with real fruit and gently dried into flexible fruit leather. This easy fruit roll ups recipe uses simple ingredients and creates a naturally sweet, kid-friendly snack perfect for lunchboxes, snack prep, or healthy homemade treats.
Ingredients
- 4 cups fresh fruit (or thawed frozen fruit, drained)
- 1–3 tablespoons honey or granulated sugar (optional)
- 1–2 teaspoons lemon juice (optional)
Instructions
- Preheat the oven to 170–175°F (75–80°C). If your oven runs hot, use the lowest setting available.
- Prepare the fruit by washing, peeling, hulling, or pitting as needed. If using frozen fruit, thaw completely and drain excess liquid.
- Add the fruit to a blender or food processor and blend until completely smooth, with no visible chunks.
- Taste the puree and adjust if needed. Add a small amount of honey or lemon juice to balance flavor.
- Line a baking sheet with parchment paper or a silicone baking mat.
- Pour the puree onto the prepared tray and spread into an even layer about 1/8 inch (3 mm) thick.
- Dry in the oven for 3 to 6 hours, or until the surface is matte, the center is no longer sticky, and the sheet peels away cleanly while remaining flexible.
- Remove from the oven and let cool completely on the tray.
- Cut into strips using a knife or pizza cutter, then roll each strip into spirals for storage.
Notes
- The puree should taste vibrant before drying. Flavor becomes more concentrated as it dries.
- Spread the puree evenly to prevent uneven drying (crispy edges and sticky center).
- Drying time varies depending on fruit type, thickness, and oven behavior.
- The center of the fruit leather determines doneness, not the edges.
- Slightly overripe fruit produces the best flavor and texture.
- Store strips with parchment to prevent sticking.
Nutrition Information:
Yield: 8 strips Serving Size: 1 stripAmount Per Serving: Calories: 70Carbohydrates: 18gFiber: 2gSugar: 15gProtein: 1g