Sopapilla Cheesecake (Creamy, Golden & Crisp)
🎁 FREE E-BOOK: 12 Sweet Favorites — reader-loved desserts in one beautiful recipe book.
This Sopapilla Cheesecake layers a smooth vanilla cheesecake filling between two golden sheets of crescent dough, then finishes the top with crisp cinnamon sugar and a light thread of honey. Each chilled bar gives you flaky pastry, cool creamy filling, and warm cinnamon in one clean, generous bite.
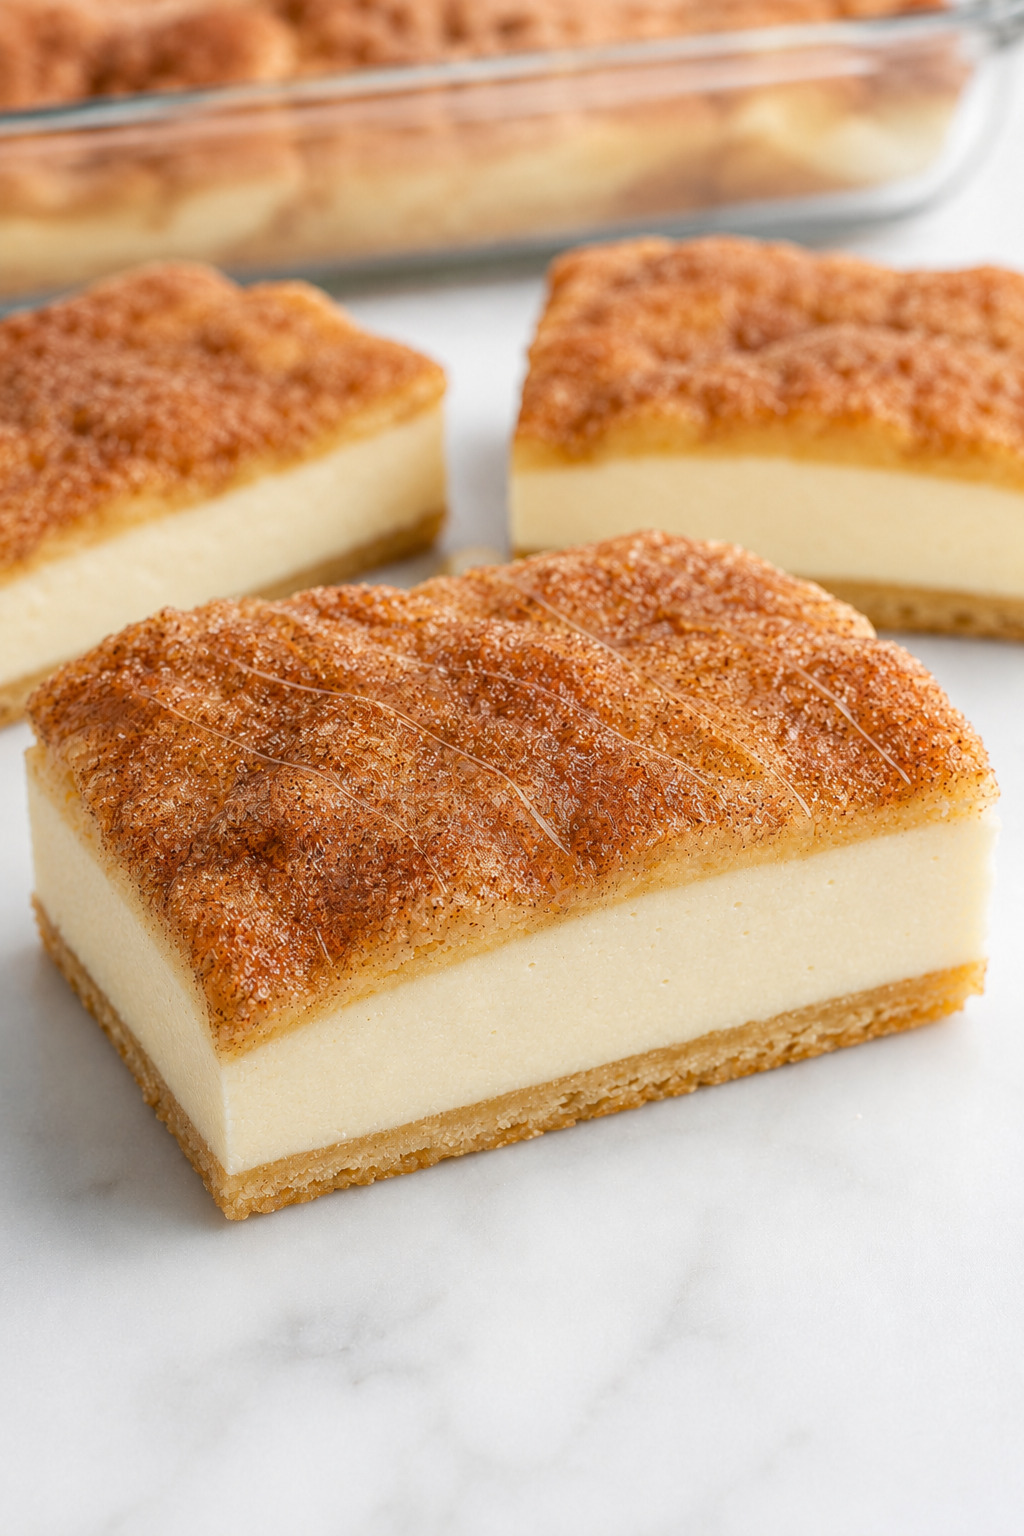
It has the easy, familiar comfort of a shortcut dessert—the kind you can carry to a potluck in its baking dish—but the finished layers still feel special enough for a holiday table. The cinnamon-sugar aroma arrives first, followed by tangy cream cheese, vanilla, butter, and just enough honey to connect the whole dessert.
This is a recipe worth saving because it solves the part that often disappoints: a top that looks done while the bottom stays pale and doughy. A short par-bake, a clear glass dish, controlled butter, and a full chill give you a more reliable bottom crust, a cleaner cheesecake layer, and a topping that is not soaked before storage.
Quick Sopapilla Cheesecake Recipe Overview
This snapshot tells you exactly what the recipe makes, how long it takes, and when it is ready to serve. Check it before beginning so the required cooling and chilling time fits your schedule.
| Detail | What to know |
|---|---|
| Flavor | Vanilla cheesecake, cinnamon sugar, butter, and a restrained honey finish |
| Texture | Flaky golden pastry, creamy clean-cut filling, and a lightly crisp top |
| Difficulty | Easy, with a few precise dough-handling and doneness cues |
| Pan | Clear 9 × 13-inch, approximately 3-quart glass baking dish |
| Yield | 16 bars |
| Prep time | 25 minutes |
| Total oven time | 37–44 minutes |
| Cooling and chilling | 1 hour cooling plus 3 hours chilling |
| Total time | About 5 hours 5 minutes–5 hours 15 minutes |
| Best served | Fully chilled for cutting, then rested 15–20 minutes before serving |
This is the easy baked bar dessert commonly known as Sopapilla Cheesecake: refrigerated crescent dough surrounds an egg-set cream cheese filling, and cinnamon sugar and honey supply the sopapilla-inspired flavor. It is not a traditional hollow fried sopapilla, scratch pastry, a tall springform cheesecake, or a warm flowing dessert designed for immediate slicing.
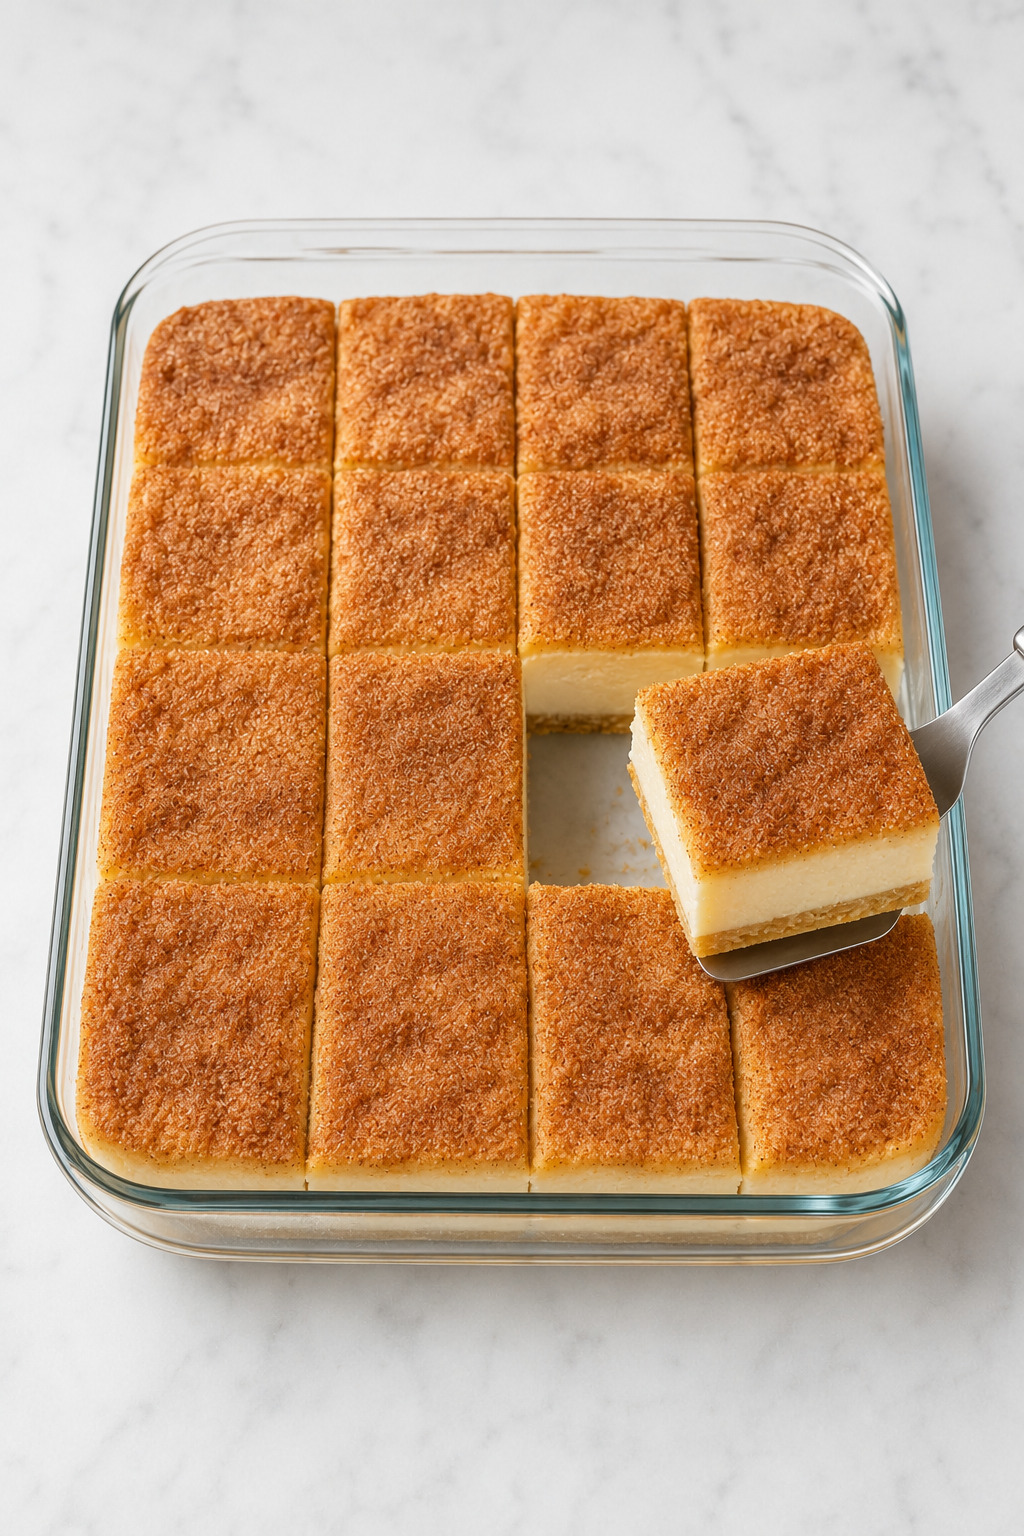
What Is Sopapilla Cheesecake?
Sopapilla Cheesecake is a popular American baked dessert made in a 9 × 13-inch pan with crescent dough, sweetened cream cheese, cinnamon sugar, and sometimes honey. Although the familiar name says “cheesecake,” the physical format is a layered dessert bar rather than a round cheesecake.
The cinnamon-sugar profile may feel familiar if you enjoy a classic Churros Recipe, but the cool cream cheese center and crescent-dough layers create their own texture and serving style. The market sometimes uses “Churro Cheesecake” for related crescent-dough bars, but the names are not automatically interchangeable because formulas and serving promises vary. Here, the sopapilla connection is carried by the golden pastry, cinnamon sugar, and honey rather than by a fried hollow dough.
Why This Recipe Works
The recipe stays easy because it uses refrigerated dough, but every technical decision protects one part of the final bar. Together, these controls balance the bottom pastry, cheesecake filling, cinnamon-sugar top, and serving texture.
- The bottom crust is par-baked. Seven to nine minutes of initial heat sets the dough before the wet filling reaches it.
- The clear dish gives you direct evidence. You can verify that the bottom is light golden instead of judging the bake only from the top.
- One egg creates a light cheesecake set. The filling stays creamy while holding a clean chilled slice.
- The sweetness is controlled in separate layers. The filling uses 2/3 cup sugar, the topping uses 1/4 cup, and the honey is added only to served portions.
- The butter is brushed, not poured. Three tablespoons create full cinnamon-sugar adhesion without the greasy edge pools caused by a much heavier coating.
- Cooling and chilling finish the structure. The filling becomes sliceable, and the three layers settle into a distinct bar.
Why You’ll Love This Sopapilla Cheesecake Recipe
This dessert earns its place when you want something generous and memorable without making pastry or managing a springform cheesecake. Its practical advantages make it especially useful for gatherings and make-ahead plans.
- It uses a short list of familiar grocery-store ingredients.
- It makes 16 rich but practical party portions in one pan.
- The cheesecake filling mixes in minutes and needs no water bath.
- The bars can be baked and chilled the day before serving.
- A 4 × 4 cut produces neat portions that are easy to lift and arrange.
- Honey stays separate, so every person can choose a light drizzle or none at all.
- The cinnamon-sugar top gives the pan a festive finish without frosting or decoration work.
Ingredients and Why They Matter
The ingredient list is compact, but product format, temperature, and divided sugar amounts all affect the result. Use the notes below to protect the smooth filling, complete dough layers, and controlled topping.
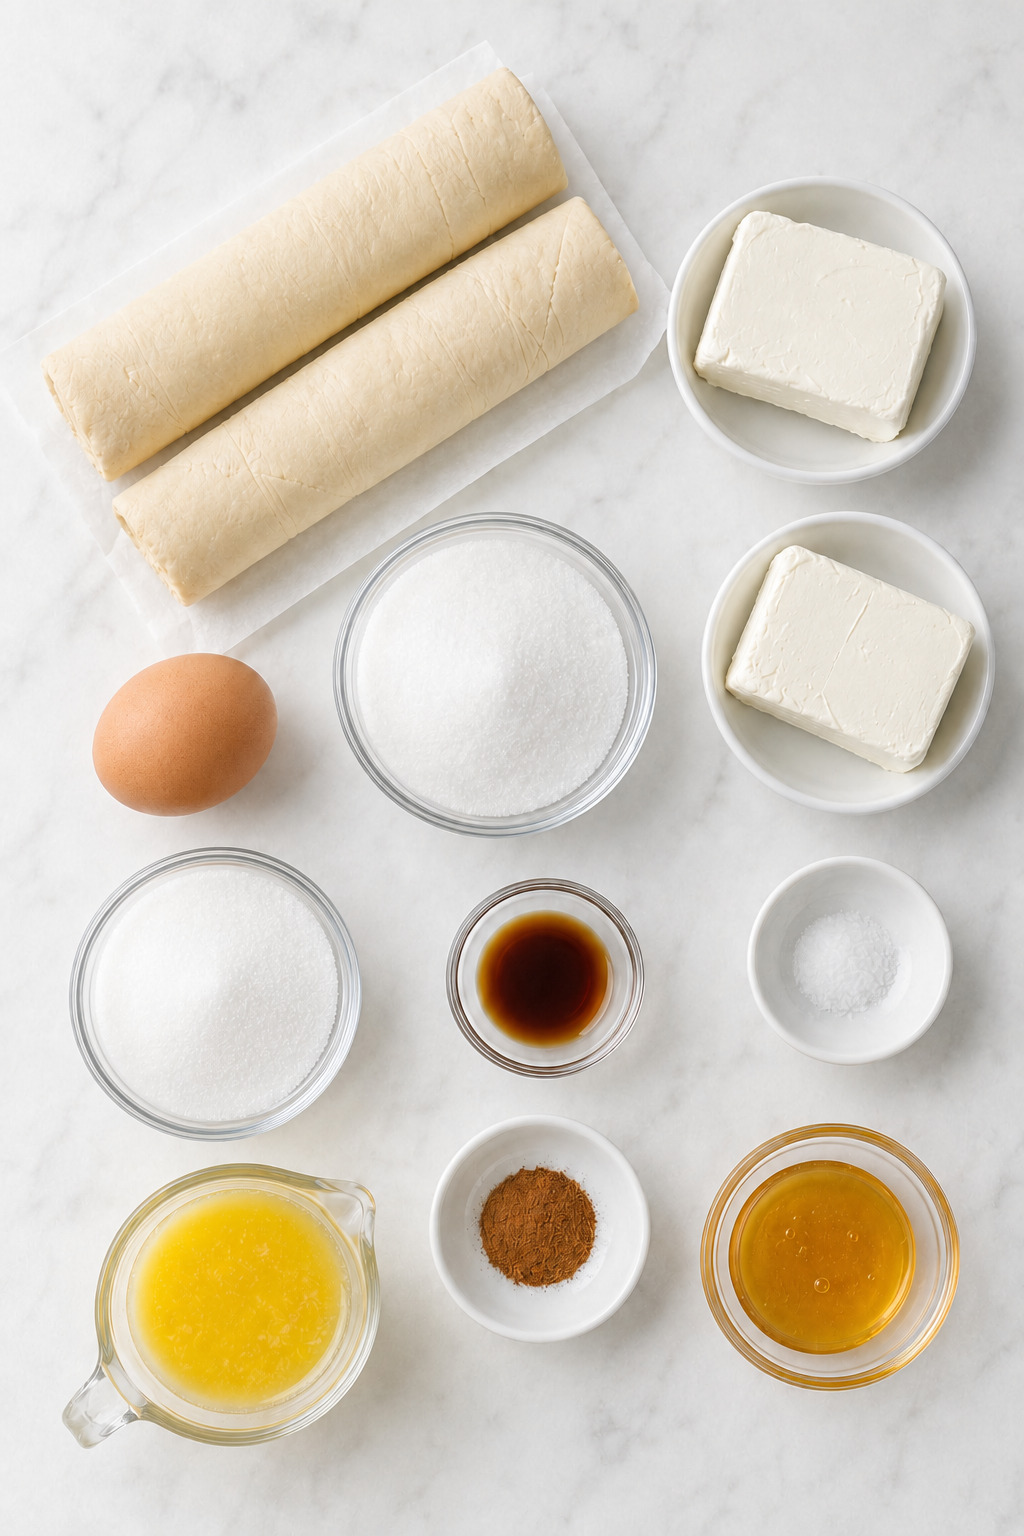
Crescent-Dough Layers
- Nonstick cooking spray, as needed
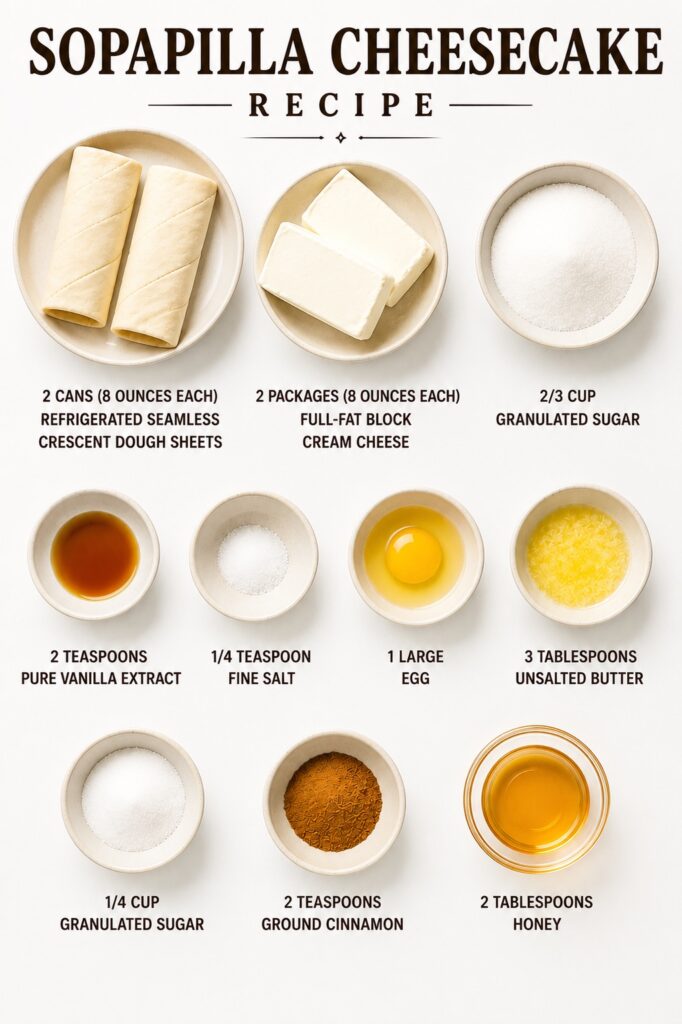
- 2 cans (8 ounces / 226 g each) refrigerated seamless crescent dough sheets, kept chilled
Vanilla Cheesecake Filling
- 2 packages (8 ounces / 226 g each; 16 ounces / 454 g total) full-fat block cream cheese, softened to 68–72°F (20–22°C)
- 2/3 cup (133 g) granulated sugar
- 2 teaspoons (10 ml) pure vanilla extract
- 1/4 teaspoon (1.5 g) fine salt
- 1 large egg (approximately 50 g out of shell), at room temperature
Cinnamon-Sugar Top
- 3 tablespoons (43 g) unsalted butter, melted and fluid but not hot
- 1/4 cup (50 g) granulated sugar
- 2 teaspoons (approximately 5 g) ground cinnamon
Honey Finish
- 2 tablespoons (42 g) honey, for the portions being served
Refrigerated crescent dough sheets
Use two 8-ounce cans of seamless crescent dough sheets, one for the bottom and one for the top. Keep each can refrigerated until its shaping step; cold dough is easier to unroll, stretch, and transfer without tearing. Original perforated crescent-roll dough can work, but every perforation must be pinched and smoothed completely closed.
Full-fat block cream cheese
Use two 8-ounce blocks and soften them to 68–72°F (20–22°C). At that temperature, the cream cheese yields easily to pressure and mixes smooth without becoming oily. Tub-style spread and reduced-fat cream cheese contain different moisture and stabilizer systems and are not direct substitutions in this egg-set filling.
Granulated sugar
The recipe uses sugar in two separate places: 2/3 cup (133 g) in the filling and 1/4 cup (50 g) on top. Keep those amounts divided. The filling quantity sweetens the cream cheese without covering its tang, while the smaller topping quantity creates a complete cinnamon crust without a heavy sugar cap.
Egg, vanilla, and fine salt
One room-temperature egg changes the filling from sweetened cream cheese into a light cheesecake layer that sets in the oven. Vanilla gives the center its main aromatic note, and 1/4 teaspoon fine salt keeps the sweetness defined. Add the egg last and mix only until its streaks disappear.
Unsalted butter and cinnamon
Three tablespoons (43 g) of melted butter are enough when they are brushed over the complete surface rather than poured. Two teaspoons of cinnamon mixed thoroughly into 1/4 cup sugar give the top an even warm flavor without concentrated spice patches.
Honey
Honey is the finishing accent, not a soaking syrup. Reserve the full 2 tablespoons and drizzle only the bars being served, using about 3/8 teaspoon per bar if all 16 portions are served. Keeping it off the stored pan protects the topping from becoming sticky and soft too quickly.
Kitchen Tools Needed
The right tools make the dough easier to shape, help the filling stay smooth, and allow you to verify that the bottom layer is fully baked. Most are basic baking tools, but the clear glass dish is especially important for this recipe.
- Measuring and mixing: Digital kitchen scale; hand or stand mixer; large mixing bowl and flexible spatula; small bowl and whisk.
- Baking setup: Clear 9 × 13-inch glass baking dish; conventional oven with centered rack.
- Dough shaping: Two sheets of parchment paper; rolling pin; fork.
- Topping: Pastry brush.
- Cooling and portioning: Wire cooling rack; thin sharp knife; small offset spatula.
Before You Begin
A few setup decisions prevent most dough, filling, and timing problems. Prepare the temperature-sensitive ingredients and tools before opening the first can of dough.
- Use the glass baking dish. Choose a clear 9 × 13-inch, approximately 3-quart glass baking dish. Metal, ceramic, and disposable foil do not heat or display bottom color in the same way.
- Preheat completely. Set a conventional oven to 350°F (175°C) with the rack centered.
- Soften the cream cheese, not the dough. Bring the cream cheese and egg to room temperature while keeping both dough cans cold.
- Prepare parchment for the top. Two sheets and a rolling pin allow you to shape the second dough layer away from the soft filling.
- Keep the sugars separate. Measure 133 g for the filling and 50 g for the top before mixing.
- Plan the chill. Clean bars require 1 hour of cooling and 3 hours in the refrigerator before cutting.
The dish is sprayed but not lined. A parchment sling would make lifting easier, but it would block the through-glass bottom-color check that protects this recipe from a pale or doughy base.
What to Expect
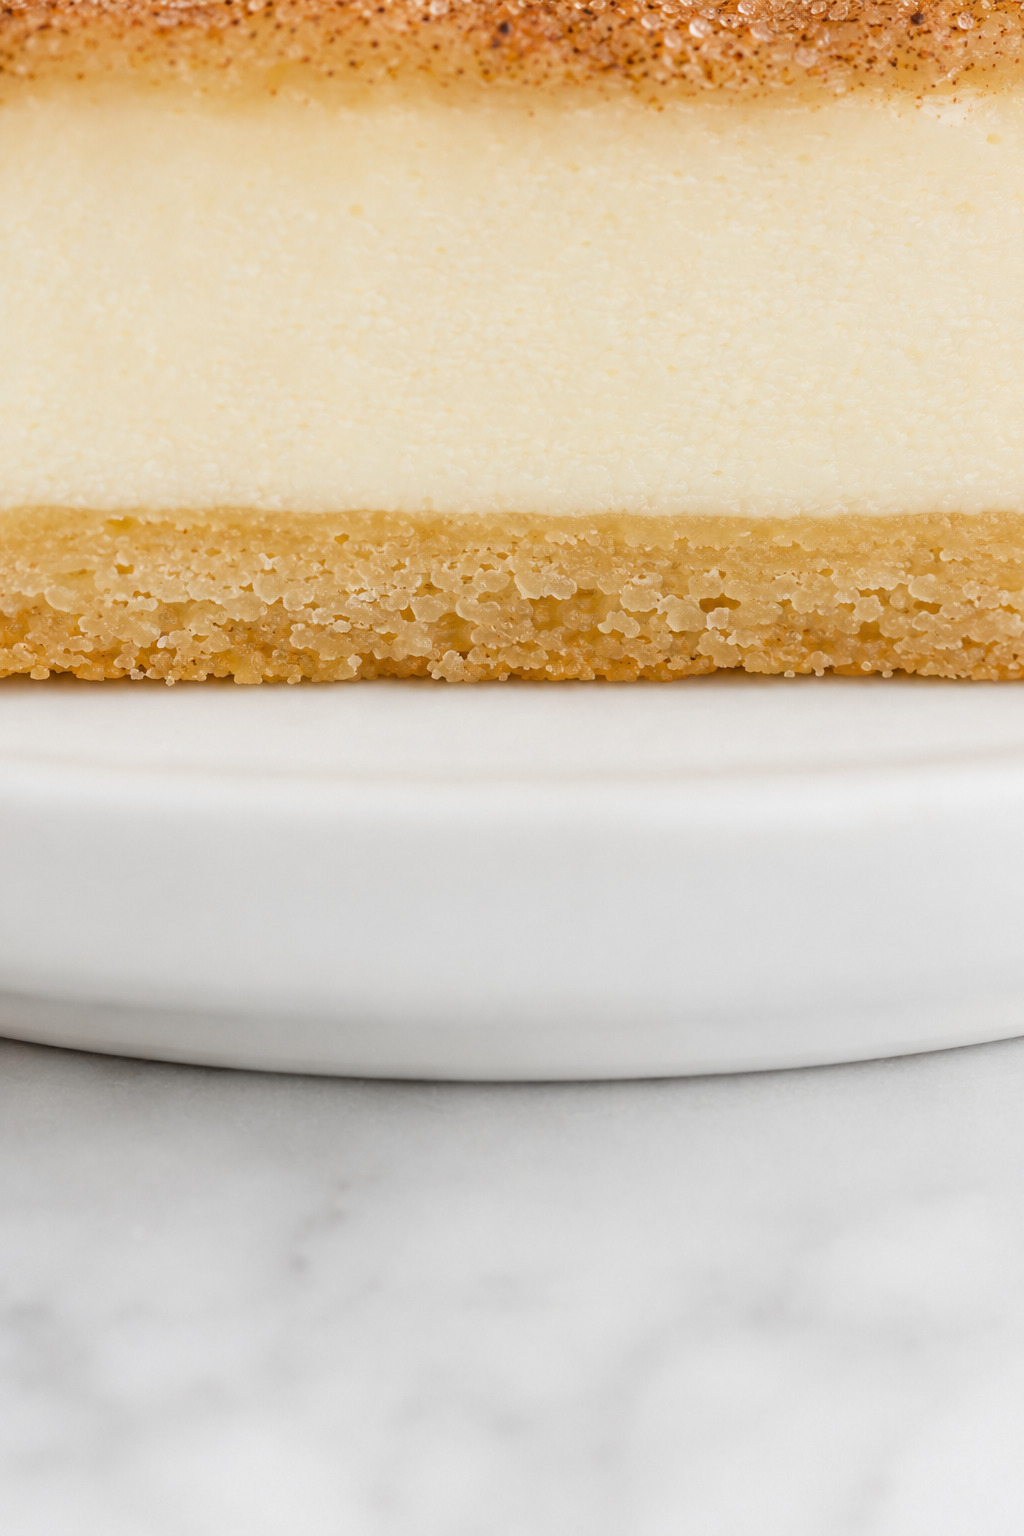
The finished pan should have a puffed deep-golden top, an attached cinnamon-sugar crust, a smooth cream cheese center, and a light-golden bottom visible through the dish. After chilling, the filling should hold a clean vertical cut without flowing or smearing heavily.
The pastry changes as the bars rest. It is crispest while hot, firmer after refrigeration, and softer after several days or after freezing and thawing. For the best balance, cut the bars fully chilled, then let only the portions being served stand for 15–20 minutes.
Small handmade variations at the edges are normal. A narrow top gap no wider than 1/4 inch at one isolated edge is acceptable; open seams, exposed filling across a large area, a liquid center ripple, or a pale gray bottom are not.
How to Make Sopapilla Cheesecake
The method moves through three controlled phases: set the bottom dough before it meets the filling, build smooth even layers, then bake and chill until the complete pan—not only the top—passes its readiness cues. Keep the dough cold and use the visual checkpoints as your stopping conditions.
Prepare and par-bake the bottom dough
The bottom layer needs a short head start because it sits beneath a moist cream cheese filling. Shape it without thick borders, dock it lightly, and stop the par-bake while it is set but still pale.
1. Prepare the oven and dish. Heat a conventional oven to 350°F (175°C) with a rack in the center. Lightly coat the clear 9 × 13-inch glass dish with nonstick cooking spray.
What you should see: a thin, even coating with no spray puddles.
2. Shape and dock the bottom. Open one cold dough can and unroll it directly into the dish. Gently stretch it over the complete base without building a high side crust. If the dough is perforated, pinch every seam from both directions and smooth it flat. Dock lightly with a fork about every 1 1/2 inches.
What you should see: one continuous layer of even thickness with no exposed glass, open seam, torn corner, or doubled perimeter.
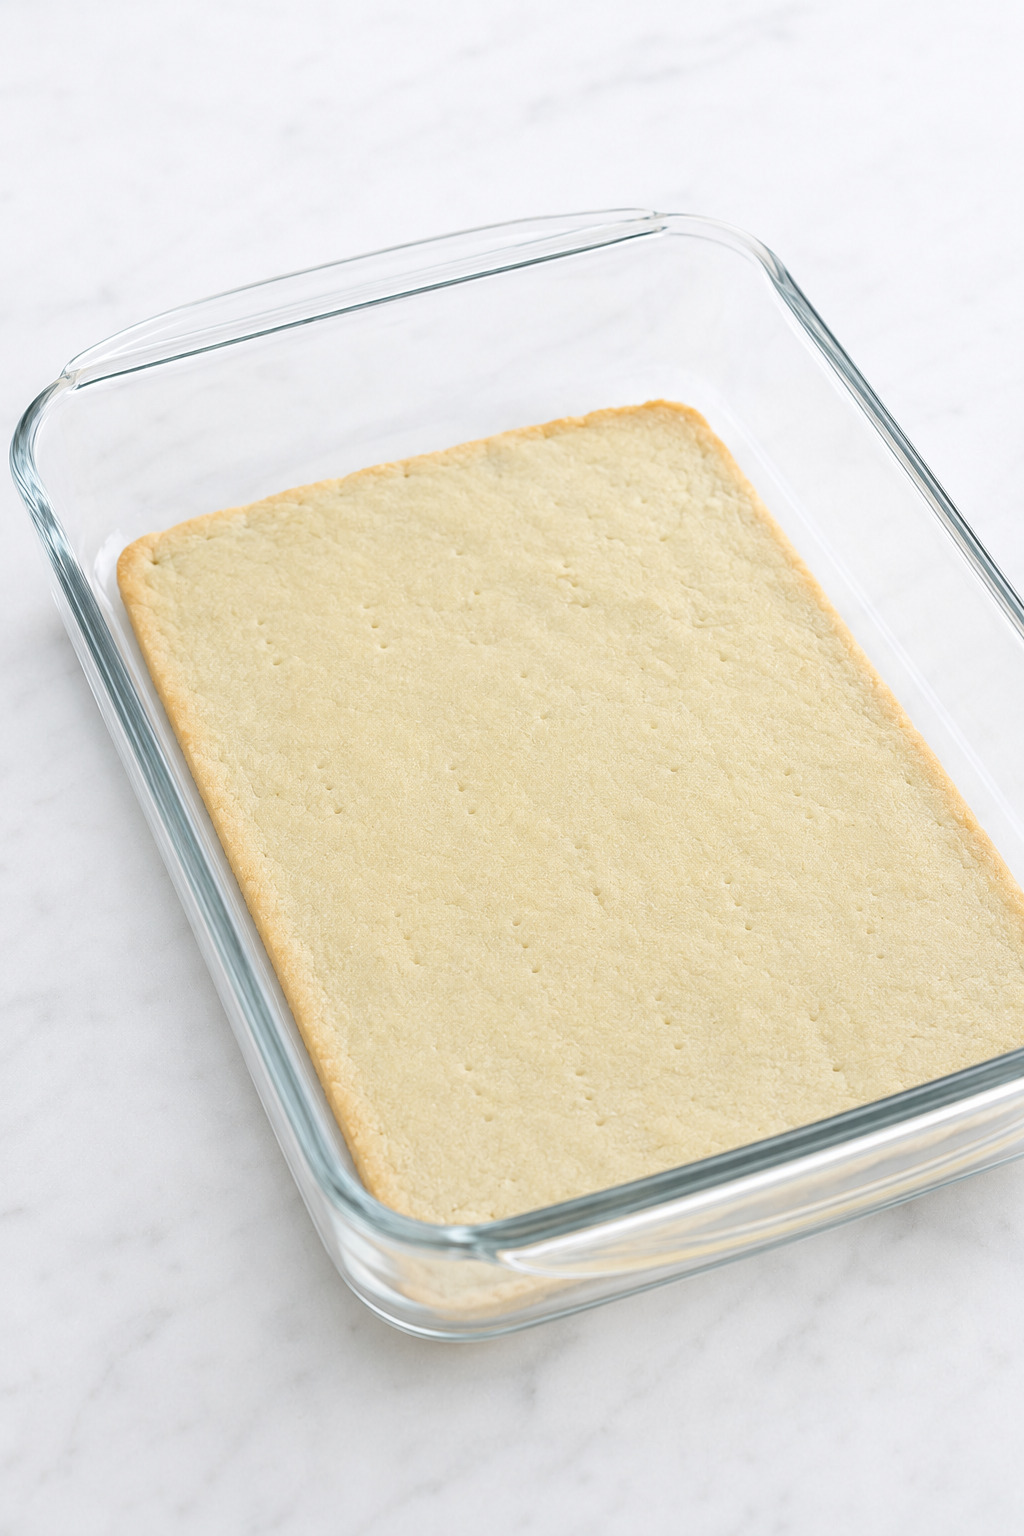
3. Par-bake. Bake for 7–9 minutes, until the wet shine disappears and the edge just begins to turn pale gold. Cool the dish on a wire rack for 10 minutes. If one large bubble remains, press it gently once with a flat spatula after the first 2–3 minutes.
What you should see: a matte, lightly set base with no raw glossy patch. It should remain pale enough to finish baking after the filling is added.
Mix the filling and build the layers
Smooth cream cheese before adding the other ingredients, and keep the mixer speed modest. The goal is a cohesive filling without cold lumps, egg streaks, or unnecessary air.
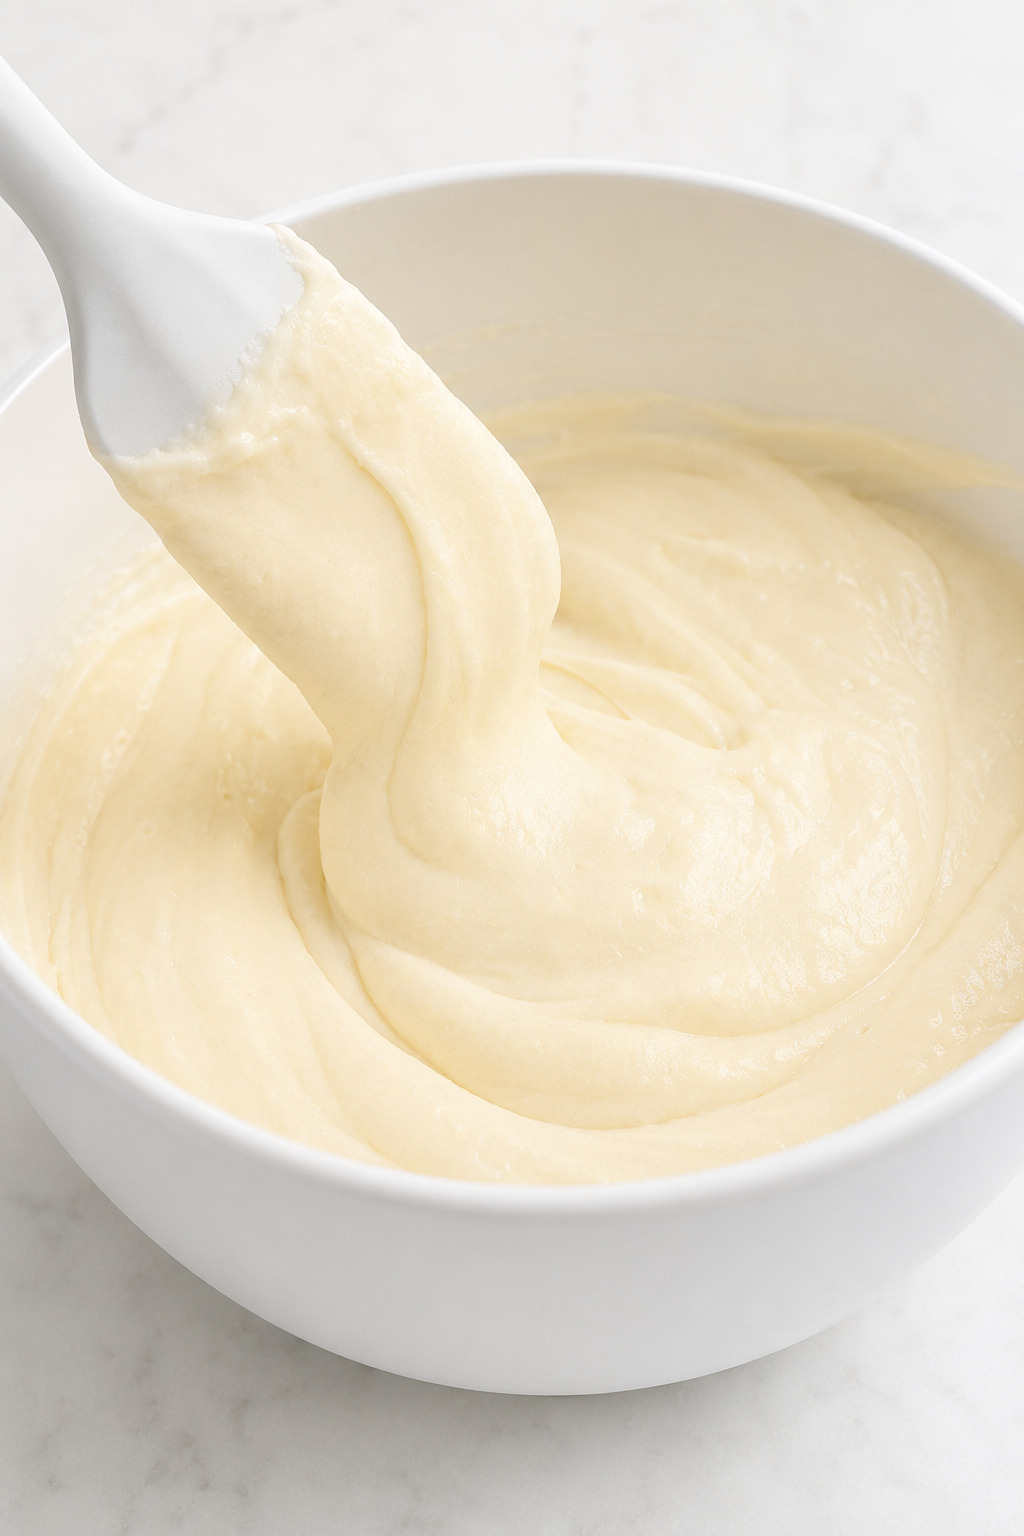
4. Mix the cheesecake filling. Beat the softened cream cheese on medium-low for 60–90 seconds, scraping the bowl, until completely smooth. Add the 133 g filling sugar, vanilla, and salt; mix for about 30 seconds and scrape again. Lightly beat the egg separately, add it last, and mix on low for 15–20 seconds. Finish with two or three folds by hand.
What you should see: thick, smooth, glossy filling that falls slowly from the spatula, with no cream cheese pellets, egg streaks, or whipped foam.
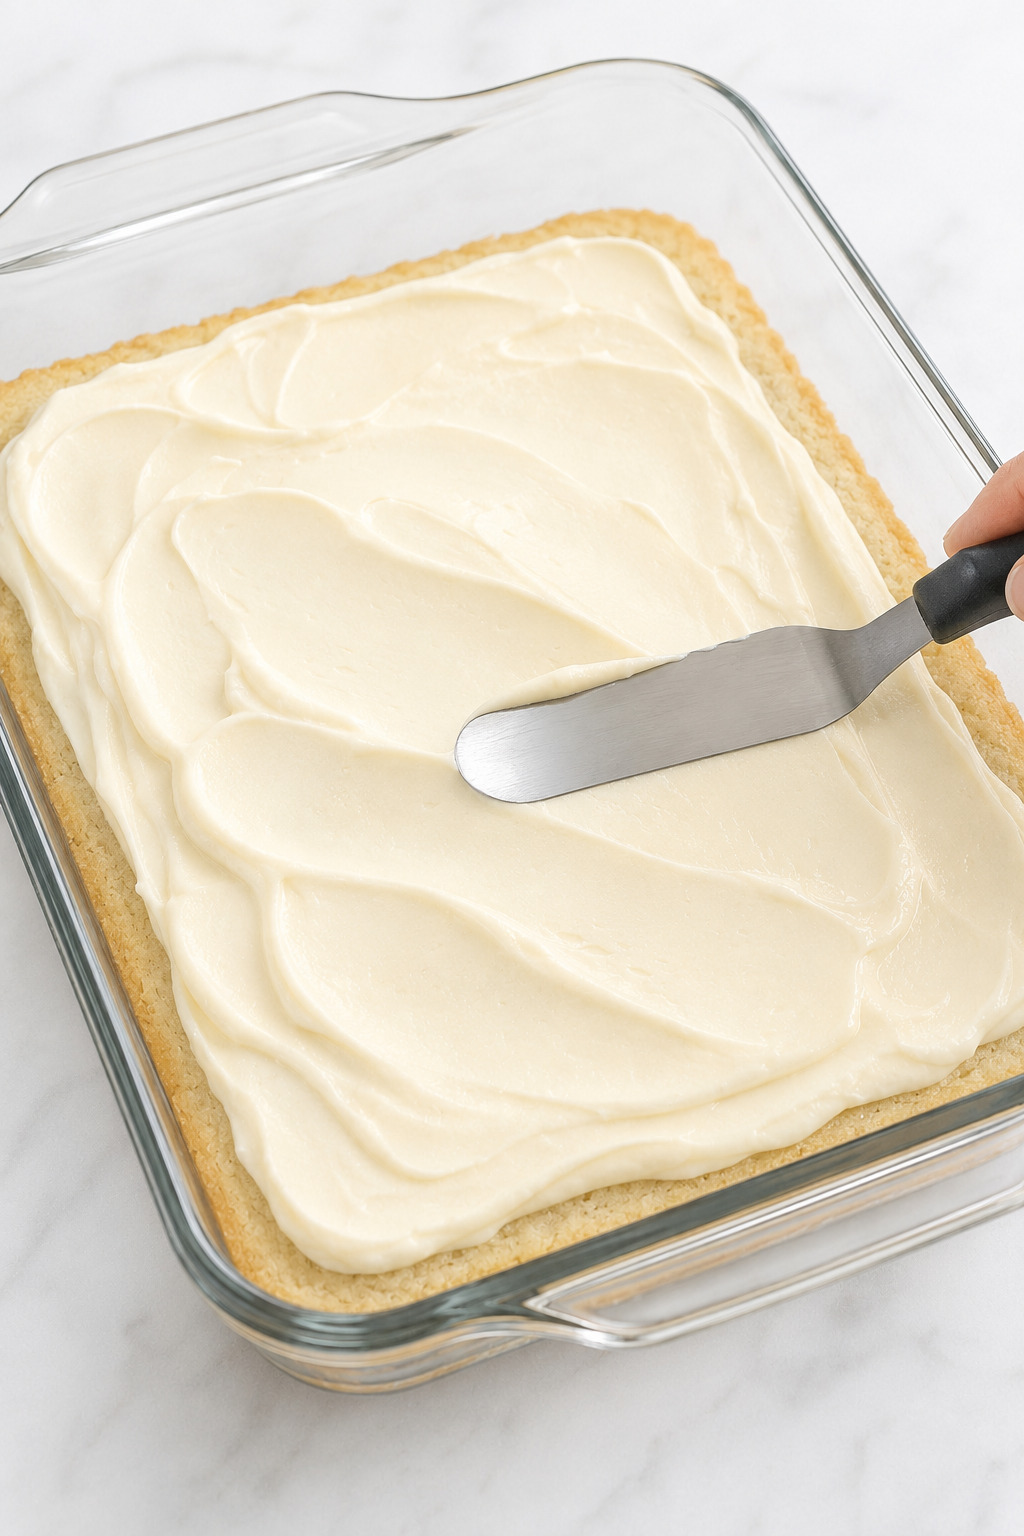
5. Add the filling. Spoon the filling over the warm—not hot—bottom crust in several mounds. Spread gently into an even layer, stopping about 1/8 inch from the glass perimeter.
What you should see: a level cream cheese layer with no exposed bottom dough and no thick filling ridge forced up the sides.
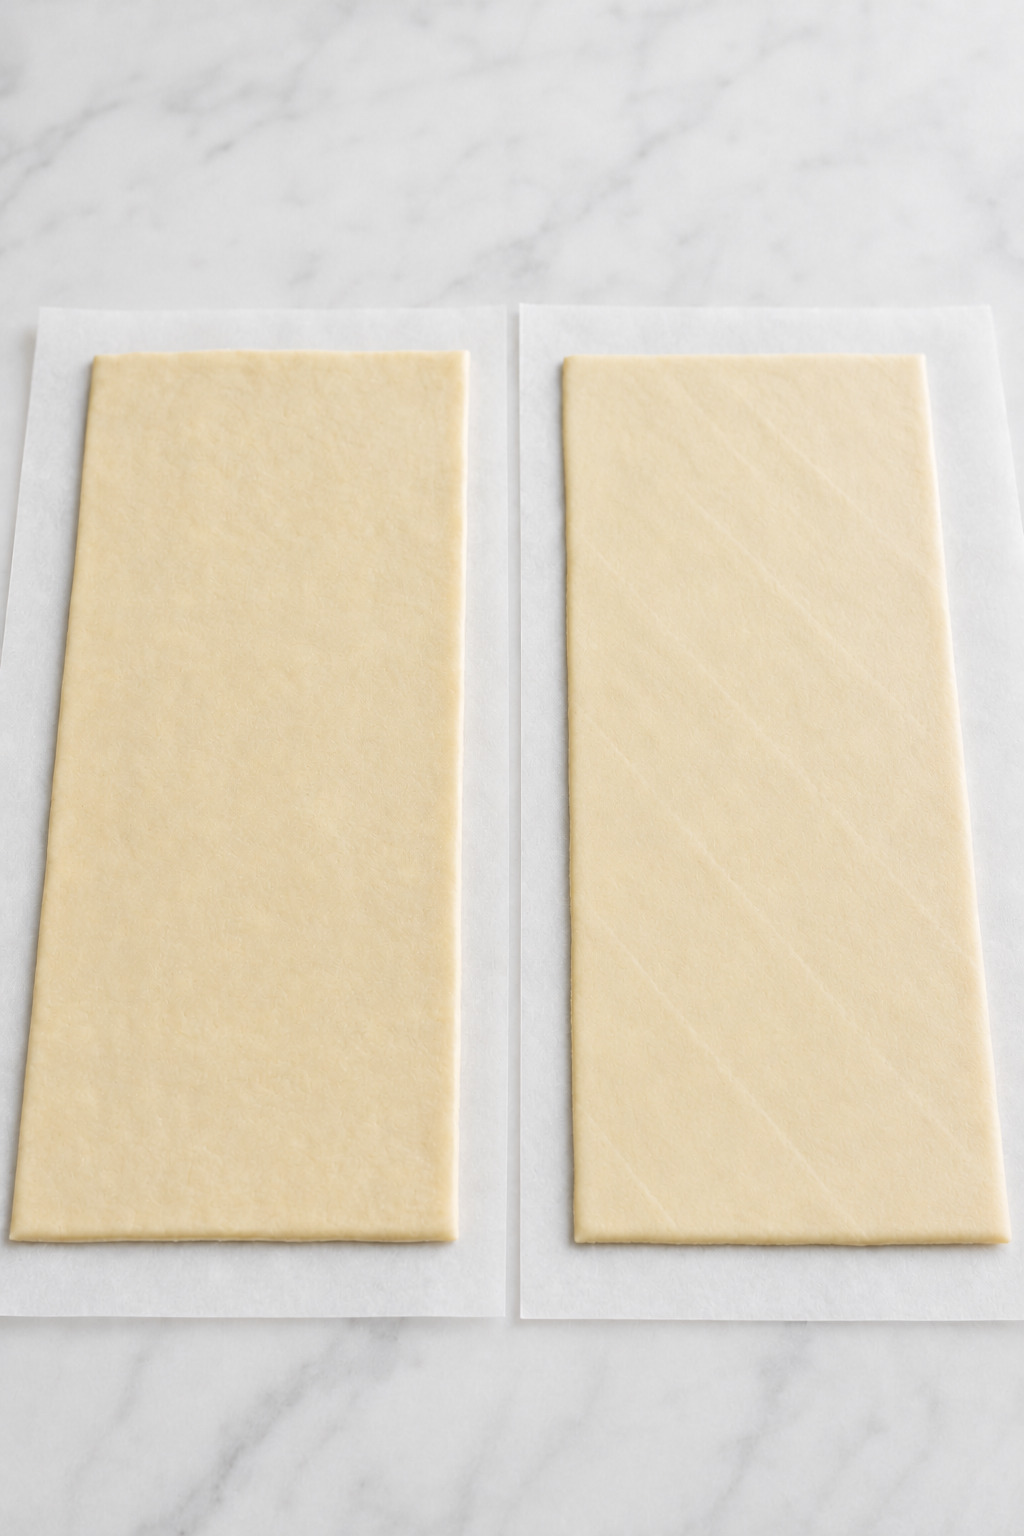
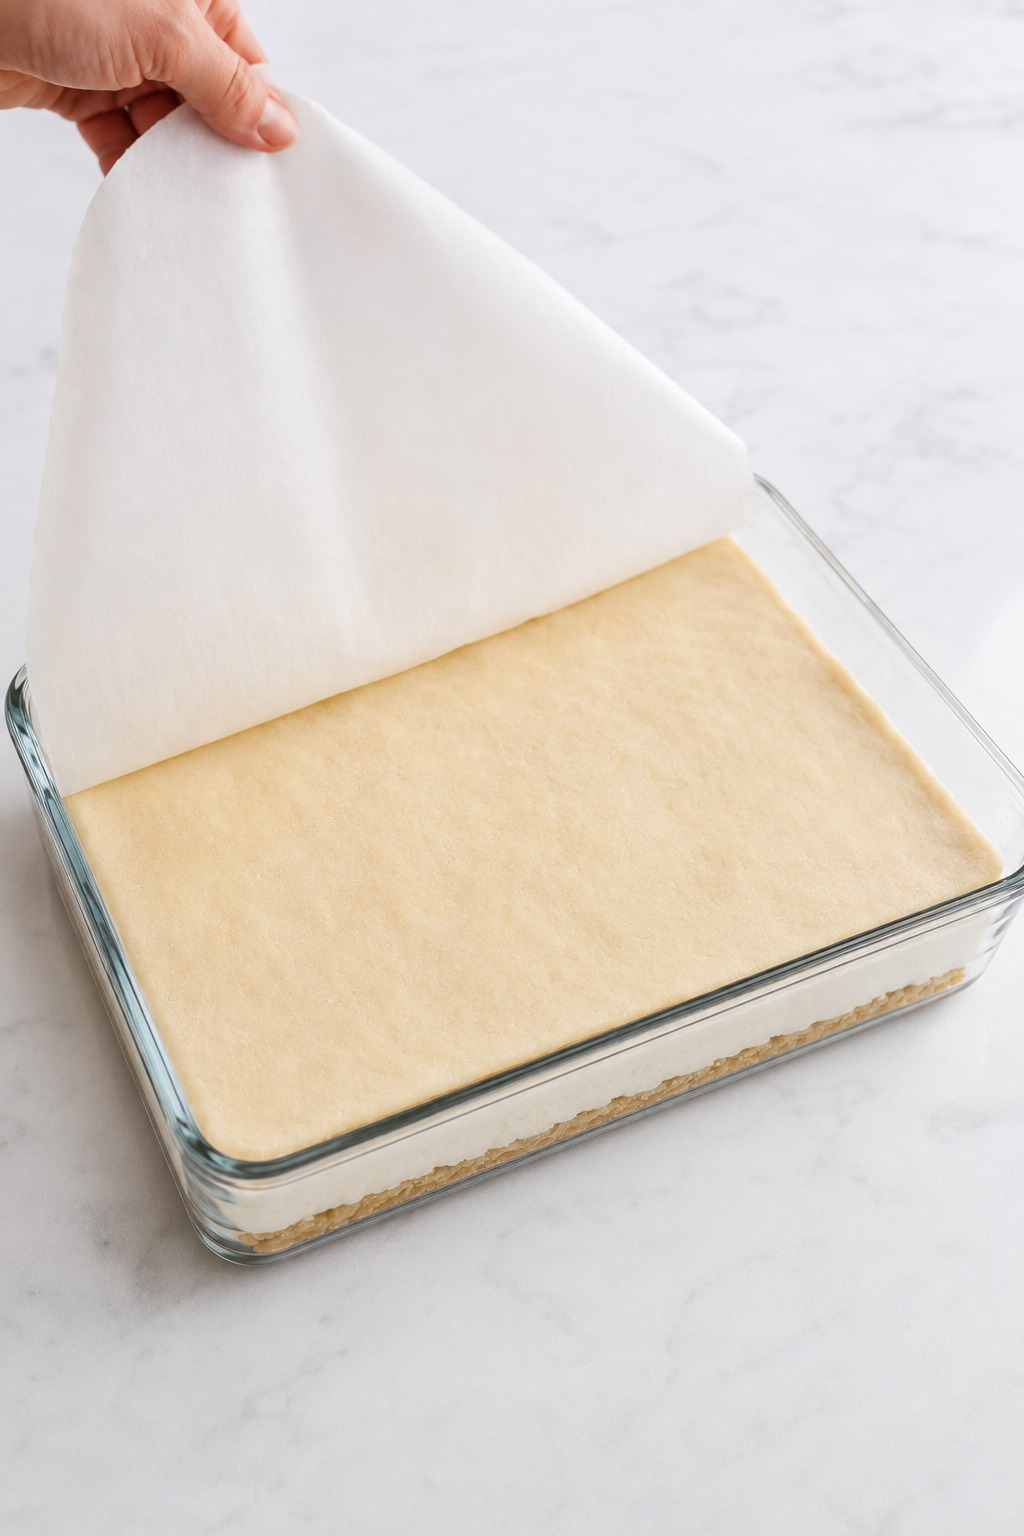
6. Shape and transfer the top. Unroll the second cold sheet onto parchment, cover it with a second sheet, and gently roll or press it to about 9 × 13 inches. Remove the upper parchment. If the dough feels soft or sticky, chill it for 5 minutes. Invert it over the filling, peel away the remaining parchment, and adjust only the edges.
What you should see: a flat, unbroken top with no major fold, tear, or exposed filling. Do not press the whole sheet into the filling.
Add the topping, bake, cool, and chill
The final phase controls both the crisp cinnamon-sugar surface and the sliceable center. Brush the butter thinly, bake until every layer is ready, then give the filling its full structural rest.
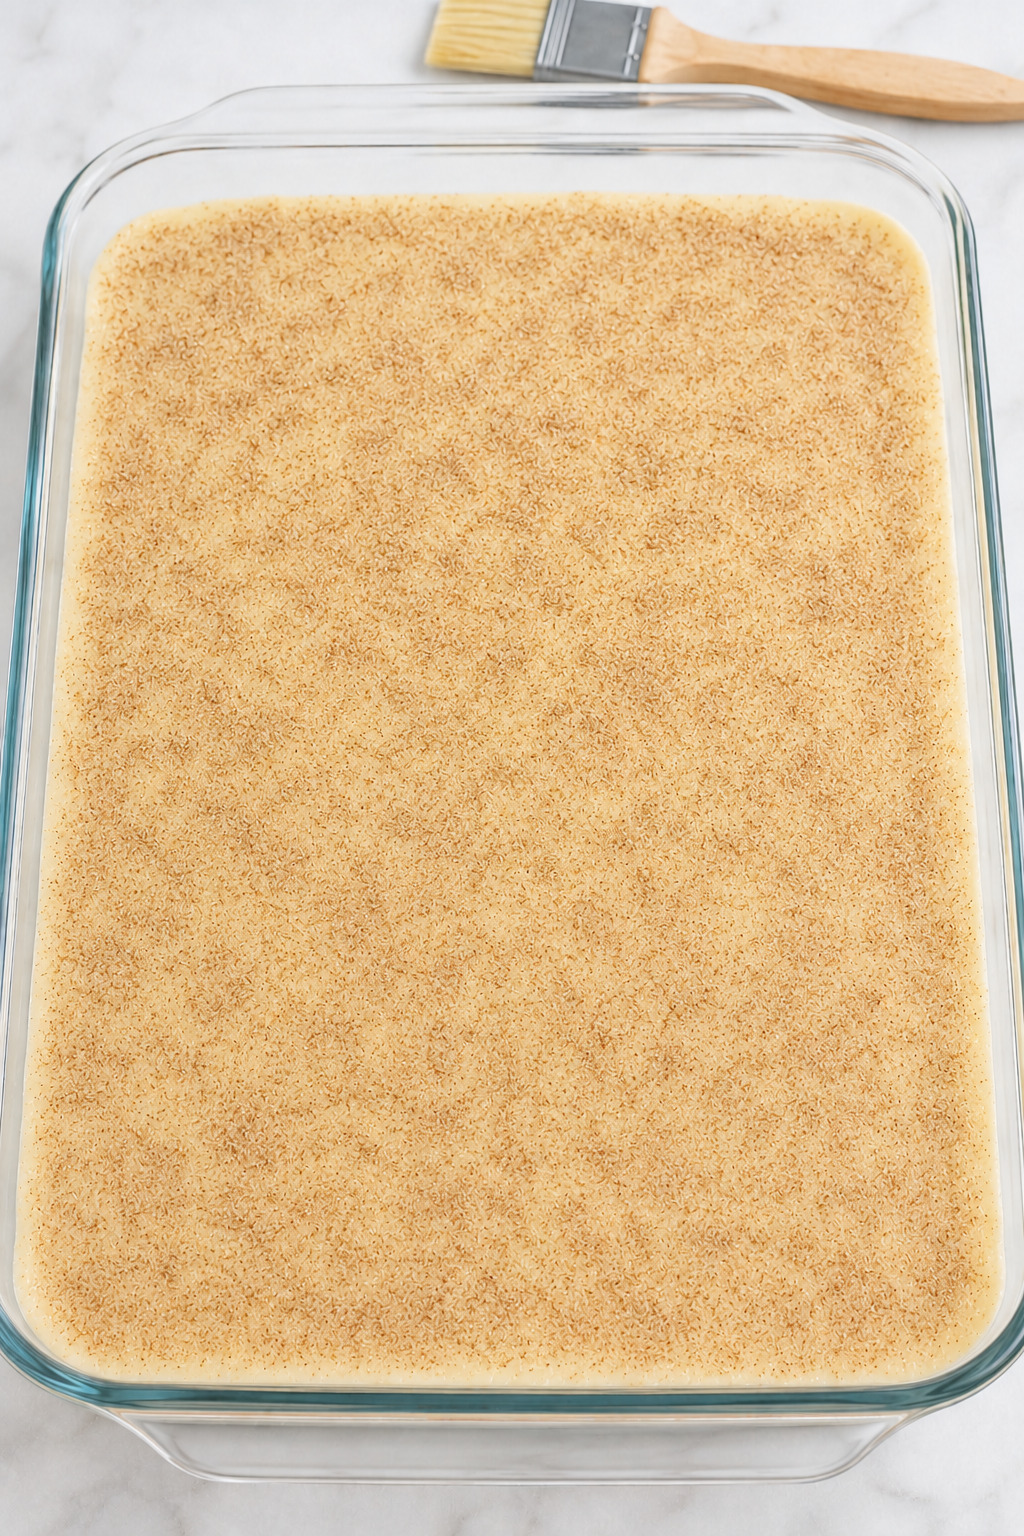
7. Apply the cinnamon-sugar top. Whisk the 50 g topping sugar with the cinnamon until no spice clumps remain. Brush all 43 g melted butter over the dough from the center outward. Sprinkle the cinnamon sugar in several light passes.
What you should see: a thin butter sheen and even cinnamon-sugar coverage over the complete surface, with no dry island or visible butter pool.
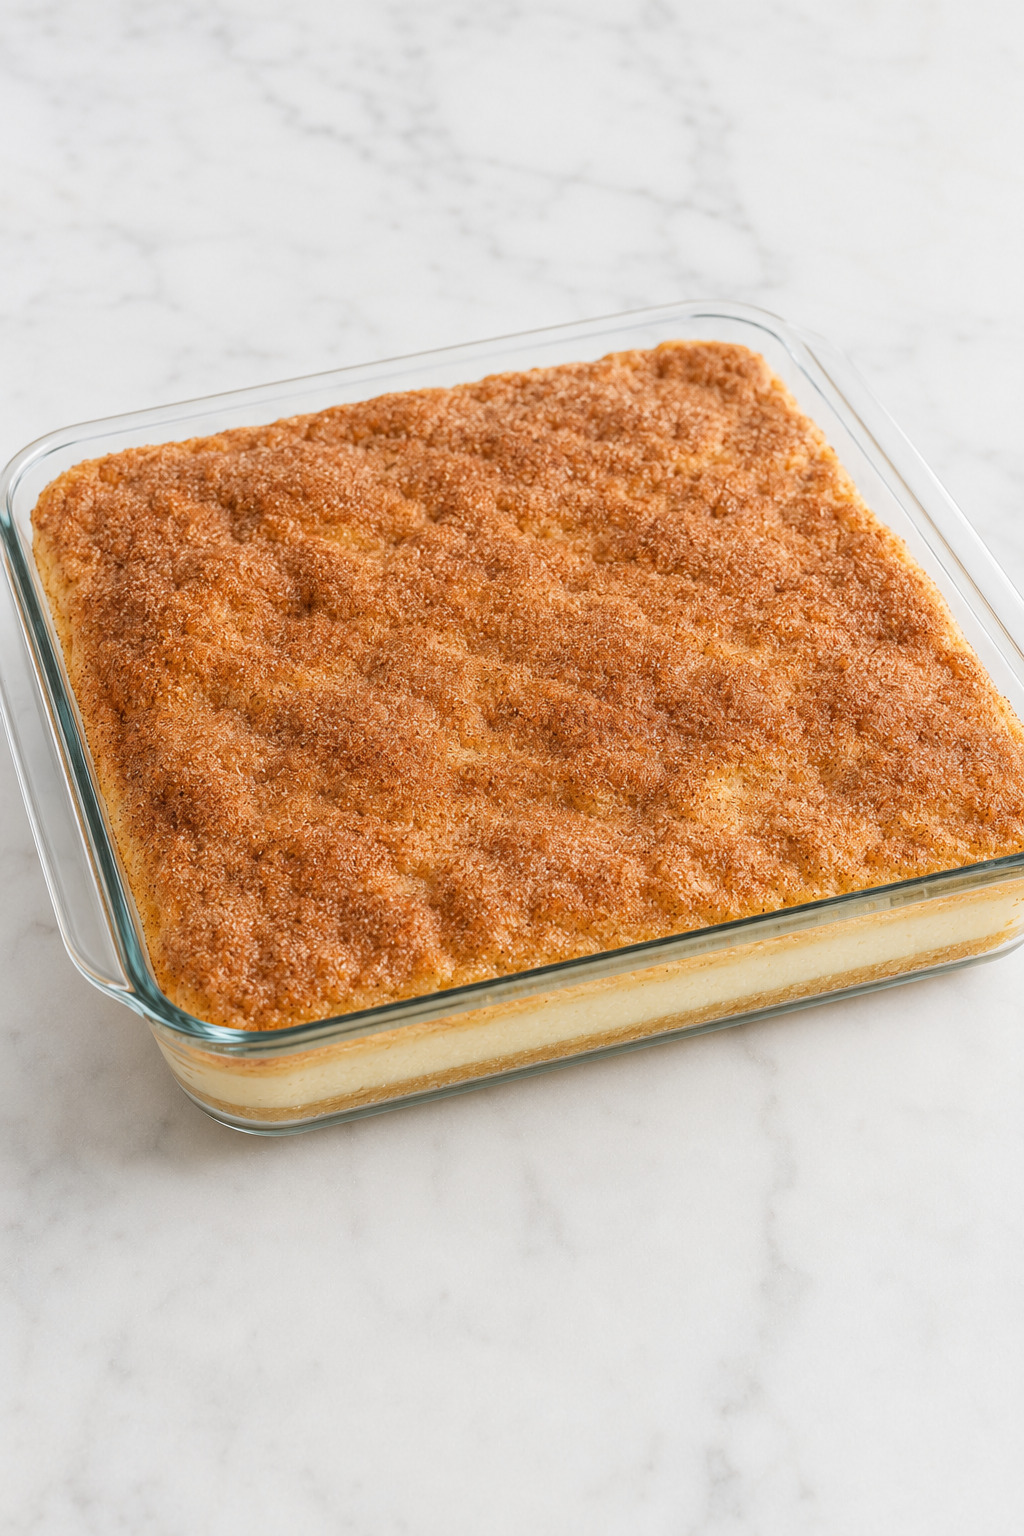
8. Bake to complete doneness. Bake for 30–35 minutes, beginning the first check at 28 minutes. The top must be deep golden and dry, the edge filling set, the center moving only slightly as one shallow unit, and the bottom light golden through the glass. If the top finishes first, tent loosely with foil and continue in 3–5-minute intervals.
What you should see: attached cinnamon sugar, puffed golden top dough, no liquid wave in the center, and no pale gray or translucent band along the bottom.
9. Cool and chill. Place the hot glass dish on a dry wire rack and cool for 1 hour. Refrigerate uncovered for the first hour, then cover without touching the surface and chill for at least 2 more hours.
What you should see: after cooling, the center no longer ripples and the top remains dry; after chilling, the filling holds a clean vertical cut.
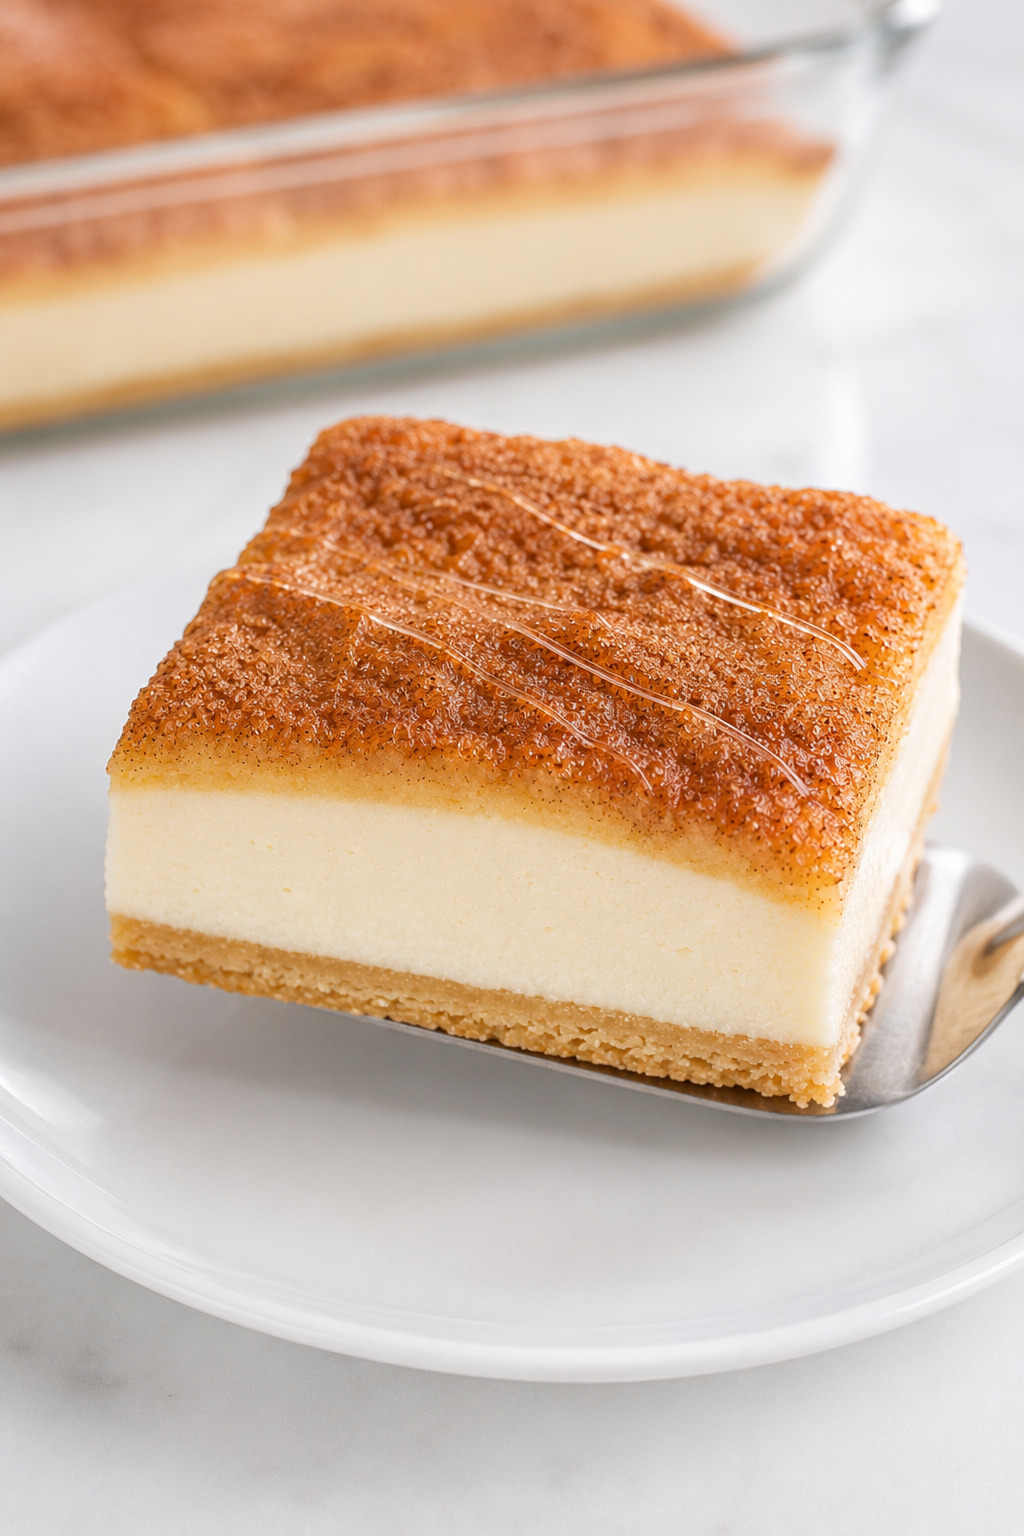
10. Cut and finish. Cut four equal rows in each direction, wiping the knife after every cut. Lift with a small offset spatula. Let the needed bars stand 15–20 minutes, then drizzle only those portions with honey.
What you should see: distinct pastry–cheesecake–pastry layers, creamy filling with no flow, and fine honey threads rather than a soaked surface.
How to Tell When Sopapilla Cheesecake Is Done
Top color alone is not enough because the upper dough can brown before the bottom and cheesecake center are ready. Check all four systems before removing the dish from the oven.
| Check | Ready | Not ready |
|---|---|---|
| Top dough | Puffed, dry, and evenly deep golden | Pale seams, wet butter patches, or soft-looking dough |
| Cinnamon sugar | Attached and lightly crisp | Wet, patchy, or sitting in butter pools |
| Cheesecake center | Moves slightly as one shallow unit | A liquid wave travels across the center |
| Bottom dough | Visible light-golden color through the glass | Pale gray, translucent, or raw-looking |
| Edges | Set without marked shrinkage | Loose filling or hard, dark, bread-like dough |
If the top is already golden but the bottom is still pale, tent the pan loosely with foil and continue baking. Check again after 3–5 minutes instead of accepting a doughy bottom to protect the top color.
Common Mistakes and How to Fix Them
Most problems trace back to temperature, dough geometry, butter distribution, incomplete baking, or shortened chilling. Use this diagnostic table to identify the likely cause and the safest realistic recovery.
| Problem | Why it happened | How to prevent it | Best recovery |
|---|---|---|---|
| Doughy bottom | Par-bake stopped while glossy, the oven ran cool, or doneness was judged only from the top | Wait for a matte set surface and verify final bottom color through glass | Before cooling, tent a golden top and bake in 3–5-minute intervals; a chilled raw-dough band has no reliable quality repair |
| Lumpy filling | Cream cheese was cold or the bowl was not scraped | Use 68–72°F cream cheese and smooth it before adding sugar and egg | Before assembly, mix briefly on low or press the filling through a fine-mesh sieve |
| Loose chilled filling | The egg was omitted, the center still rippled when removed, or the full chill was shortened | Use one large egg, bake to unit movement, and chill 3 hours | Chill longer only when the pan was correctly baked; chilling does not repair underbaked egg filling |
| Greasy top | Butter was poured, increased, or allowed to pool at the edges | Weigh 43 g and brush from the center outward | Blot a small surface pool immediately after baking; a saturated crust cannot be restored |
| Top dough tears or shrinks | The dough warmed or was stretched directly over the filling | Shape cold dough between parchment and chill 5 minutes if sticky | Patch a small pre-bake tear with a thin scrap without creating a thick overlap |
| Soggy stored topping | The pan was covered warm or honey was added before storage | Chill uncovered for the first hour and store without honey | Uncover briefly before serving; the top may dry slightly but will not return fully to fresh crispness |
Expert Tips for The Best Sopapilla Cheesecake
These are the small controls that make the recipe easier to repeat, especially when dough temperature, pan heat, and filling texture are changing at the same time.
- Judge the par-bake by surface change, not color alone. A matte, set surface is the key cue; waiting for broad browning at this stage can make the finished bottom hard.
- Spread the filling in mounds. Several small deposits require less dragging than one large mound and protect the delicate par-baked dough.
- Roll the top to size before lifting it. Stretching over soft filling creates tears, folds, and displaced cheesecake; parchment turns the transfer into one controlled movement.
- Brush butter in two directions. A center-to-edge pass followed by a light crosswise pass reveals missed dry patches without forcing butter into the perimeter.
- Use movement as a center cue. The filling may move slightly, but it should move together; a wave that crosses the center means it needs more oven time.
- Cut cold, serve less cold. Chilling gives the knife clean geometry, while 15–20 minutes at room temperature restores a creamier eating texture.
I’m always tempted to cut cheesecake bars before they are fully chilled, but this is one of those desserts where patience gives you the clean layers you actually want.
Recipe Timeline / Workback Plan
The longest requirement is not active work but the structural cooling and chilling window. Work backward from serving time so the bars are fully cold before cutting and the honey stays separate until the final minutes.
| Serving plan | When to begin | Final dependency |
|---|---|---|
| Same-day clean slices | At least 5 hours 15 minutes before serving | Chill completely before cutting; stand 15–20 minutes after cutting if desired |
| Evening party or potluck | About 5 hours 45 minutes before departure | Transport cold and covered; carry honey separately |
| Next-day service | Bake, cool, and chill the day before | Cover only after the dish and top are cold; cut near service |
| Warm secondary service | At least 30 minutes before serving | Expect softer filling and less precise slices |
| Freezer preparation | Up to 1 month ahead | Freeze fully chilled bars without honey; thaw overnight in the refrigerator |
Beautiful Ways to Serve Sopapilla Cheesecake
The clean cinnamon-speckled layers are already decorative, so serving should emphasize the bar rather than hide it. Choose one restrained finish and add it only when the portion reaches the plate.
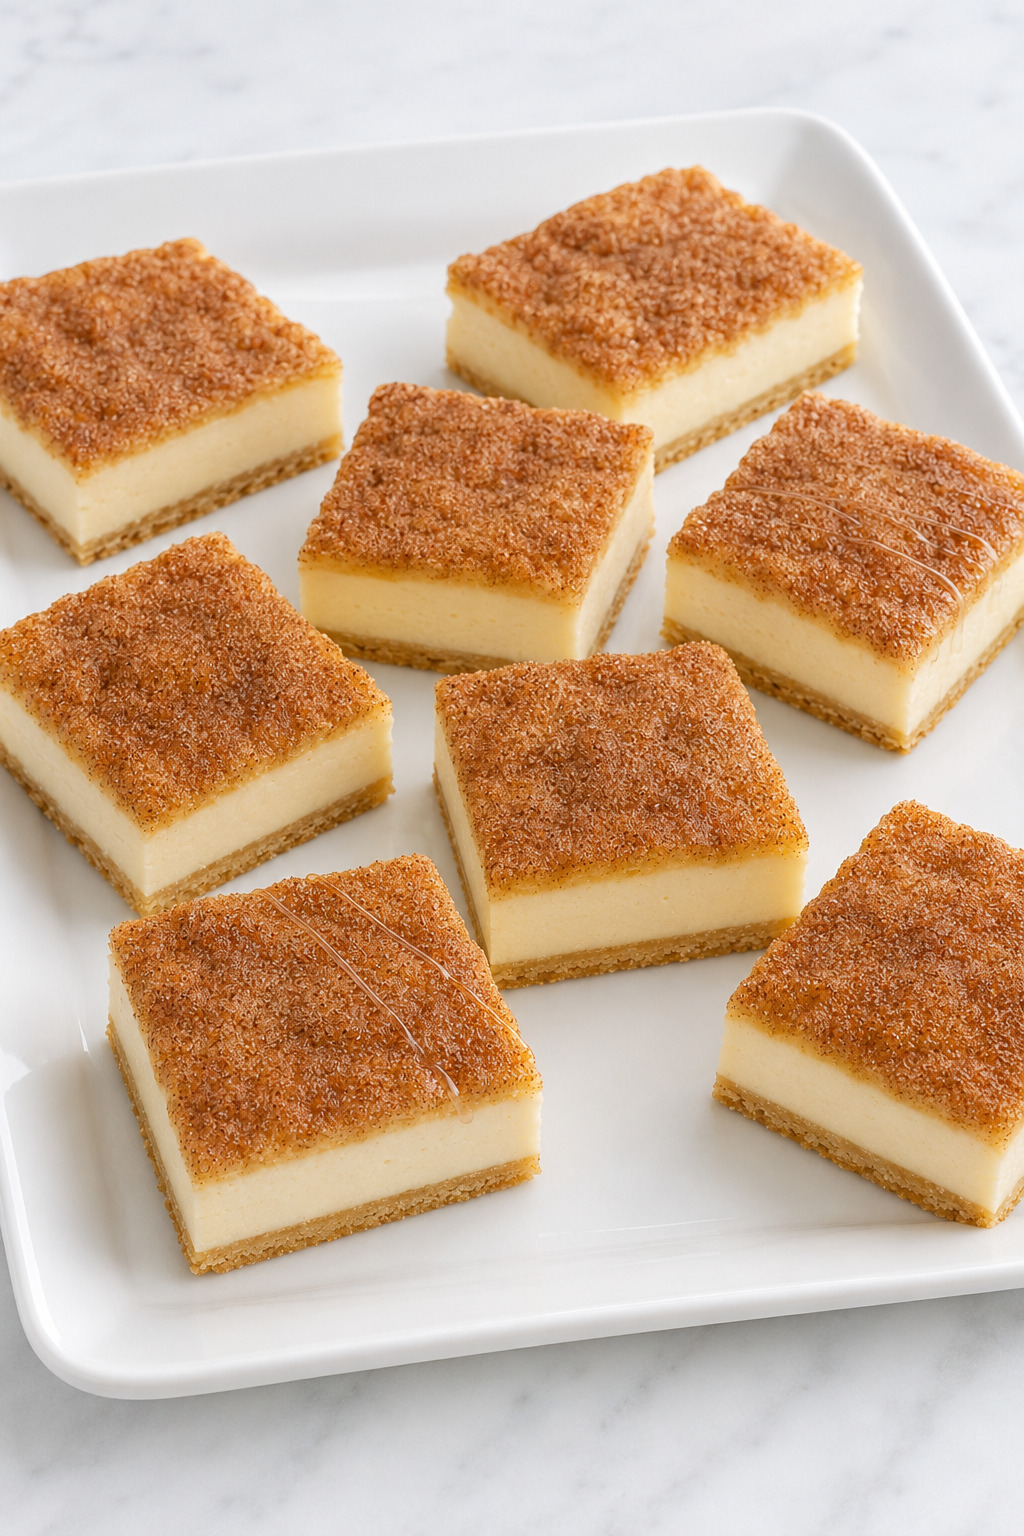
- Classic honey threads: Drizzle a small amount across each bar just before serving so the lines stay glossy and delicate.
- Clean dessert tray: Arrange fully chilled bars in a single layer with their cut faces visible to show the three distinct layers.
- Cool room-temperature plate: Let individual bars stand 15–20 minutes for a creamier center while the pastry still holds its shape.
- Warm secondary serving: Serve a softer piece after at least 30 minutes of cooling when clean geometry matters less than the warm cinnamon aroma.
Pairings
Sopapilla Cheesecake is rich, creamy, and cinnamon-forward, so the most useful pairings either add contrast or keep the serving simple. Avoid heavy sauces that would bury the pastry and soften the top.
- Fresh coffee: Its bitterness balances the sweet cinnamon and creamy filling.
- Unsweetened black tea: A clean warm cup keeps the dessert from feeling too heavy.
- Cold milk: The simple pairing works especially well for family dessert trays.
- Fresh apple or pear slices: Crisp fruit adds a light texture contrast without changing the bar itself.
Make Ahead, Storage, Freezing, and Reheating
This dessert is naturally make-ahead, but pastry quality depends on controlling condensation and keeping honey away from stored bars. Cool, chill, cover, and finish in that order.
Make ahead
Bake the full pan one day ahead, cool for 1 hour, then refrigerate uncovered for 1 hour before covering. Complete cooling is the same clean-slice principle that makes chilled Blueberry Cream Cheese Bars easier to portion. Keep the Sopapilla Cheesecake uncut and undrizzled until close to serving for the best surface and edge quality.
Refrigerator storage
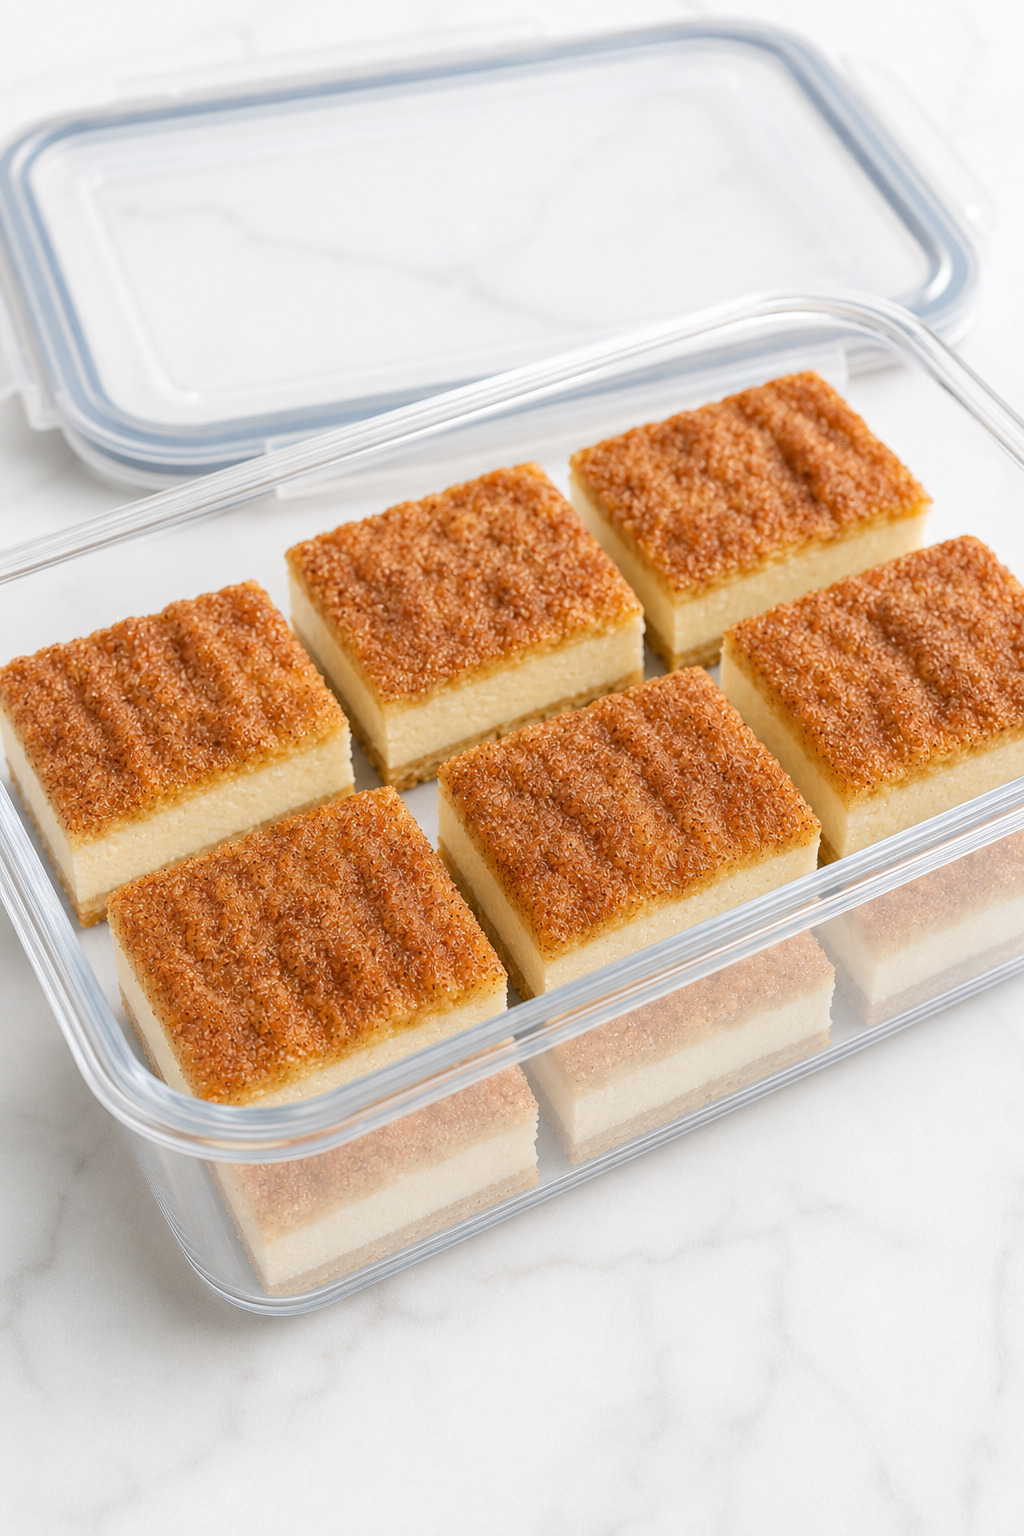
Store fully chilled bars in a single layer in an airtight container at 40°F (4°C) or below for up to 4 days; pastry quality is best during the first 3. Because the bars contain cream cheese and egg, refrigerate them within 2 hours of baking or serving; above 90°F (32°C), reduce that window to 1 hour, following FoodSafety.gov’s refrigeration guidance.
Freezing and thawing
Freeze fully chilled bars without honey. Wrap individual portions, place them in an airtight freezer container, and freeze for up to 1 month for best quality. Thaw overnight in the refrigerator with the wrapping in place, then unwrap after thawing to limit surface condensation. The crescent dough and cinnamon-sugar top will be softer than fresh.
Preferred service recovery
For the best texture, remove only the needed chilled bars and let them stand for 15–20 minutes. This softens the filling gently without adding microwave moisture to the cinnamon-sugar surface.
Optional microwave softening
Microwave only when you prefer a softer, slightly warmer bar and accept that the topping will lose crispness. Place one refrigerated bar on a microwave-safe plate, use 50% power, and add honey only after warming.
| Microwave power | Initial time |
|---|---|
| 700 W | 10–14 seconds |
| 800 W | 8–12 seconds |
| 1000 W | 6–10 seconds |
| 1200 W | 5–8 seconds |
Stop when the refrigerator chill has softened but the filling still holds its shape. If needed, continue in 3–5-second intervals.
Why This Recipe Belongs in Your Recipe Box
This is the kind of dessert to keep for gatherings, make-ahead weekends, and cinnamon-sugar cravings because its strengths are both practical and easy to recognize.
- Shortcut pastry, deliberate result. Refrigerated dough keeps the project approachable while the method protects the finished layers.
- Reliable bottom-crust control. A short par-bake and clear dish address the category’s most frustrating texture problem.
- Balanced cheesecake center. The filling stays creamy and lightly tangy instead of becoming a thick layer of sweetened cream cheese.
- Cleaner make-ahead serving. The full chill gives you 16 portable bars that can be arranged before guests arrive.
- Controlled cinnamon-sugar finish. Measured butter and sugar create even coverage without a greasy or overly thick top.
- Honey on your terms. Portion-level finishing preserves stored texture and lets each serving stay restrained.
Keep the Cinnamon-Sugar Baking Going
Choose your next recipe by following the part of this dessert you enjoyed most: the creamy cheesecake center, the cinnamon-sugar comfort, or the shareable celebration format.
More Creamy Cheesecake Desserts
Stay with smooth cream cheese desserts, from portable bars and cups to a cool no-bake centerpiece.
- Blueberry Cream Cheese Bars — add a bright blueberry layer to your next chilled, portable cream cheese dessert.
- Pumpkin Cheesecake Bars — keep the bar format but move into warmly spiced pumpkin flavor.
- Cheesecake Cups — choose individual portions when you want easy serving without cutting a pan.
- No Bake Cheesecake — make a cool creamy dessert when you would rather leave the oven off.
Follow the Cinnamon-Sugar Craving
If the fragrant top was your favorite part, continue with recipes where cinnamon and golden dough remain central.
- Churros Recipe — move from a baked sopapilla-inspired bar to crisp fried dough coated in cinnamon sugar.
- Homemade Cinnamon Rolls — turn the same warm spice profile into soft spiraled breakfast pastry.
- Cinnamon Roll Pancakes — bring cinnamon swirls to a relaxed brunch without making yeast dough.
- Monkey Bread — choose a pull-apart bake with caramelized cinnamon edges for sharing.
Choose Your Next Celebration Dessert
For a larger dessert-table centerpiece, these recipes keep the rich, generous feeling while changing the main flavor.
- Biscoff Cheesecake — lean into caramelized cookie spice with a full cheesecake presentation.
- Blueberry Cheesecake — pair creamy cheesecake with a vivid fruit finish for a classic centerpiece.
- Turtle Cheesecake — choose chocolate, caramel, and pecans when the occasion calls for a richer profile.
- Strawberry Cheesecake Dump Cake — keep the easy 9 × 13-inch spirit while moving toward a warm strawberry dessert.
Final Thoughts
This Sopapilla Cheesecake is built for the moment when you want an easy pan dessert to feel more deliberate: golden pastry above and below, a smooth vanilla center, cinnamon sugar that stays attached, and honey that arrives only when the bar is served.
Return to it when you need a make-ahead dessert for 16, especially when clean slices and dependable transport matter as much as the warm cinnamon-sugar flavor.
The shortcut is the crescent dough; the care is in knowing exactly when each layer is ready.

Sopapilla Cheesecake
A 9 × 13-inch layered dessert with flaky golden crescent dough, a smooth vanilla cheesecake center, crisp cinnamon sugar, and a light honey drizzle added only at serving.
Ingredients
Crescent-Dough Layers
- 2 cans (8 ounces / 226 g each) refrigerated seamless crescent dough sheets, kept chilled
- Nonstick cooking spray, as needed
Vanilla Cheesecake Filling
- 2 packages (8 ounces / 226 g each; 16 ounces / 454 g total) full-fat block cream cheese, softened to 68–72°F (20–22°C)
- 2/3 cup (133 g) granulated sugar
- 2 teaspoons (10 ml) pure vanilla extract
- 1/4 teaspoon (1.5 g) fine salt
- 1 large egg (approximately 50 g out of shell), at room temperature
Cinnamon-Sugar Top
- 3 tablespoons (43 g) unsalted butter, melted and fluid but not hot
- 1/4 cup (50 g) granulated sugar
- 2 teaspoons (approximately 5 g) ground cinnamon
Honey Finish
- 2 tablespoons (42 g) honey, for the portions being served
Instructions
- Prepare the oven and dish. Heat a conventional oven to 350°F (175°C) with a rack in the center. Lightly coat a clear 9 × 13-inch glass baking dish with nonstick spray. What you should see: a thin, even coating with no spray puddles.
- Shape and dock the bottom. Open one cold dough can and unroll it directly into the dish. Gently stretch it over the complete base without building a high side crust. If using perforated crescent-roll dough, pinch every seam closed from both directions and smooth it flat. Dock lightly with a fork about every 1 1/2 inches. What you should see:one continuous layer with no exposed glass, open seam, tear, or doubled edge.
- Par-bake the bottom. Bake for 7–9 minutes, until the wet shine disappears and the outer edge just begins to turn pale gold. Cool on a wire rack for 10 minutes. If one large bubble remains, press it gently once with a flat spatula after 2–3 minutes. What you should see: a matte, lightly set base with no raw glossy patch; it should not be fully browned.
- Mix the filling. Beat the softened cream cheese on medium-low for 60–90 seconds, scraping the bowl, until smooth. Add the 133 g filling sugar, vanilla, and salt; mix for about 30 seconds and scrape again. Lightly beat the egg separately, add it last, and mix on low for 15–20 seconds. Finish with two or three folds by hand. What you should see: thick, smooth, glossy filling with no cream cheese pellets, egg streaks, or whipped foam.
- Add the filling. Spoon the filling over the warm—not hot—bottom crust in several mounds. Spread gently into an even layer, stopping about 1/8 inch from the perimeter. What you should see: a level cream cheese layer with no exposed bottom dough or thick filling ridge at the sides.
- Shape and transfer the top. Unroll the second cold dough sheet onto parchment, cover with a second sheet, and gently roll or press to about 9 × 13 inches. Remove the upper parchment. If sticky, chill for 5 minutes. Invert over the filling, peel away the remaining parchment, and adjust only the edges. What you should see: a flat, unbroken top with no major fold, tear, or exposed filling.
- Apply the topping. Whisk the 50 g topping sugar with the cinnamon. Brush all the melted butter over the dough from the center outward. Sprinkle the cinnamon sugar in several light passes. What you should see: a thin butter sheen and even cinnamon-sugar coverage with no dry island or visible pool.
- Bake to complete doneness. Bake for 30–35 minutes, beginning the first check at 28 minutes. The top must be puffed, dry, and deep golden; the cinnamon sugar attached; the edge filling set; the center moving only slightly as one shallow unit; and the bottom light golden through the glass. If the top finishes first, tent loosely with foil and continue in 3–5-minute intervals.
- Cool and chill. Place the hot dish on a dry wire rack and cool for 1 hour. Refrigerate uncovered for the first hour, then cover without touching the surface and chill for at least 2 additional hours. What you should see: a dry settled top and filling firm enough to hold a clean vertical cut.
- Cut and finish. Cut four equal rows in each direction, wiping the knife after every cut. Lift with a small offset spatula. Let the needed bars stand 15–20 minutes, then drizzle only those portions with honey. What you should see: distinct pastry–cheesecake–pastry layers, creamy filling with no flow, and light honey threads rather than a soaked top.
Notes
- Use full-fat block cream cheese. Tub-style spread and reduced-fat cream cheese are not direct substitutions.
- Keep the 2/3 cup (133 g) filling sugar separate from the 1/4 cup (50 g) topping sugar.
- Keep both dough cans refrigerated until their individual shaping steps.
- The clear glass dish is part of the doneness system. Metal, ceramic, and disposable foil pans are not represented as timing-equivalent.
- Do not line the dish with parchment; it would block the bottom-color check.
- Do not taste raw dough or filling containing raw egg.
- The bars are done only when the top, cinnamon sugar, filling movement, edges, and bottom color all pass their cues.
- Clean slices require 1 hour of cooling and 3 hours of refrigerator chilling.
- Refrigerate within 2 hours of baking or serving, or within 1 hour above 90°F (32°C).
- Store fully chilled bars without honey in a single layer in an airtight container for up to 4 days; best pastry quality is during the first 3 days.
- Freeze fully chilled, individually wrapped bars without honey for up to 1 month. Thaw overnight in the refrigerator. The crescent dough and topping will be softer than fresh.
- Preferred service recovery: let chilled bars stand 15–20 minutes.
- Optional microwave softening at 50% power for one refrigerated bar: 700 W for 10–14 seconds; 800 W for 8–12 seconds; 1000 W for 6–10 seconds; 1200 W for 5–8 seconds. Continue only in 3–5-second intervals. Honey is added after warming.
Nutrition Information:
Yield: 16 Serving Size: 1Amount Per Serving: Calories: 260Total Fat: 15gSaturated Fat: 9gCholesterol: 47mgSodium: 385mgCarbohydrates: 28gSugar: 18gProtein: 4g
Nutrition information is provided as an estimate only and may vary based on specific ingredients, brands, and portion sizes used. This information should not be considered medical or nutritional advice.
12 Sweet Favourites — Yours, Free 🍰
Tiramisù, no-bake cheesecake, the perfect chocolate chip cookie & 9 more reader-loved desserts — gathered into one beautiful free recipe book. From my kitchen to yours.
No spam, just sweet things. Unsubscribe anytime.