Chocolate Lava Cake Recipe
🎁 FREE E-BOOK: 12 Sweet Favorites — reader-loved desserts in one beautiful recipe book.
This chocolate lava cake recipe gives you the best contrast a chocolate dessert can offer: tender, set edges around a warm center that moves in a thick, glossy ribbon as soon as you cut into it. This version is deeply chocolatey without being too sweet, with just enough structure to stand neatly on the plate.
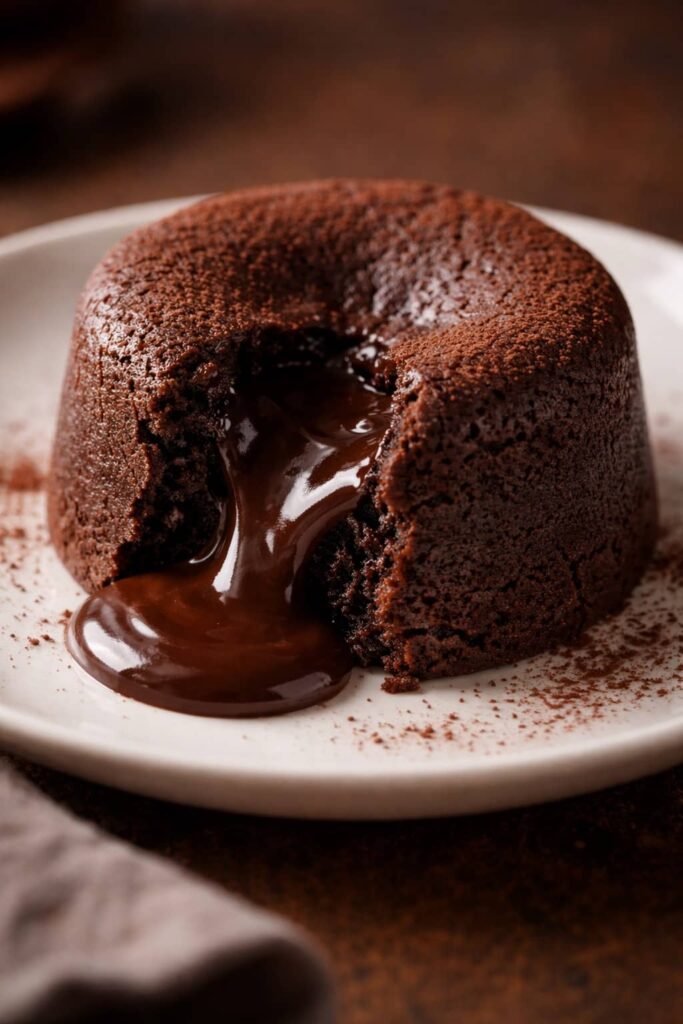
It has the polished feel of a restaurant dessert, yet the batter comes together from a short list of familiar baking ingredients. Four individual cakes make an ordinary dinner feel finished and special, whether you serve them for date night, Valentine’s Day, or a small gathering.
The part worth saving is the control built into the method: exact 6-ounce ramekins, equal 129–130 gram portions, and a three-zone doneness test that tells you more than the clock alone. Those details protect both the freestanding shell and the molten center.
Chocolate Lava Cake at a Glance
This recipe makes four individual molten chocolate cakes in straight-sided 6-ounce ramekins, baked at 425°F (218°C) for 12–14 minutes in a conventional oven and served immediately after a one-minute rest.
- Yield: 4 individual cakes
- Primary vessel: Four 6-ounce (180 ml) ceramic ramekins
- Batter per ramekin: Approximately 129–130 g
- Active preparation: About 15 minutes
- Bake: 12–14 minutes
- Total elapsed time: About 29 minutes, excluding overlapping oven preheat
- Best serving window: Within 5 minutes of unmolding
These cakes create their molten centers through a short, high-heat bake; there is no separate chocolate ganache filling. The same batter sets around the outside while remaining thick and fluid in the middle.
Why This Chocolate Lava Cake Works
This version works because the batter depth, aeration, and bake endpoint are defined together instead of treating the timer as the only control.
- One exact primary vessel. Four 6-ounce ramekins keep the batter depth consistent with the 12–14 minute window.
- Equal portions. Weighing 129–130 g into each ramekin helps all four cakes reach the same stage at the same time.
- A stable but tender shell. Whipped eggs and a restrained 30 g of flour give the exterior enough structure to unmold without turning the center into ordinary cake.
- Controlled chocolate temperature. Cooling the melted chocolate and butter to 100–110°F (38–43°C) keeps it fluid while protecting the egg foam from excessive heat.
- Cue-led doneness. A set wall, matte outer ring, and cohesive moving center identify the target more reliably than “slightly jiggly” on its own.
Why You’ll Love These Chocolate Lava Cakes
These cakes fit the moments when you want an impressive warm dessert without assembling layers, frosting a cake, or making a separate filling.
- The active work takes about 15 minutes.
- The recipe makes four plated portions with no slicing or decorating.
- The batter can be portioned and refrigerated for up to 4 hours.
- The flavor is intensely chocolatey but moderated by 60–70% bittersweet chocolate and a lower added-sugar level.
- A standard muffin pan provides one supported alternative when ramekins are unavailable.
- The serving style can be as simple as confectioners’ sugar or as polished as berries and vanilla ice cream.
Ingredients for a Deep Chocolate, Molten Center
The ingredient list is short, but the chocolate percentage, butter state, egg temperature, and flour amount all influence whether the cakes release cleanly and remain molten.
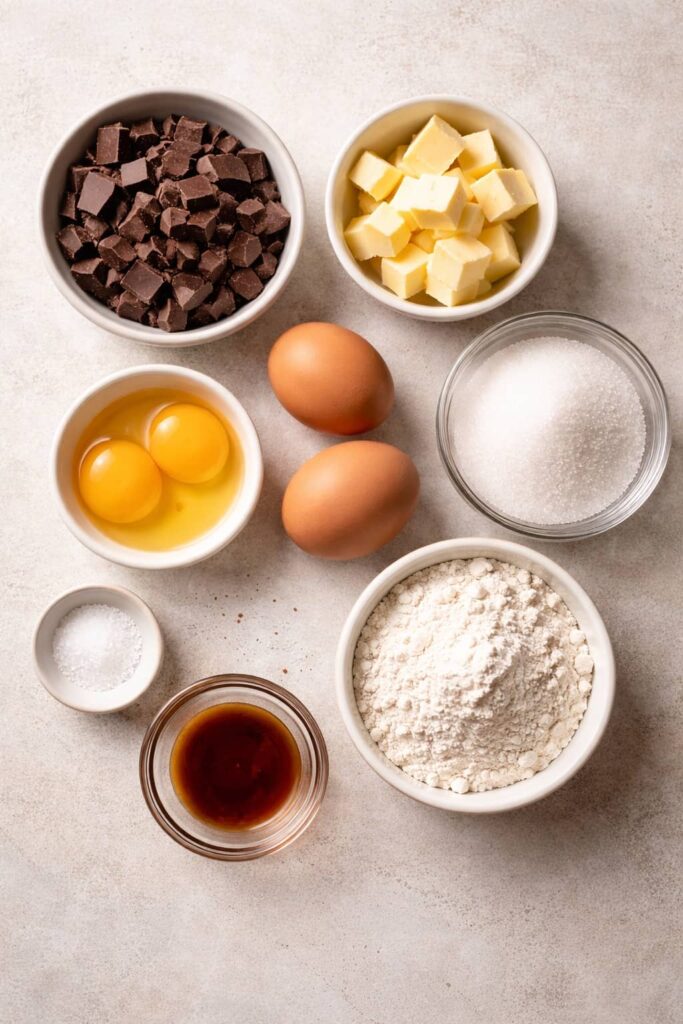
Ingredient List
These quantities make four cakes in 6-ounce ramekins and appear in the same order used by the method and Recipe Card.
- 1 tablespoon (14 g) unsalted butter, softened, for the ramekins
- 1 tablespoon (5 g) unsweetened cocoa powder
- 6 ounces (170 g) 60–70% bittersweet baking chocolate, finely chopped
- 1/2 cup (113 g) unsalted butter, cut into small cubes
- 2 large eggs (about 100 g without shells), at room temperature
- 2 large egg yolks (about 36 g), at room temperature
- 1/4 cup plus 1 tablespoon (63 g) granulated sugar
- 1/4 teaspoon (about 1.5 g) fine sea salt
- 1 teaspoon (5 ml) pure vanilla extract
- 1/4 cup (30 g) all-purpose flour, spooned and leveled, then sifted immediately before folding
Ingredient Notes That Affect the Center
The most important purchase is a 60–70% bittersweet baking bar because it melts more predictably than chips and keeps the finished dessert rich without making it excessively sweet.
- Baking chocolate: Finely chopped bars form a smoother, more fluid base. Chocolate chips contain ingredients designed to help them retain shape, so they are not an approved one-for-one substitute here.
- Butter and cocoa coating: Softened butter clings to the ramekin; cocoa covers it without leaving a white flour film on the dark cake.
- Room-temperature eggs: Eggs around 68–72°F (20–22°C) whip and combine more predictably than refrigerator-cold eggs.
- All-purpose flour: Thirty grams is enough to support the shell. Fold only until the final dry streak disappears.
- Salted butter: You may use it if you omit the added salt, although flavor and sodium will vary by brand.
Milk chocolate, chocolate above 70% cacao, and gluten-free flour alter more than one structural variable and need separately validated formulas rather than casual substitutions.

Kitchen Tools Needed
For lava cake, vessel capacity and portioning equipment are part of the recipe: changing the depth of the batter changes how quickly the center sets.
- Baking and serving: Four straight-sided 6-ounce (180 ml) oven-safe ceramic ramekins, one light-colored rimmed metal baking sheet, four dessert plates, and oven mitts.
- Mixing and aeration: A stand mixer fitted with the whisk attachment and a flexible silicone spatula.
- Melting and sifting: A heatproof bowl, a small saucepan, and a fine-mesh sieve.
- Portioning and calibration: A digital scale; an instant-read thermometer is optional for one sacrificial calibration cake. A 1/2-cup measure is a less precise portioning fallback.
Before You Bake: Five Lava Cake Checks
Confirm the vessel, ingredient temperature, oven mode, portioning setup, and serving station before you begin; each one affects a step that is difficult to pause or undo later.
One thing I’ve learned while revisiting this recipe is that “ramekin” is not a measurement. Capacity changes the depth of the batter and the time it needs, so this version starts with exact 6-ounce ramekins.
- Check that you have four straight-sided 6-ounce (180 ml) ramekins, not four 4-ounce dishes.
- Bring the whole eggs and yolks to about 68–72°F (20–22°C).
- Use the conventional 425°F (218°C) setting. If your oven uses a fan, follow the separate adjustment below.
- Set a digital scale beside the prepared ramekins so you can portion 129–130 g into each one.
- Put the plates, mitts, and any serving accompaniments in place before the cakes enter the oven.
What to Expect from These Lava Cakes
A properly baked lava cake looks more set than its center feels: the wall and outer top ring hold their shape while only the central zone moves as one soft area.
- The finished batter is smooth and thick enough to fall in ribbons, not thin like chocolate sauce.
- The cakes rise and set around the perimeter rather than forming a uniformly firm cupcake dome.
- The center may move when the tray is nudged, but its surface should not look liquid or wet like raw batter.
- The one-minute rest stabilizes the exterior for release; a much longer rest steadily reduces the molten effect.
- When opened promptly, the center flows slowly and thickly rather than spilling like a watery liquid.
How to Make Chocolate Lava Cakes
The method follows eight controlled stages, and each stage has a visible endpoint so you can move forward based on the batter rather than on time alone.
1. Prepare the Oven and Coat the Ramekins
Position a rack in the center of the oven and preheat a conventional oven to 425°F (218°C). Coat the interiors and rims of four 6-ounce ramekins with the 1 tablespoon softened butter, using upward strokes. Add the cocoa powder, rotate each ramekin until every buttered surface is covered, and tap out all loose excess. Place the ramekins on the room-temperature baking sheet and refrigerate them while you make the batter.
What you should see: An even, thin cocoa coating with no bare ceramic, butter clumps, or loose piles of cocoa.
2. Melt and Cool the Chocolate Mixture
Set a heatproof bowl over a saucepan containing about 1 inch of barely simmering water, making sure the bowl does not touch the water. Add the chopped chocolate and 1/2 cup (113 g) cubed butter. Stir gently until completely melted and glossy, about 4–7 minutes. Remove from the heat and cool for about 5 minutes, until the mixture is warm and fluid rather than hot, ideally 100–110°F (38–43°C).
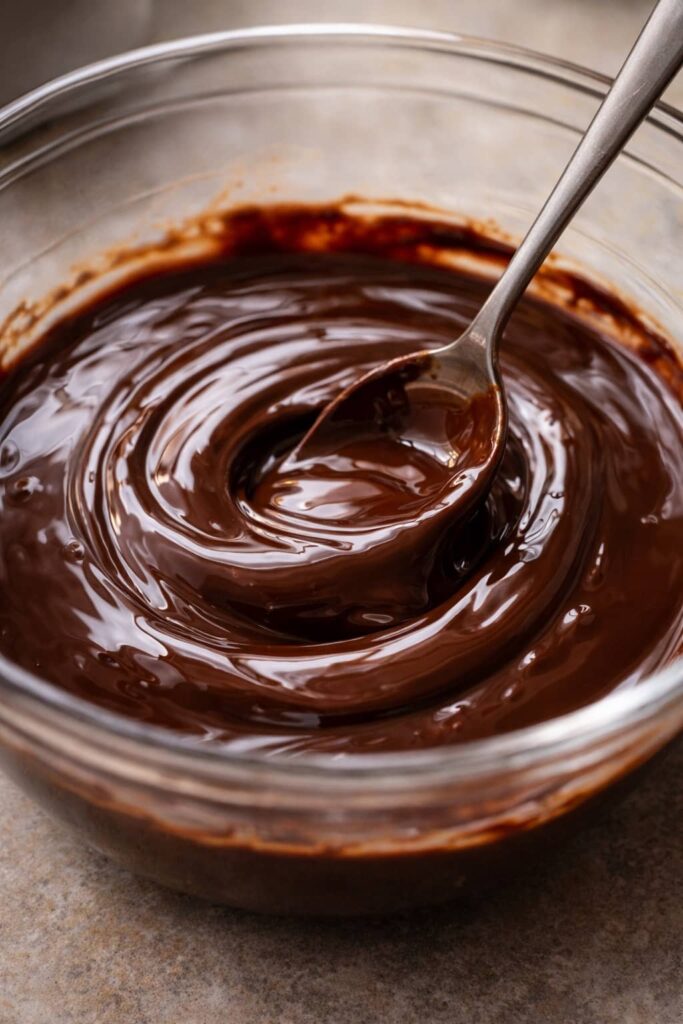
What you should see: A cohesive, glossy emulsion that flows from the spatula without oily separation, graininess, or unmelted pieces.
3. Whip the Eggs, Yolks, Sugar, and Salt
Place the 2 eggs, 2 yolks, granulated sugar, and salt in the stand-mixer bowl. Whip with the whisk attachment on medium-high to high speed for 2–3 minutes, until the mixture is distinctly paler, increased in volume, and thick enough to fall from the whisk in a ribbon that remains visible on the surface for about 2 seconds.
What you should see: A pale, aerated mixture with a brief ribbon trail; it should not be thin or disappear immediately into itself.
4. Fold the Chocolate into the Egg Foam
Add the warm chocolate mixture to the whipped eggs in two additions, folding gently with the silicone spatula after each one. Fold in the vanilla, then scrape the bottom and sides until no pale foam or dark chocolate streaks remain.
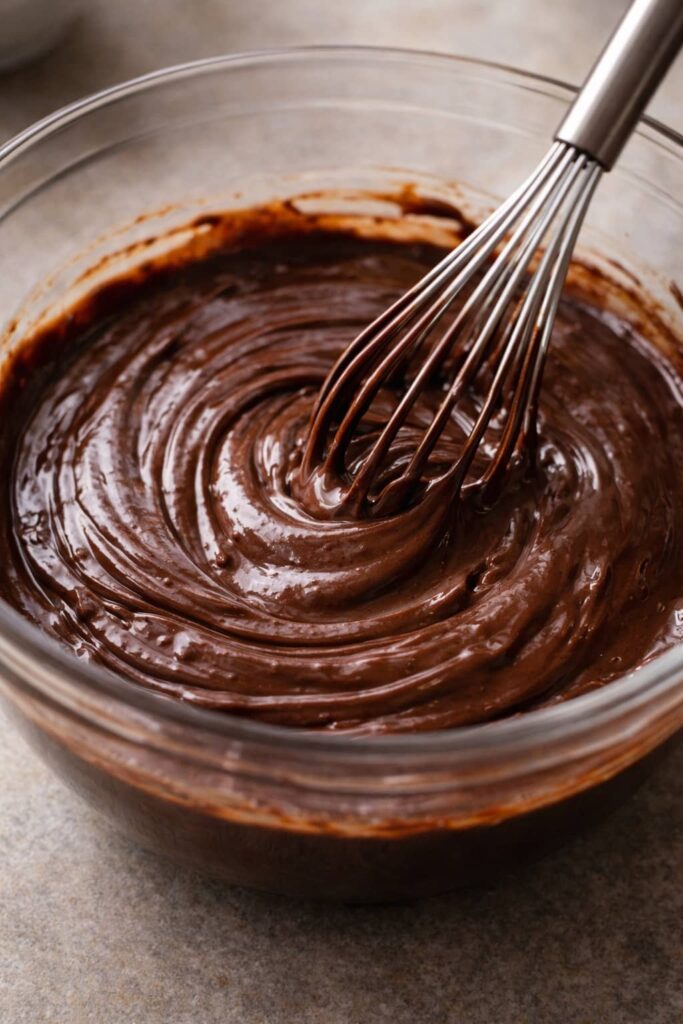
What you should see: A uniform, glossy batter that remains fluid and slightly aerated, without oily streaks or watery, deflated pockets.
5. Sift and Fold in the Flour
Sift the all-purpose flour directly over the batter. Fold with broad strokes only until the last dry streak disappears, scraping the bottom once to check for hidden flour. Stop as soon as the batter is uniform.
What you should see: A smooth batter that falls in a thick ribbon with no flour pockets. Prolonged mixing will reduce tenderness and aeration.
6. Portion the Batter by Weight
Divide the batter among the prepared ramekins, placing approximately 129–130 g in each one. Smooth only obvious peaks and wipe the rims clean without pressing air out of the batter.

What you should see: Four evenly filled ramekins, roughly two-thirds to three-quarters full, with level batter depths and clean rims.
7. Bake to the Three-Zone Endpoint
Bake on the center rack for 12–14 minutes. Begin checking at 12 minutes instead of automatically adding time. The sides and outer top ring should be risen, matte, and set, while only the center moves slightly as one cohesive area when you nudge the baking sheet.
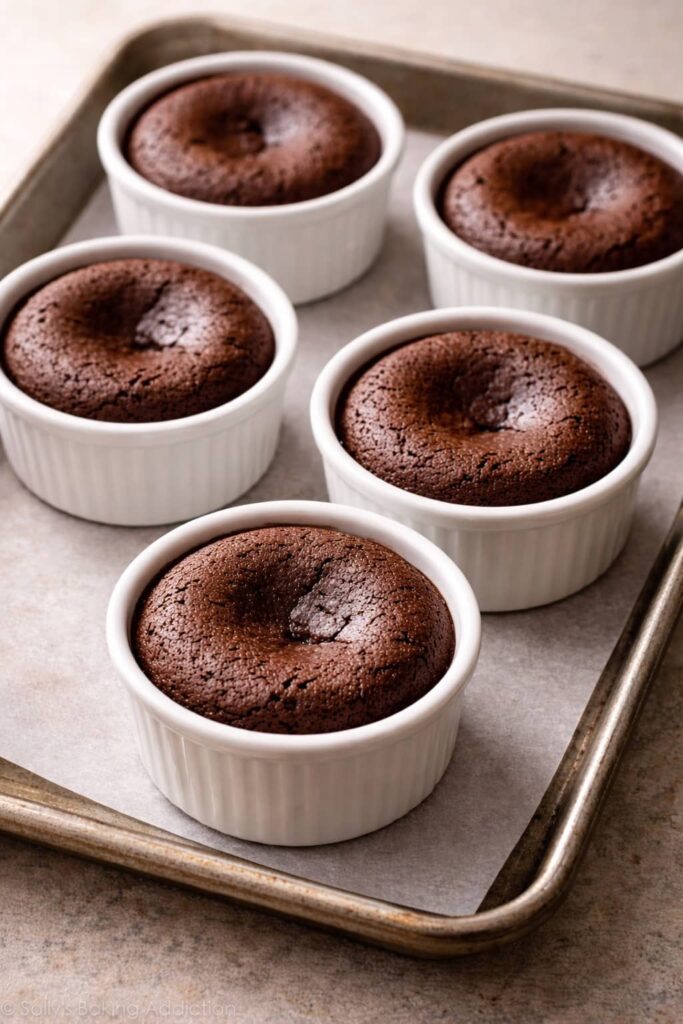
What you should see: A stable side wall, a set matte outer ring, and a softer center with no liquid-looking raw batter on its surface.
8. Rest, Invert, and Serve Immediately
Set the baking sheet on a heat-safe surface and rest the cakes in their ramekins for exactly 1 minute. If one spot at the rim appears attached, loosen only that spot with a thin knife. Place an inverted dessert plate over a ramekin, hold both securely with oven mitts, turn them over, wait 10 seconds, and lift away the ramekin. Repeat with the remaining cakes and serve within 5 minutes.
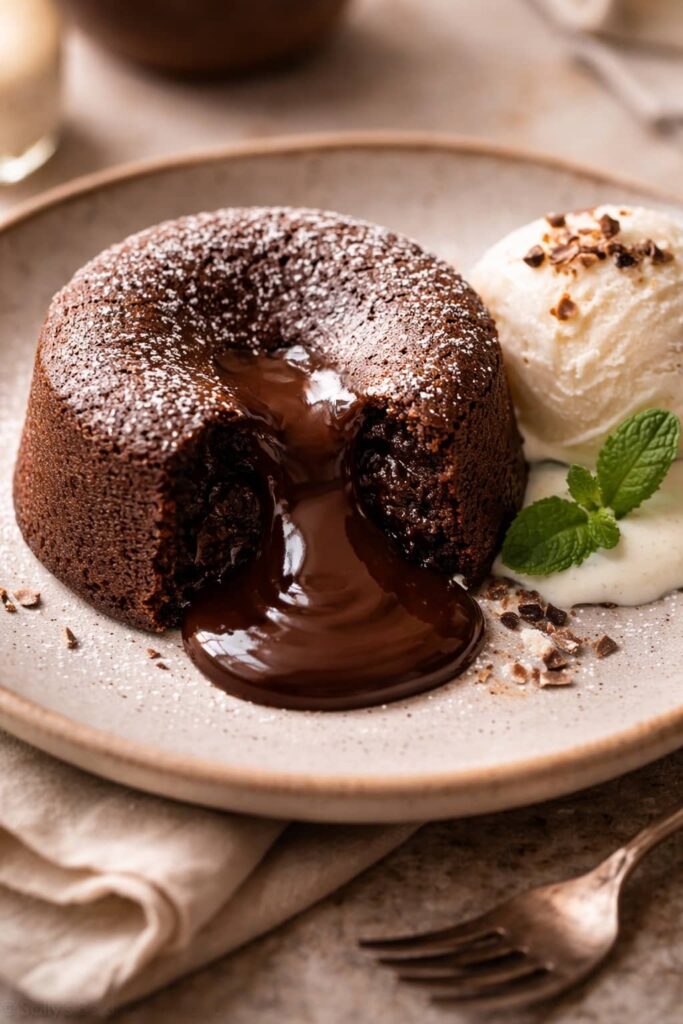
What you should see: Each cake releases intact, stands independently, and opens to a slow-flowing, thick, glossy center.
The Three-Zone Doneness Test for a Molten Center
Chocolate lava cake is ready when three areas tell the same story: the side wall is stable, the outer top ring is matte and lightly resilient, and only the central zone moves slightly without looking wet.
- Side wall: It should look visibly set and strong enough to support the cake after inversion.
- Outer top ring: It should be matte rather than shiny and should resist a very light touch.
- Center zone: It should move as one soft, cohesive area when the tray is nudged. The surface should not ripple like liquid batter.
| State | What you see before unmolding | Likely result | Best action |
|---|---|---|---|
| Underdone | Weak sides, shiny outer ring, or visibly wet center surface | Collapse or watery, raw-looking middle | If still in the ramekin, return it briefly to the oven; presentation may change |
| Correct | Stable wall, matte set ring, cohesive movement only in the center | Tender shell with a thick molten flow | Rest 1 minute, invert, and serve promptly |
| Overbaked | Firm top with little or no central movement | Fudgy or fully set center | Serve it as cake and reduce the next bake only after checking vessel, portion, and oven |
For a one-time oven calibration, you may probe the center of one sacrificial cake immediately after baking. A reading near 160°F (71°C) can coexist with a molten center and aligns with the U.S. food-safety temperature guidance for egg dishes. Treat temperature as supporting calibration, not the primary endpoint, because probe position varies and the hole affects presentation.
The Science Behind Chocolate Lava Cake’s Molten Center
The molten center is created by the way three structural controls develop at different rates: aerated eggs support the outside, warm chocolate preserves a smooth emulsion, and a small amount of flour thickens the batter without setting it uniformly.
- The egg foam supports the shell. Whipping eggs, yolks, sugar, and salt to a two-second ribbon traps air and builds enough structure for the perimeter to rise. Under-whipped eggs give the batter less support; rough folding knocks that support out.
- Chocolate temperature protects the emulsion. At 100–110°F (38–43°C), the chocolate-butter mixture remains easy to fold but is no longer hot enough to expose the foam to unnecessary heat. A smooth emulsion gives the center a glossy, cohesive body instead of oily separation.
- Flour controls viscosity and release. Thirty grams helps the exterior stand and keeps the middle from pouring like uncooked batter. More flour or prolonged folding shifts the result toward ordinary cake.
Expert Tips for Protecting the Molten Center
The best refinements are the ones that protect even batter depth, gentle aeration, clean release, and fast service without adding decorative work.
- Chill the coated ramekins. A short chill keeps the softened-butter and cocoa layer even while you prepare the batter.
- Use a room-temperature baking sheet. A preheated sheet adds unplanned bottom heat and may set the base faster.
- Scrape the bowl once, deliberately. After folding the flour, one bottom-to-top scrape finds hidden dry pockets without encouraging prolonged mixing.
- Clean the rims before baking. Batter baked onto a rim can hold the cake in place during inversion.
- Rehearse the serving setup. Plates, mitts, and accompaniments should be ready because the ideal center continues to set as it waits.
Chocolate Lava Cake Mistakes and How to Correct Them
When a lava cake misses the target, diagnose the visible result first and change one variable at a time; reducing the bake blindly can trade a set center for a collapsing shell.
| What happened | Likely mechanism | How to prevent it | Recovery or next batch |
|---|---|---|---|
| No molten center | Overbaking, hot oven, small vessel, low portion, substitution, or delayed service | Confirm 6-ounce capacity, 129–130 g portions, oven mode, early cue check, and five-minute service | Serve as a fudgy cake; next time change only the confirmed variable |
| Center looks watery or raw | Cake was pulled before the wall and matte ring set | Require all three doneness zones, not movement alone | If still in its ramekin, return briefly to the oven; expect presentation to change |
| Cake collapses or leaks | Perimeter under-set, incomplete rest, or violent inversion | Wait for a stable wall, rest exactly 1 minute, and invert in one controlled motion | Serve from the ramekin if it is too fragile to move safely |
| Cake sticks | Incomplete coating, batter on the rim, or long holding time | Butter and cocoa every interior surface and clean the rim | Loosen only the attached edge; do not saw deeply into the wall |
| Chocolate becomes grainy | Steam or water entered the bowl, or the mixture overheated | Use dry tools, barely simmering water, and a bowl that does not touch the water | Restart if the mixture is badly seized or separated |
| Batter looks streaky or flat | Chocolate was too hot, eggs were under-whipped, or folding was aggressive | Use the temperature and ribbon endpoints and fold in two additions | Do not try to restore collapsed foam with prolonged beating |
| Muffin-pan cakes are fully set | Metal wells and smaller portions baked on the ramekin schedule | Use six 86 g portions and check at 8 minutes | Reduce only after confirming portion size and oven setting |
| Chilled batter bakes unevenly | The primary window was applied to refrigerator-cold batter | Bring portioned batter out about 30 minutes before baking | Do not rely on a universal “add one minute” correction |
| Large ramekin timing is unclear | Capacity, depth, and surface area are unknown | Use the primary vessel or run a separate calibration | Do not guess an exact time from the word “large” |
Beautiful Ways to Serve Chocolate Lava Cake
Keep the plate restrained enough that the molten center remains the focal point, then add one contrast in temperature, color, or texture.
With Cold Vanilla Ice Cream
Place a small scoop of homemade vanilla ice cream beside—not over—the cake so the hot center stays visible while each bite gets a creamy temperature contrast.
With Berries and a Light Dusting of Sugar
A few raspberries or sliced strawberries add acidity and color, while a restrained dusting of confectioners’ sugar defines the dark surface without making the dessert sweeter throughout.
With Softly Whipped Cream
A spoonful of lightly sweetened whipped cream gives the warm cake a cool, airy contrast and is a gentler option when ice cream would feel too rich.
With a Thin Caramel or Berry Accent
Use a narrow swipe or a few small dots of caramel or berry sauce on the plate rather than flooding the cake, which preserves the look and flavor of the chocolate center.
Make-Ahead, Storage, and Reheating Without False Promises
Freshly baked and immediately unmolded is the only route to the canonical molten result, but the batter can be staged ahead and finished cakes can be stored with a clear loss of center fluidity.
- Make-ahead batter: Portion into prepared ramekins, cover, and refrigerate for up to 4 hours. Bring the ramekins out for about 30 minutes before baking. Do not rewhip the batter.
- Refrigerated cakes: Cool completely, cover, and refrigerate for up to 3 days.
- Frozen cakes: Freeze fully cooled cakes airtight for up to 1 month. Freezing preserves an acceptable dessert, not the original lava effect.
- Reheating: Warm a refrigerated cake at 350°F (177°C) for about 8–9 minutes. The center will generally be thicker and less fluid than when freshly baked.
Safe storage and ideal texture are separate questions: a cake may store safely within these limits while no longer delivering the intended molten flow.
A Dinner-Party Workback for Lava Cakes
For a planned dessert course, work backward from the moment you want to serve because the cakes can wait before baking but should not wait after unmolding.
| Moment | What to do | Why now |
|---|---|---|
| Up to 4 hours before baking | Prepare, portion, cover, and refrigerate the batter in ramekins | Reduces last-minute work within the approved hold |
| About 30 minutes before baking | Remove the filled ramekins from the refrigerator | Avoids applying the primary window to refrigerator-cold batter |
| Before baking | Fully preheat the oven and prepare plates and accompaniments | The finished cakes have almost no useful holding time |
| 12–14 minutes before dessert | Bake and begin checking at 12 minutes | The center moves through its target quickly |
| 1 minute before serving | Rest the cakes in their ramekins | Stabilizes the wall for release |
| Service | Invert, wait 10 seconds, lift the ramekin, and serve | The best flow is within 5 minutes of unmolding |
Ramekins, Muffin Tins, and Unsupported Pan Sizes
The primary 12–14 minute schedule belongs only to four 6-ounce ceramic ramekins; a metal muffin pan has its own yield and timing, while differently sized ramekins need independent calibration.
| Format | Portion | Oven | Timing | Status |
|---|---|---|---|---|
| Four 6-ounce ceramic ramekins | 129–130 g each | 425°F (218°C) conventional | 12–14 minutes | Primary |
| Six standard metal muffin wells | About 86 g each | 425°F (218°C) conventional | 8–10 minutes | Supported alternative |
| Fan/convection with primary ramekins | 129–130 g each | 400°F (about 205°C) | Begin checking early; no identical-time promise | Body guidance |
| Four 4-ounce, 8-ounce, two large, or one large vessel | Not established | Not established | No exact time | Unsupported without calibration |
For the muffin-pan version, grease and cocoa-dust six wells, divide the batter evenly, and release the cakes with a spoon or small offset spatula rather than using the ramekin plate inversion. For a half batch, the formula is technically divisible into two 6-ounce ramekins, but follow the cues rather than treating the primary time as a new exact promise. For a double batch, use eight ramekins and bake in two batches instead of crowding two oven racks.
Chocolate Lava Cake Questions, Answered
These concise answers cover the vessel, timing, safety, and make-ahead decisions readers most often need, while the sections above remain the full technical authority.
What Size Ramekins Should I Use for Chocolate Lava Cake?
Use four straight-sided 6-ounce (180 ml) oven-safe ceramic ramekins and add approximately 129–130 g of batter to each one. The published 12–14 minute window depends on that capacity and batter depth.
Can I Make Chocolate Lava Cake in a Muffin Tin?
Yes. Divide the full batch among six greased and cocoa-dusted standard metal muffin wells, about 86 g per well, and bake at 425°F (218°C) for approximately 8–10 minutes. Do not use the ramekin timing.
How Do I Know When Lava Cake Is Done?
Pull the cakes when the side walls are stable, the outer top rings are matte and set, and only the central zones move slightly as cohesive areas. A shiny, liquid-looking center surface is underdone; a firm top with no movement is likely overbaked.
Why Did My Lava Cake Have No Molten Center?
The usual causes are too much oven time, a hotter-than-indicated oven, smaller vessels, low portions, ingredient substitutions, or waiting too long to serve. Confirm capacity, 129–130 g portions, oven mode, and the five-minute service window before changing the bake time.
Can I Make the Batter Ahead?
Yes. Portion the batter into prepared ramekins, cover, and refrigerate for up to 4 hours, then bring the ramekins out for about 30 minutes before baking. Do not bake straight from the refrigerator using a universal “add one minute” rule.
Is the Center Raw, and Is Lava Cake Safe to Eat?
The target center is thick and molten, not visibly wet raw batter. Use the complete wall-ring-center cue set; for one-time oven calibration, a sacrificial cake may be checked near 160°F (71°C). Risk-sensitive diners may prefer pasteurized eggs and a fully set dessert.
Can I Use 4-Ounce, 8-Ounce, or Two Large Ramekins?
Not with an exact time from this recipe. Capacity, shape, and batter depth change the setting rate, so four 4-ounce dishes, 8-ounce ramekins, two large dishes, and one large pan each require a separate calibration.
Keep the Chocolate Mood Going
If the warm dark-chocolate center is what brought you here, choose your next dessert by whether you want another soft spoonful, an individual treat for sharing, or a bigger chocolate baking project.
Still Craving Soft, Spoonable Chocolate?
These recipes keep the soft, rich chocolate experience while changing the temperature, structure, or serving style.
- Chocolate Cobbler Recipe is the warm, self-saucing option when you want to scoop dessert from one dish.
- Chocolate Pudding Recipe gives you deep chocolate flavor without calibrating a freestanding shell.
- Chocolate Mousse turns the same elegant mood into a chilled, airy dessert.
- French Silk Pie offers a creamy, sliceable make-ahead format.
Want Individual Desserts for Sharing?
These smaller desserts are easier to portion for a table while keeping a polished, celebration-ready presentation.
- Chocolate Cupcake Recipe is the portable choice when a fully baked crumb and frosting matter more than a molten center.
- Brownie Bites give you compact fudgy portions that are simple to stage for a crowd.
- Chocolate Covered Strawberries bring the same date-night elegance with almost no baking.
- Panna Cotta is another restaurant-style individual dessert designed for advance preparation.
Ready for a Bigger Chocolate Project?
Choose one of these when you want a centerpiece that serves more people and rewards a longer baking session.
- Flourless Chocolate Cake gives you a dense, fudgy, sliceable centerpiece rather than a flowing middle.
- Matilda Cake is the full chocolate-drama route for a celebratory layer cake.
- German Chocolate Cake Recipe adds coconut-pecan character to a more involved layer cake.
- Chocolate Peanut Butter Texas Sheet Cake scales the rich chocolate payoff for a crowd.
Why This Chocolate Lava Cake Belongs in Your Recipe Box
Once you understand the vessel and the three-zone endpoint, this becomes a repeatable technique rather than a dessert you have to approach by luck.
- Exact Vessel Guidance. You know which ramekin capacity the formula and timing actually support.
- Weighted Portions. Four equal batter depths make simultaneous doneness more realistic.
- Cue-Led Doneness. The wall, ring, and center system gives you a decision even when your oven runs differently.
- Dinner-Party Timing. The four-hour make-ahead window and five-minute serving window fit into one practical workback.
- Supported Muffin Option. The alternative changes yield, portion, time, and release method instead of pretending every pan behaves alike.
- Honest Leftover Expectations. Storage and reheating guidance tells you what remains enjoyable and what molten quality cannot be restored.
A Final Note on Chocolate Lava Cake
Chocolate lava cake earns its drama through a narrow but understandable contrast: enough heat to build a shell and just little enough time to preserve the center. Exact ramekins, equal portions, and visible stopping cues turn that contrast into a series of manageable decisions.
This is the kind of recipe to return to whenever a warm individual dessert suits the table. The ingredients stay simple, while the same three-zone test helps you adjust thoughtfully to the small differences between home ovens.
Precision should protect the pleasure of dessert, not make it feel clinical. Here, a measured vessel and a watchful final minute are exactly what give you the freedom to cut into the cake and enjoy the flow.
Chocolate Lava Cake Recipe Card
The Recipe Card will carry the same ten ingredients, four-cake yield, eight numbered steps, 425°F (218°C) oven, and 12–14 minute cue-led bake used throughout this article.
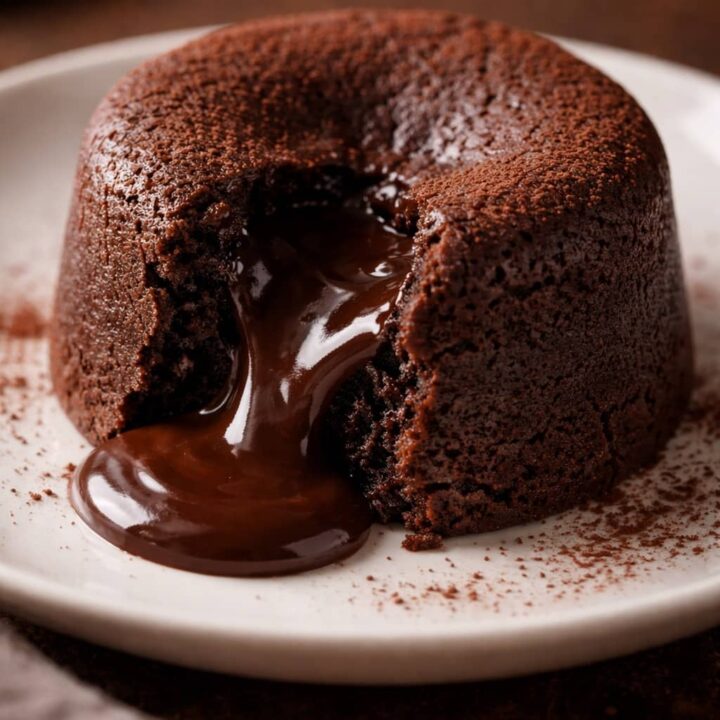
Chocolate Lava Cake
Four individual chocolate lava cakes with tender, set edges and a thick molten center. Exact 6-ounce ramekins, equal portions, and clear three-zone doneness cues make the short bake easier to judge.
Ingredients
- 1 tablespoon (14 g) unsalted butter, softened, for the ramekins
- 1 tablespoon (5 g) unsweetened cocoa powder
- 6 ounces (170 g) 60–70% bittersweet baking chocolate, finely chopped
- 1/2 cup (113 g) unsalted butter, cut into small cubes
- 2 large eggs (about 100 g without shells), at room temperature
- 2 large egg yolks (about 36 g), at room temperature
- 1/4 cup plus 1 tablespoon (63 g) granulated sugar
- 1/4 teaspoon (about 1.5 g) fine sea salt
- 1 teaspoon (5 ml) pure vanilla extract
- 1/4 cup (30 g) all-purpose flour, spooned and leveled, then sifted immediately before folding
Instructions
1. Prepare the Oven and Coat the Ramekins
Position a rack in the center of the oven and preheat a conventional oven to 425°F (218°C). Coat the interiors and rims of four straight-sided 6-ounce (180 ml) ramekins with the 1 tablespoon softened butter. Dust every buttered surface with the cocoa powder and tap out the excess. Place the ramekins on a room-temperature light-colored rimmed baking sheet and refrigerate them while you make the batter. What you should see: An even, thin cocoa coating with no bare ceramic, butter clumps, or loose cocoa piles.
2. Melt and Cool the Chocolate Mixture
Set a heatproof bowl over a saucepan containing about 1 inch of barely simmering water; the bowl must not touch the water. Add the chopped chocolate and 1/2 cup (113 g) cubed butter. Stir gently until completely melted and glossy, about 4–7 minutes. Remove from the heat and cool for about 5 minutes, until warm and fluid rather than hot, ideally 100–110°F (38–43°C). What you should see: A cohesive glossy emulsion that flows from the spatula without oily separation, graininess, or unmelted pieces.
3. Whip the Eggs, Yolks, Sugar, and Salt
Place the 2 whole eggs, 2 yolks, granulated sugar, and salt in the stand-mixer bowl. Whip with the whisk attachment on medium-high to high speed for 2–3 minutes, until the mixture is distinctly paler, increased in volume, and falls from the whisk in a ribbon that remains visible for about 2 seconds. What you should see: A pale, aerated mixture with a brief ribbon trail; it should not be thin or disappear immediately into itself.
4. Fold the Chocolate into the Egg Foam
Add the warm chocolate mixture to the whipped eggs in two additions, folding gently with a silicone spatula after each one. Fold in the vanilla, then scrape the bottom and sides until no pale foam or dark chocolate streaks remain. What you should see: A uniform, glossy batter that remains fluid and slightly aerated, without oily streaks or watery, deflated pockets.
5. Sift and Fold in the Flour
Sift the all-purpose flour directly over the batter. Fold with broad strokes only until the final dry streak disappears, scraping the bottom once to check for hidden flour. Stop as soon as the batter is uniform. What you should see: A smooth batter that falls in a thick ribbon with no flour pockets.
6. Portion the Batter by Weight
Divide the batter among the prepared ramekins, placing approximately 129–130 g in each one. Smooth only obvious peaks and wipe the rims clean without pressing air out of the batter. What you should see: Four evenly filled ramekins, roughly two-thirds to three-quarters full, with level batter depths and clean rims.
7. Bake to the Three-Zone Endpoint
Bake on the center rack for 12–14 minutes. Begin checking at 12 minutes. The side walls and outer top rings should be risen, matte, and set, while only the center zones move slightly as cohesive areas when you nudge the baking sheet. What you should see: Stable side walls, matte set outer rings, and softer centers with no liquid-looking raw batter on the surface.
8. Rest, Invert, and Serve Immediately
Rest the cakes in their ramekins for exactly 1 minute. If one spot at a rim appears attached, loosen only that spot with a thin knife. Place an inverted dessert plate over a ramekin, turn both over with oven mitts, wait 10 seconds, and lift away the ramekin. Repeat and serve within 5 minutes. What you should see: Each cake releases intact, stands independently, and opens to a slow-flowing, thick, glossy center.
Notes
- The primary timing applies only to four straight-sided 6-ounce (180 ml) ceramic ramekins filled with approximately 129–130 g batter each.
- Do not substitute chocolate chips for the 60–70% bittersweet baking bar; chip formulations can reduce fluidity and change the molten texture.
- For a fan/convection oven, use 400°F (about 205°C) and begin checking early; do not assume the conventional timing is identical.
- A standard metal muffin pan is a supported article alternative only: use six wells, about 86 g per well, and bake 8–10 minutes at 425°F (218°C). The primary card yield remains four.
- Four 4-ounce ramekins, 8-ounce ramekins, two large ramekins, and one large pan do not have approved exact timings.
- The cake is done when the wall is stable, the outer ring is matte and set, and only the center moves cohesively without a wet raw surface.
- Salted butter may replace unsalted butter only if the added salt is omitted; flavor and sodium vary by brand.
Storage and Make-Ahead Note
The batter may be portioned into prepared ramekins, covered, and refrigerated for up to 4 hours. Bring the ramekins out for about 30 minutes before baking; do not rewhip and do not use a universal “bake from cold plus one minute” rule. Cool finished cakes completely, cover, and refrigerate for up to 3 days or freeze airtight for up to 1 month. Reheat a refrigerated cake at 350°F (177°C) for about 8–9 minutes, understanding that the center will be thicker and less fluid than when freshly baked.
Recommended Products
As an Amazon Associate and member of other affiliate programs, I earn from qualifying purchases.


Nutrition Information:
Yield: 4 Serving Size: 1 mini cakeAmount Per Serving: Calories: 633Total Fat: 49gSaturated Fat: 28gCholesterol: 260mgSodium: 194mgCarbohydrates: 45gFiber: 5gSugar: 32gProtein: 8g
Nutrition information is provided as an estimate only and may vary based on specific ingredients, brands, and portion sizes used. This information should not be considered medical or nutritional advice.
12 Sweet Favourites — Yours, Free 🍰
Tiramisù, no-bake cheesecake, the perfect chocolate chip cookie & 9 more reader-loved desserts — gathered into one beautiful free recipe book. From my kitchen to yours.
No spam, just sweet things. Unsubscribe anytime.

I have two big ramekins. How would I do the recipe?
Because “large ramekin” can mean very different capacities and shapes, I can’t give one reliable additional baking time without knowing the exact volume. This recipe is calibrated for four straight-sided 6-ounce ramekins with about 129–130 g of batter in each. Two larger ramekins would create a deeper layer and require separate testing, so I recommend using the four 6-ounce ramekins for the most predictable molten center.