Graveyard Cake (Moist, Spooky & From Scratch)
🎁 FREE E-BOOK: 12 Sweet Favorites — reader-loved desserts in one beautiful recipe book.
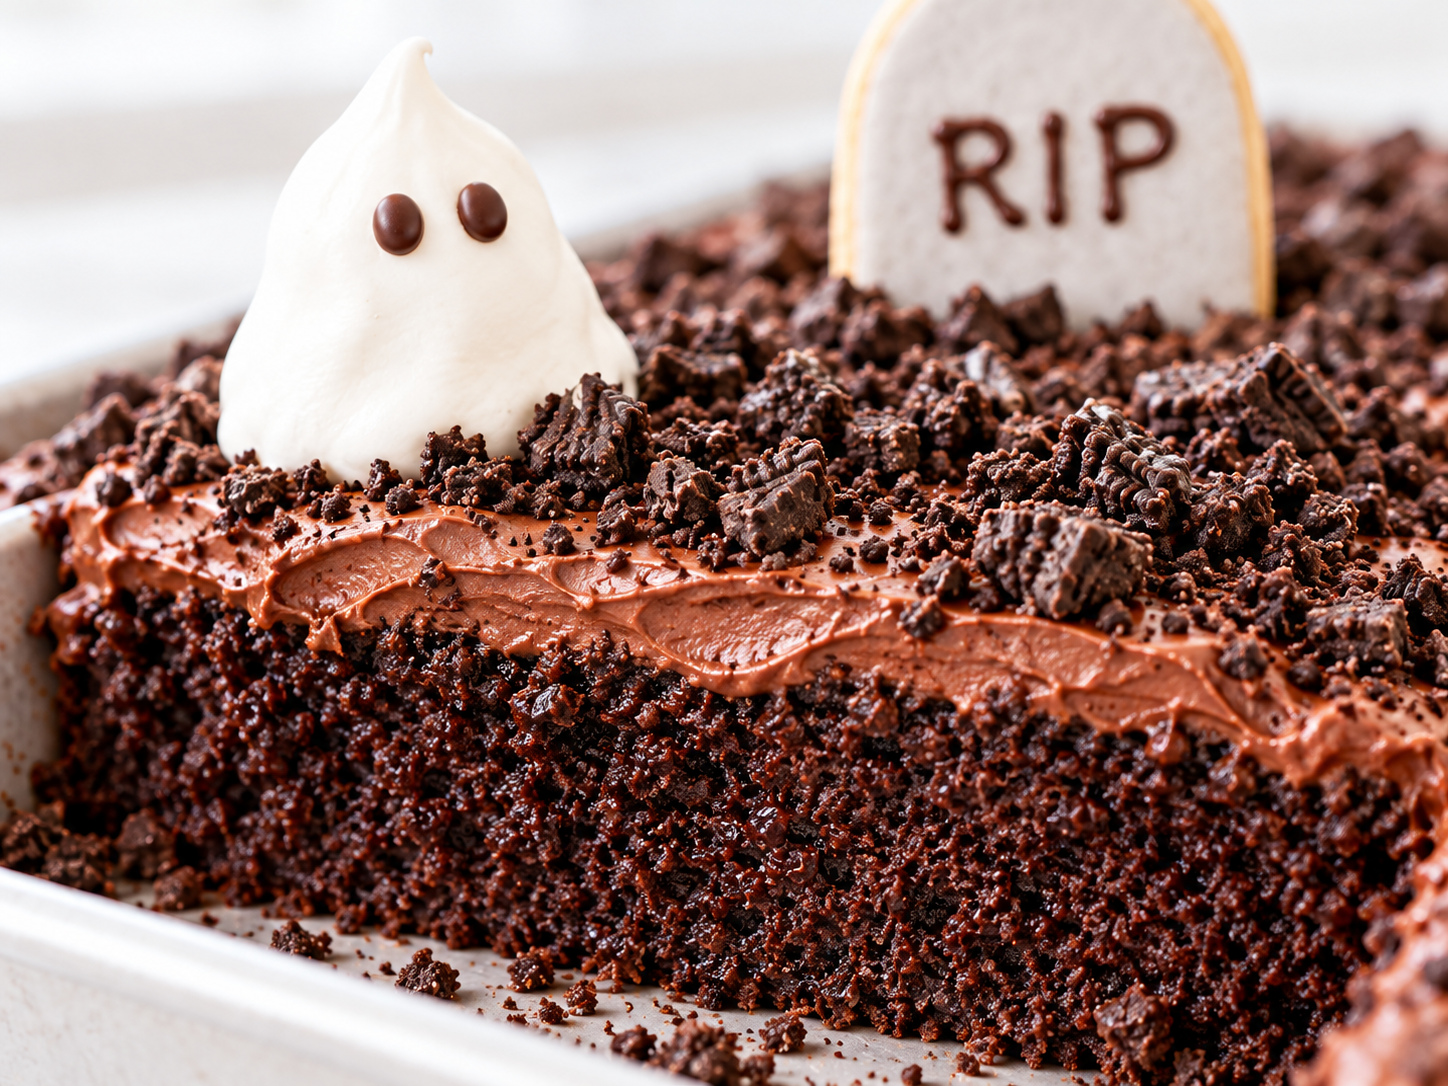
Graveyard Cake has a dark, moist chocolate crumb beneath creamy chocolate buttercream, crushed-cookie soil, crisp shortbread tombstones, and little white meringue ghosts. Every forkful begins soft and deeply chocolatey, while the handmade decorations bring buttery and delicately crisp contrasts.
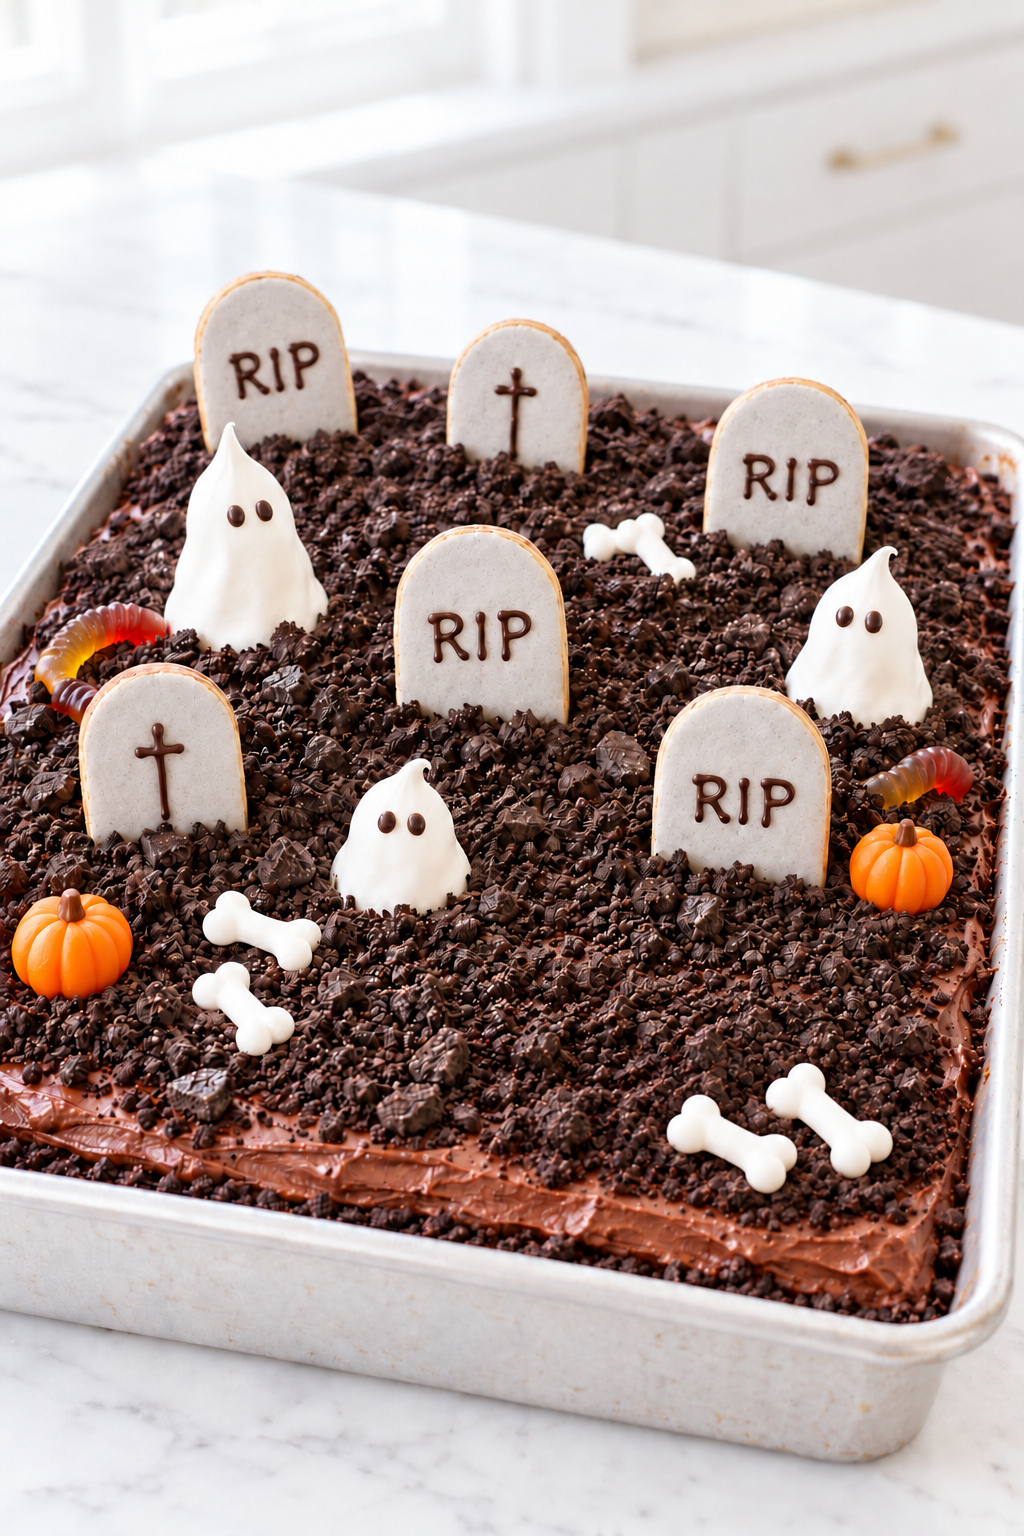
There is a familiar comfort in bringing a homemade chocolate cake to the table, even when little ghosts are standing on top. This Graveyard Cake adds the playful anticipation of Halloween to that simple pleasure. The handmade details give everyone something to notice before the first slice is shared.
Keep this recipe for the measured components and the order in which they come together. The tombstones and meringues can be prepared ahead, the Graveyard Cake can cool overnight, and the final graveyard can be assembled shortly before the first slice is served.
Graveyard Cake at a Glance
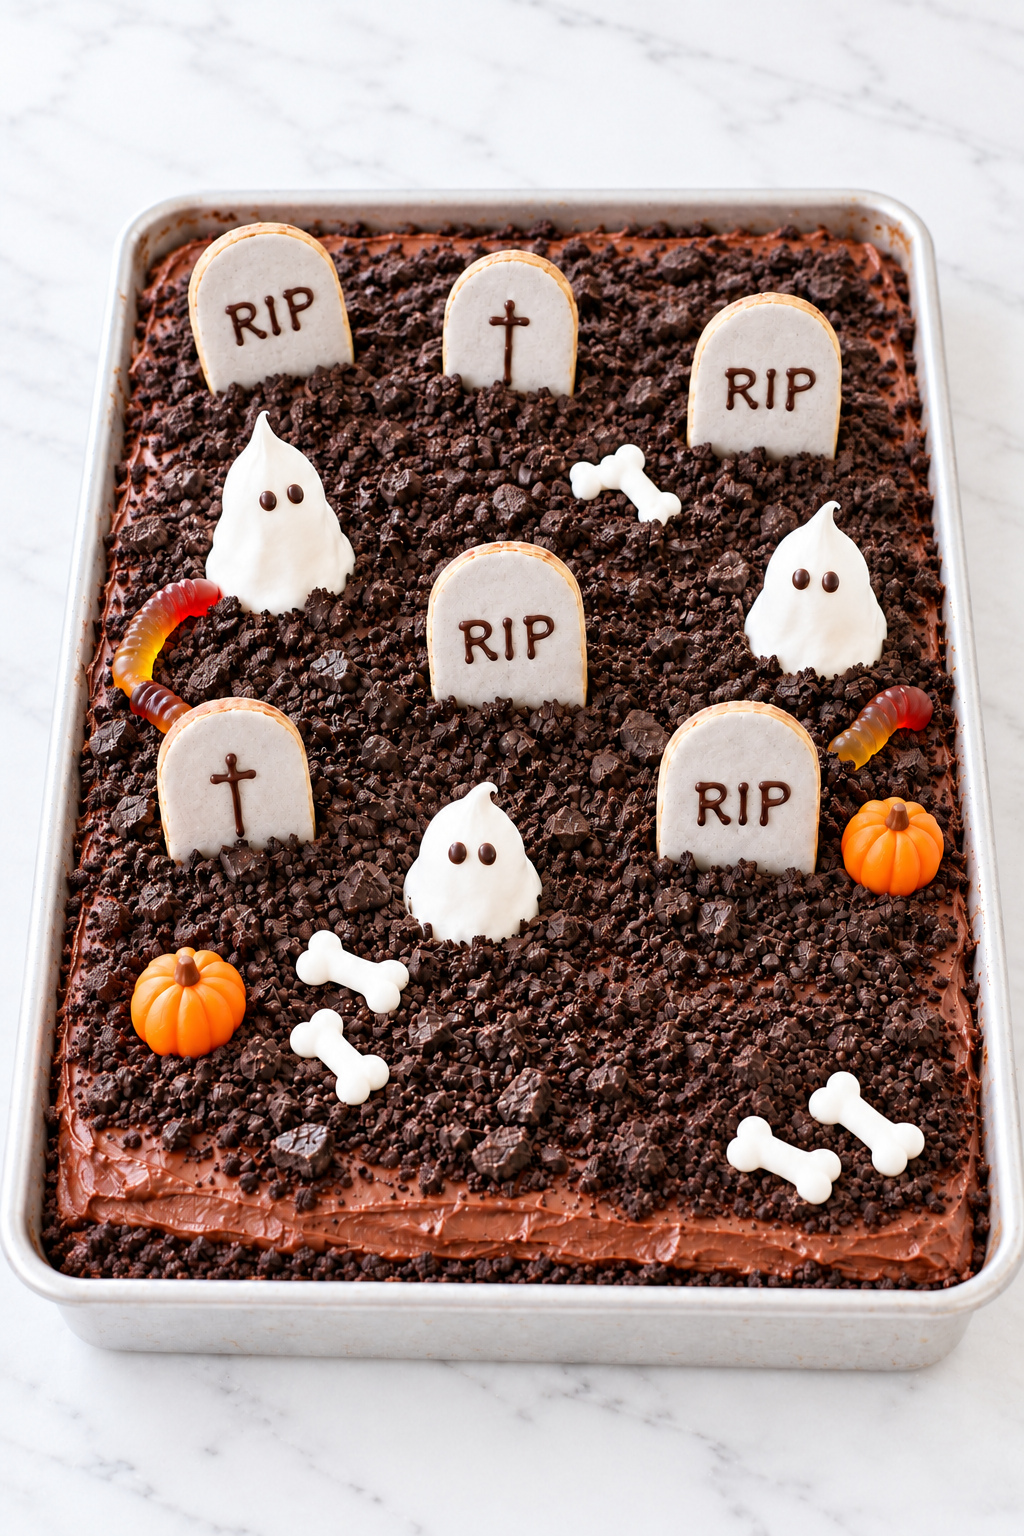
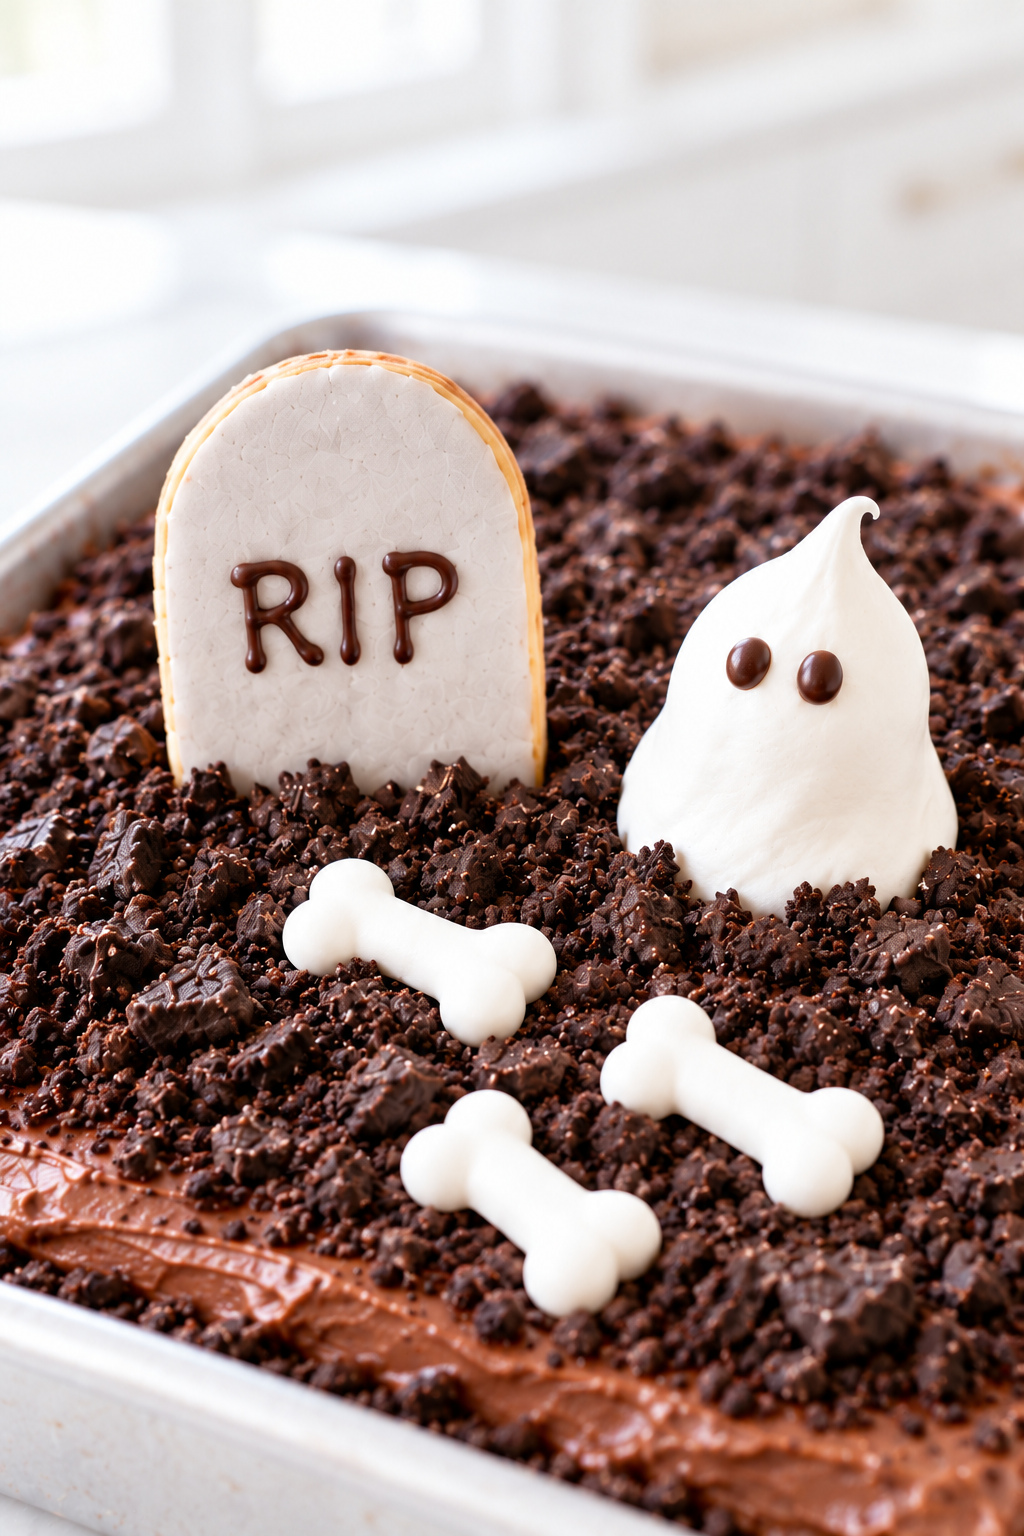
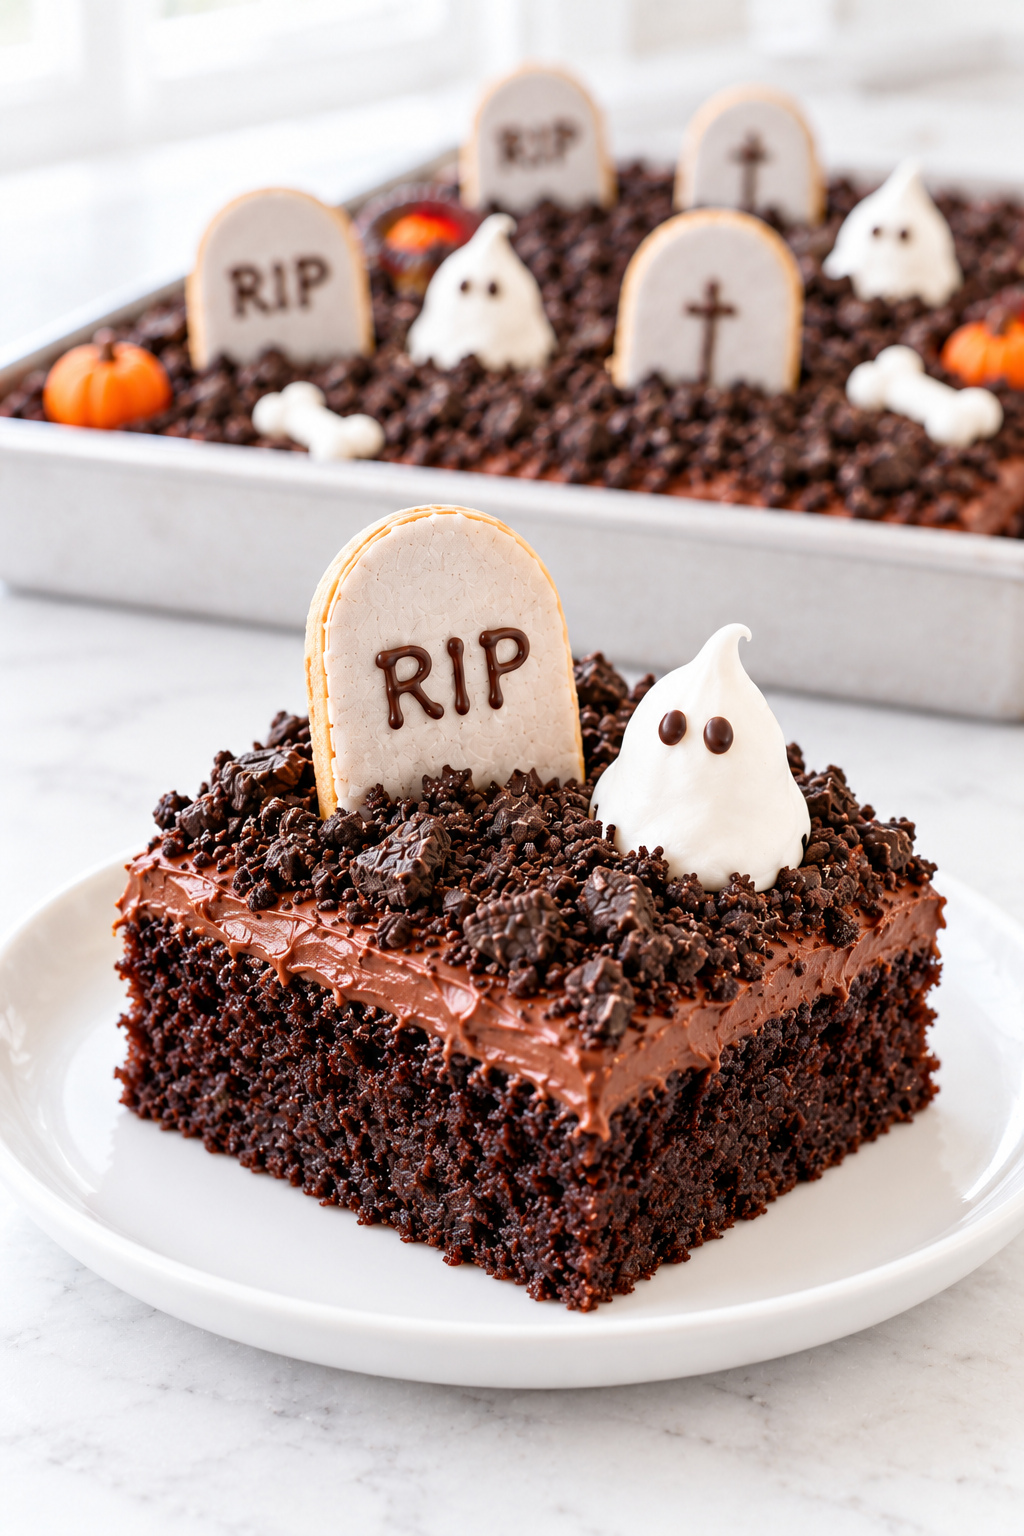
This Graveyard Cake is a completely homemade 9 x 13-inch chocolate sheet cake decorated with six shortbread tombstones, three meringue ghosts, small meringue bones, and dark chocolate-cookie soil.
| Detail | What to expect |
|---|---|
| Flavor | Deep chocolate, vanilla shortbread, dark cookie crumbs, and light vanilla meringue |
| Texture | Moist cake, creamy buttercream, crisp cookies, and dry meringue |
| Yield | One 9 x 13-inch cake, cut into 15 servings |
| Difficulty | Intermediate, with several manageable components |
| Prep time | About 1 hour 45 minutes of active work |
| Cook time | About 2 hours 25 minutes across the three oven stages: cake 32 to 38 minutes, shortbread 15 to 18 minutes, and meringues about 90 minutes |
| Additional time | About 1 hour 50 minutes of additional elapsed time after overlapping tasks; includes oven temperature changes, cooling, and setting |
| Total project time | Allow about 6 hours with one oven; longer if the meringues or icing need more drying time |
| Method | Bake, dry, frost, and assemble |
| Best for | Halloween parties, family gatherings, and seasonal dessert tables |
This Graveyard Cake is an intermediate 9 x 13-inch chocolate cake for 15. Allow about 1 hour 45 minutes of active preparation within a six-hour same-day schedule. These are planning estimates: cake cooling overlaps with the later oven stages, and the dry decorations can be made ahead. Follow the readiness cues if drying or setting takes longer.
This is a sliceable chocolate sheet cake with firm buttercream and crisp edible decorations, not a scoopable pudding dessert like Dirt Cake. Six homemade tombstones and three meringue ghosts create the height, while restrained candy accents leave the dark cake, gray stones, and white ghosts easy to read.
Why This Graveyard Cake Works
This Graveyard Cake works because the cake, frosting, cookies, and meringues are designed as one coordinated structure rather than four unrelated recipes.
The 9 x 13-inch Graveyard Cake stays in its pan, giving the upright decorations a broad, stable base. The buttercream is firm enough to hold shallow ridges and anchor the tombstones, while the mixed-texture cookie crumbs create convincing soil without turning pasty.
The dry decorations are finished before assembly and kept separate from the moist cake, helping their crisp texture last until serving. A fixed count of six tombstones and three ghosts also prevents the surface from becoming crowded or top-heavy.
Why You’ll Love This Graveyard Cake
This Graveyard Cake turns a familiar chocolate dessert into an unmistakable Halloween centerpiece without hiding the cake beneath heavy sculpted decoration.
- A complete homemade project: The Graveyard Cake, frosting, tombstones, ghosts, and bones are all included.
- A party-friendly format: Fifteen square servings are easier to portion than a tall decorated layer cake.
- Flexible preparation: The dry decorations can be made days before the final assembly.
- No special cutter: A paper template and a small knife are enough for the tombstones.
- Clear decorating limits: Six tombstones, three ghosts, and a few accents keep the scene legible.
- Real chocolate appeal: The moist Graveyard Cake and dark buttercream remain as important as the Halloween finish.
The Baking Science Behind a Moist, Stable Graveyard Cake
A few simple baking principles keep the chocolate crumb tender, the buttercream firm, and the decorations crisp.
Oil remains fluid after cooling and helps the chocolate crumb feel tender, even after refrigeration. The same practical effect is explained in this King Arthur Baking guide to oil in cake. Buttermilk and sour cream provide moisture and acidity that reacts with baking soda. Baking powder supplies additional leavening, while Dutch-process cocoa contributes a darker color and milder flavor than natural cocoa.
The buttercream uses cocoa for color and volume plus bittersweet chocolate for a firmer finish. Adding cream gradually preserves enough structure to support the tombstones without making the frosting difficult to spread.
Cornstarch contributes a tender shortbread texture, while chilling the compact dough before and after cutting helps the silhouettes stay sharp. Heating the egg whites and sugar to 160°F (71°C) dissolves the sugar before whipping, then the low oven removes moisture so the ghosts and bones dry crisp rather than remaining marshmallow-like.
Ingredients for Graveyard Cake
The complete formula below groups the Graveyard Cake ingredients by component, including amounts, preparation states, and optional decorations. The method arranges the oven stages separately so everything can be made with one oven.
Ingredient List
Measure the ingredients by weight where given and keep the six components separate until each stage calls for them. For this Graveyard Cake, use 75 g cocoa in the batter and 63 g in the buttercream. The cup equivalents are approximate: spoon cocoa into the measure without packing, level it, and sift afterward. A scale gives the most consistent result across brands.
Chocolate Cake
- 2 cups (240 g) all-purpose flour
- 75 g Dutch-process cocoa powder (about 3/4 cup plus 2 tablespoons)
- 1 2/3 cups (330 g) granulated sugar
- 2 teaspoons baking powder
- 3/4 teaspoon baking soda
- 1 teaspoon fine salt
- 2 large eggs (about 100 g without shells), at room temperature
- 1 cup (240 ml) whole buttermilk, at room temperature
- 1/2 cup (120 g) full-fat sour cream, at room temperature
- 1/2 cup (120 ml) neutral vegetable oil
- 2 teaspoons (10 ml) vanilla extract
- 3/4 cup (180 ml) freshly brewed hot coffee
- A little extra neutral oil, for greasing the pan
Shortbread Tombstones
- 1/2 cup (113 g) unsalted butter, softened
- 1/2 cup (60 g) confectioners’ sugar
- 1/2 teaspoon (2.5 ml) vanilla extract
- 1/4 teaspoon fine salt
- 1 1/4 cups (150 g) all-purpose flour
- 2 tablespoons (16 g) cornstarch
Gray Icing and Tombstone Details
- 1 cup (120 g) confectioners’ sugar
- 1 1/2 to 2 tablespoons (22 to 30 ml) milk
- Black gel food coloring, as needed
- 1 oz (28 g) dark chocolate, melted
Meringue Ghosts and Bones
- 3 large egg whites (about 90 g)
- 180 g granulated sugar (about 3/4 cup plus 2 tablespoons plus 1 teaspoon)
- 1/4 teaspoon cream of tartar
- 1/2 teaspoon (2.5 ml) vanilla extract
- 1/2 oz (14 g) dark chocolate, melted, for the ghost faces
Dark Chocolate Buttercream
- 1 cup (226 g) unsalted butter, softened
- 63 g Dutch-process cocoa powder (about 3/4 cup), sifted after measuring
- 3 cups (360 g) confectioners’ sugar
- 3 oz (85 g) bittersweet chocolate, melted and cooled
- 1/4 teaspoon fine salt
- 2 teaspoons (10 ml) vanilla extract
- 1/4 to 1/3 cup (60 to 80 ml) heavy cream, at room temperature
Oreo Soil and Optional Accents
- 16 regular Oreo cookies (about 6 1/3 oz or 180 g), filling included
- 2 to 3 candy pumpkins, optional
- Up to 3 gummy worms, optional
Ingredient Notes for the Best Texture and Structure
The ingredients that most affect the finished Graveyard Cake are the cocoa, cultured dairy, chocolate, and cookie crumbs.
- Dutch-process cocoa: Use it as written because the leavening system is balanced for its lower acidity. This comparison of Dutch-process and natural cocoa explains why an unadjusted swap changes rise, color, and flavor.
- Whole buttermilk: Its moisture and acidity support a tender crumb. For a closer look at how cultured milk behaves in baking, see How to Make Buttermilk.
- Bittersweet chocolate: Cool it before mixing so it strengthens the buttercream without melting the softened butter.
- Filled Oreo cookies: Keep the filling because it creates a few darker clumps, but preserve some irregular cookie pieces so the soil does not look flat.
Kitchen Tools Needed for Graveyard Cake
Gather these tools before you begin so you can move easily between baking, cooling, and decorating.
- Cake pan and cooling: One light-colored 9 x 13-inch metal cake pan, parchment paper, and a cooling rack.
- Decoration baking: Two baking sheets lined with parchment so the tombstones and meringues remain separate.
- Mixing and temperature control: Large mixing bowls, one heatproof mixing bowl, a fine-mesh sieve, a stand mixer or electric hand mixer, and an instant-read thermometer.
- Shaping and piping: A rolling pin, a small sharp knife or clean pizza cutter, and piping bags with large and small plain openings.
- Finishing and portioning: A small offset spatula and a sharp knife for clean 3-by-5 portions; crush the cookies with the rolling pin or use a food processor if available.
Before You Begin the Graveyard Cake
Five quick checks make this Graveyard Cake easier to schedule before the first ingredient is mixed. The method uses one conventional oven: cake first, shortbread second, and meringues last.
- Clear flat space for a rolled dough sheet, a cooling cake, and two trays of meringues. Check that both meringue trays fit in the oven with room for air to circulate.
- Prepare three tombstone templates about 3 1/2 to 4 inches tall and 1 3/4 to 2 1/4 inches wide.
- Bring the eggs, buttermilk, and sour cream toward room temperature and soften the butter until it dents without looking greasy.
- Allow about six hours for the same-day project, with extra time if the icing sets slowly or the meringues need longer to dry. The cake cools on a rack while the decorations use the oven; reserve the final hour of oven cooling for the meringues alone.
- Set aside airtight, dry storage for the tombstones and meringues until final assembly.
The first time I planned this Graveyard Cake, I thought the smartest approach would be to finish every detail as early as possible. I learned that the dry decorations need a different timeline from the cake. Tombstones and meringue ghosts stay beautifully defined when they are stored separately, then added shortly before serving. Now I prepare them ahead, keep them airtight, and save the final graveyard assembly for the day the cake will be served.
What to Expect from This Graveyard Cake
Several stages look different from an ordinary butter cake, and each of these states is normal for this Graveyard Cake.
The batter is fluid and glossy enough to pour in a continuous ribbon, so its thin consistency is not a sign that flour is missing.
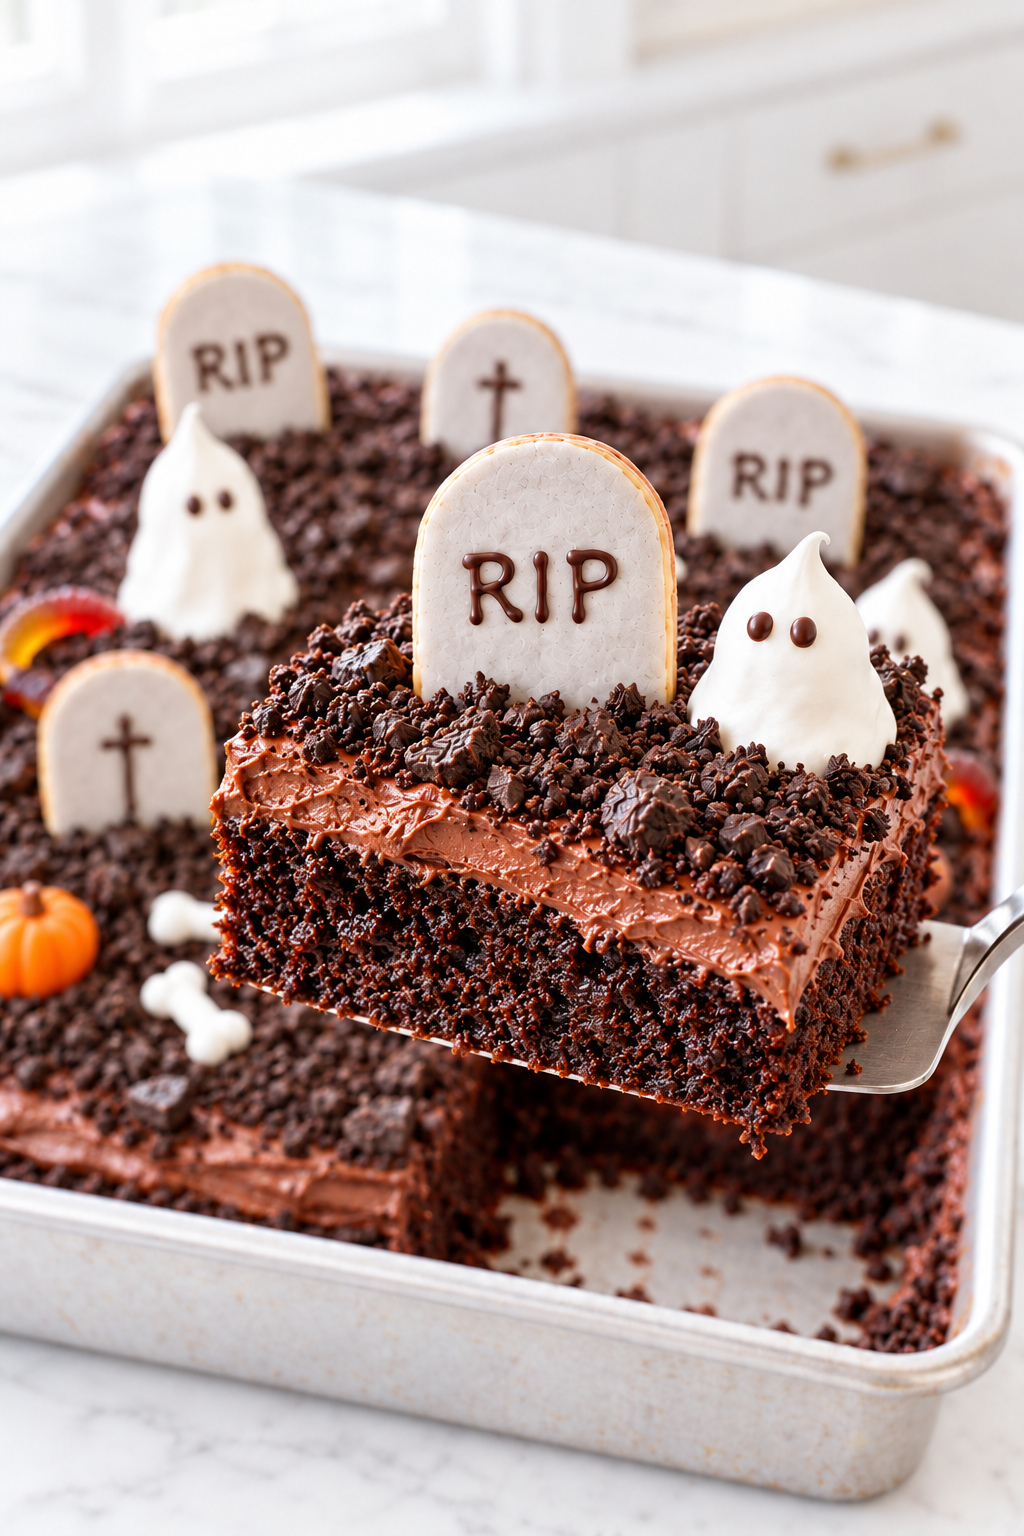
The baked Graveyard Cake is flat or only gently domed, with a dark, cohesive crumb that remains moist rather than brownie-dense.
The tombstones remain pale through the center and the gray icing dries matte, so faint golden lower edges and tiny handmade irregularities are expected rather than flaws.
The dried ghosts and bones become matte, light, and crisp, while the dark buttercream holds loose ridges beneath nearly black cookie soil without looking shiny or fluid.
How to Make Graveyard Cake
Build the Graveyard Cake in twelve stages using one oven. Mix and bake the cake while the shortbread dough chills, bake the tombstones next, and dry the meringues last. Ice the cooled tombstones and prepare the buttercream during the meringue drying period, then assemble only after every component is ready.
1. Make and Chill the Tombstone Dough
Beat 1/2 cup (113 g) softened unsalted butter with 1/2 cup (60 g) confectioners’ sugar for about 1 minute, until smooth but not highly aerated. Mix in 1/2 teaspoon vanilla and 1/4 teaspoon fine salt. Add 1 1/4 cups (150 g) all-purpose flour and 2 tablespoons (16 g) cornstarch. Mix on low only until the dough gathers into soft clumps.
Place the dough between two parchment sheets and roll it to an even 1/4-inch thickness. Transfer the flat packet to a baking sheet and refrigerate for at least 45 minutes. Leave it chilled while you mix and bake the cake in the next three steps.
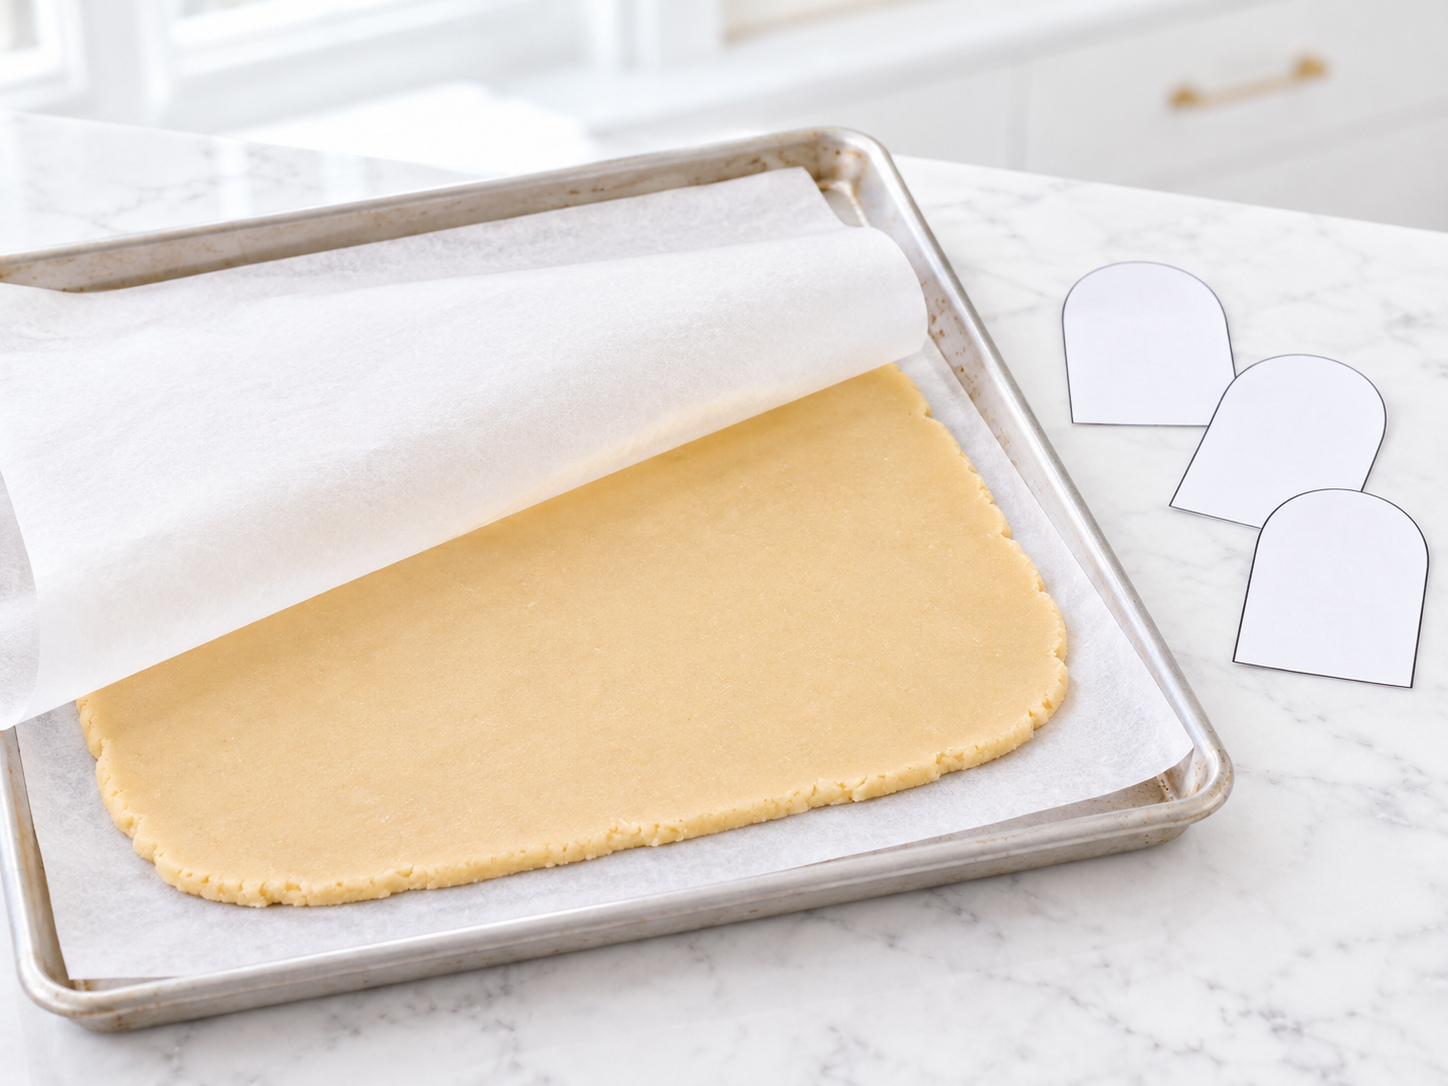
What you should see: A smooth, compact sheet of dough with even thickness and no wet or crumbly patches. If the dough smears under the rolling pin, chill it briefly before continuing.
2. Prepare the Pan and Dry Ingredients
While the tombstone dough chills, heat the oven to 350°F (175°C). Lightly grease a 9 x 13-inch metal pan with the extra oil and fit parchment across the bottom. In a large bowl, whisk 2 cups (240 g) all-purpose flour, 75 g Dutch-process cocoa (about 3/4 cup plus 2 tablespoons), 1 2/3 cups (330 g) granulated sugar, 2 teaspoons baking powder, 3/4 teaspoon baking soda, and 1 teaspoon fine salt.
Whisk for at least 30 seconds so the cocoa and leaveners are evenly dispersed. Break up every visible cocoa lump before liquid enters the bowl.
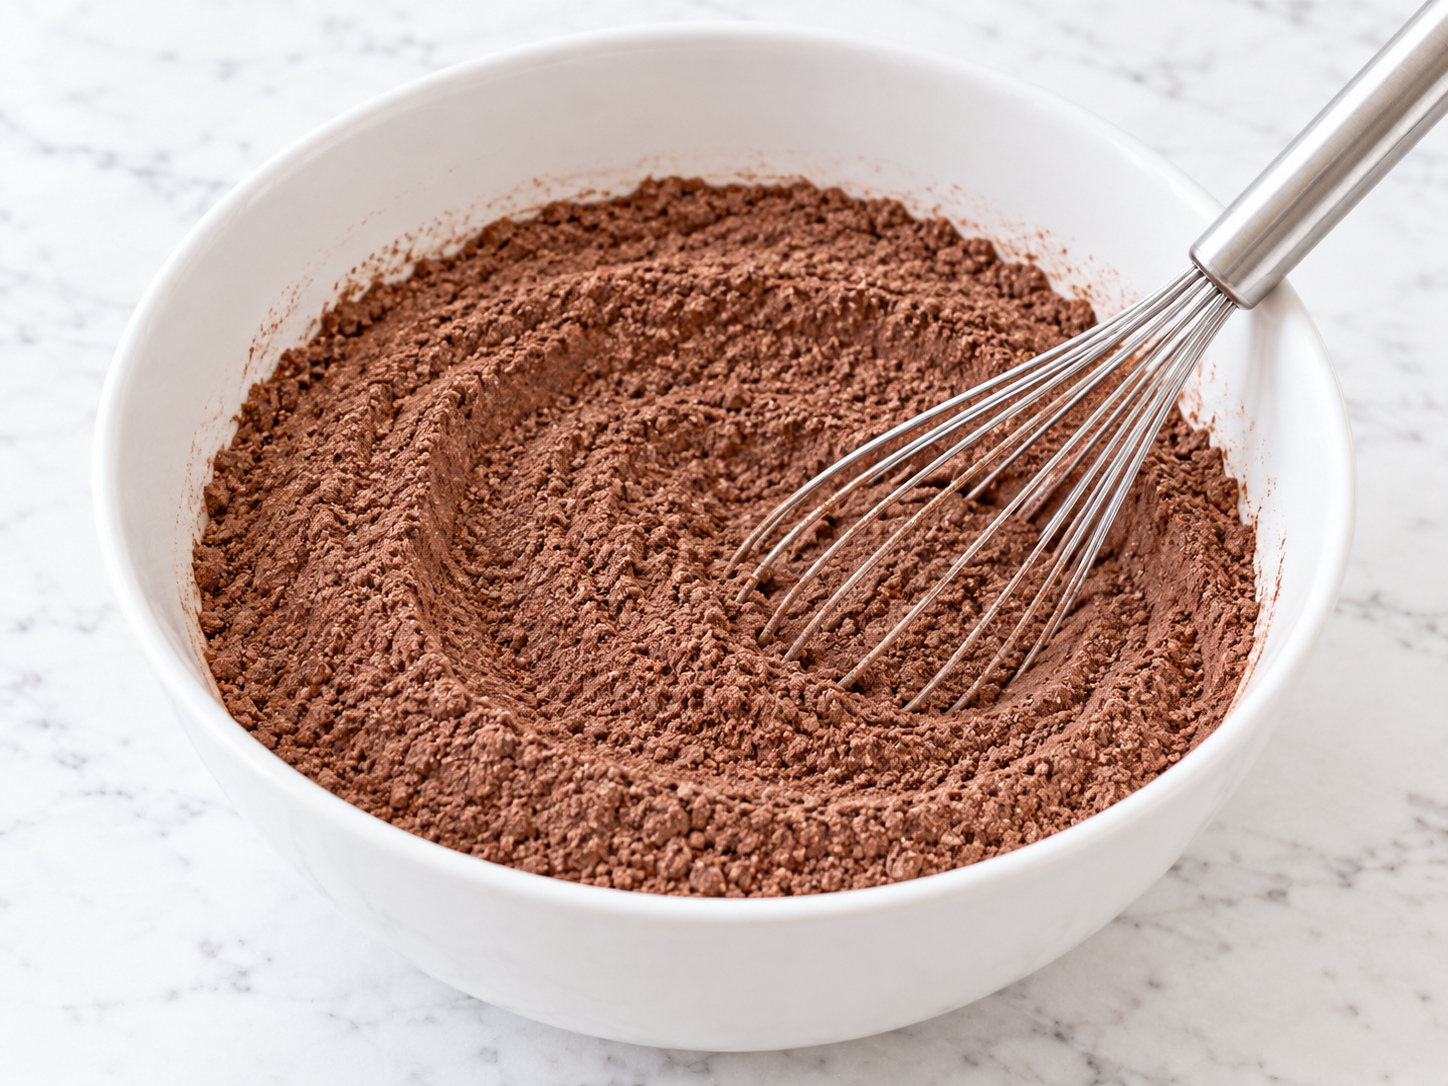
What you should see: A uniform cocoa-brown mixture without pale flour streaks, white leavener pockets, or compact cocoa lumps.
3. Mix the Chocolate Cake Batter
In a second bowl, whisk 2 large eggs, 1 cup (240 ml) whole buttermilk, 1/2 cup (120 g) full-fat sour cream, 1/2 cup (120 ml) neutral oil, and 2 teaspoons vanilla until smooth. Pour the wet mixture into the dry ingredients and whisk only until no dry pockets remain.
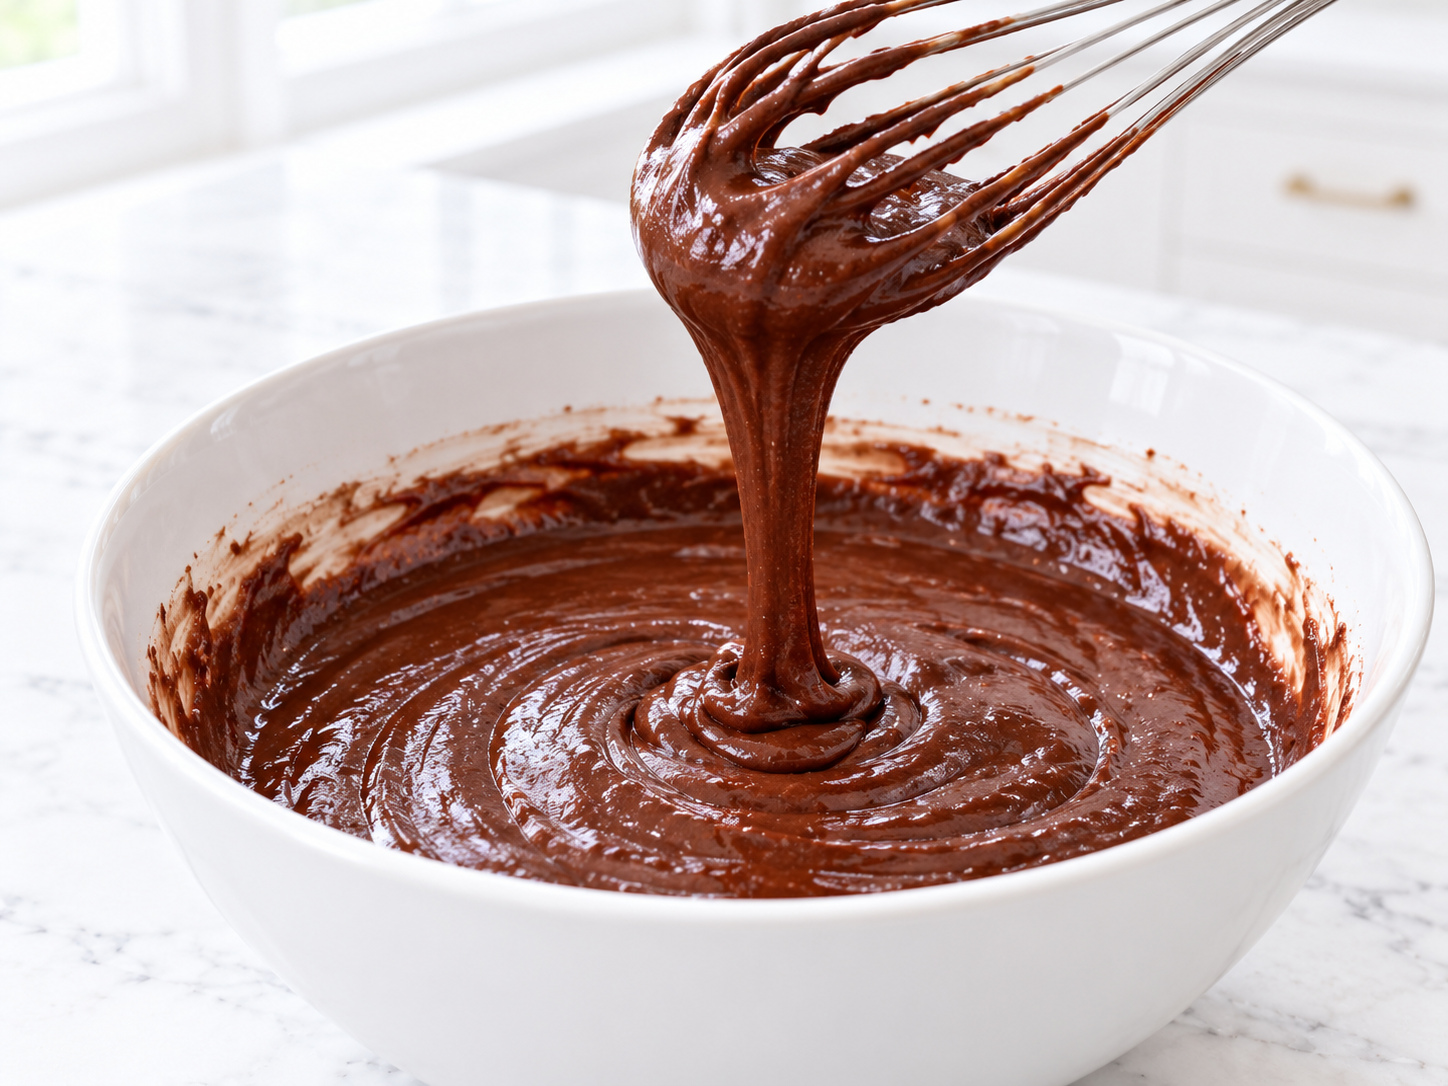
Add 3/4 cup (180 ml) freshly brewed hot coffee gradually while whisking slowly. Scrape the bowl once and stop as soon as the batter is even. Transfer it immediately to the prepared pan.
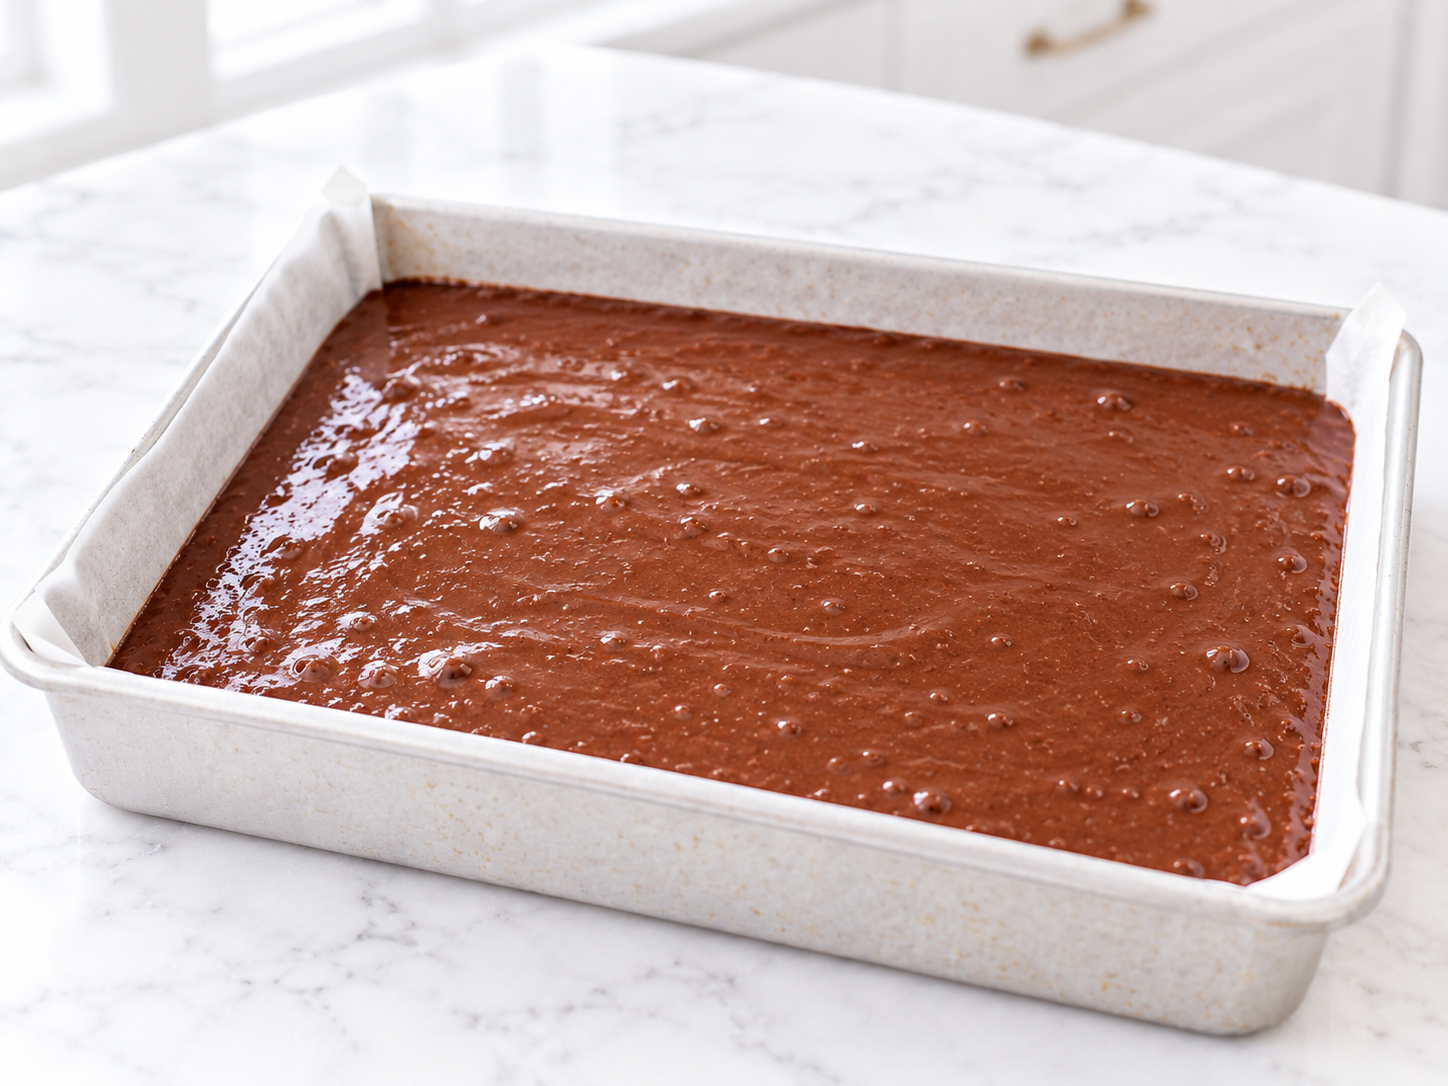
What you should see: Smooth, fluid, glossy batter that pours easily and settles level. A few small bubbles are normal; dry flour pockets or thick lumps are not.
4. Bake and Cool the Cake Completely
Bake for 32 to 38 minutes, beginning the doneness check at 32 minutes. The center should spring back slowly, the surface should be set, and a thin tester should show no liquid batter. A few moist crumbs are correct.
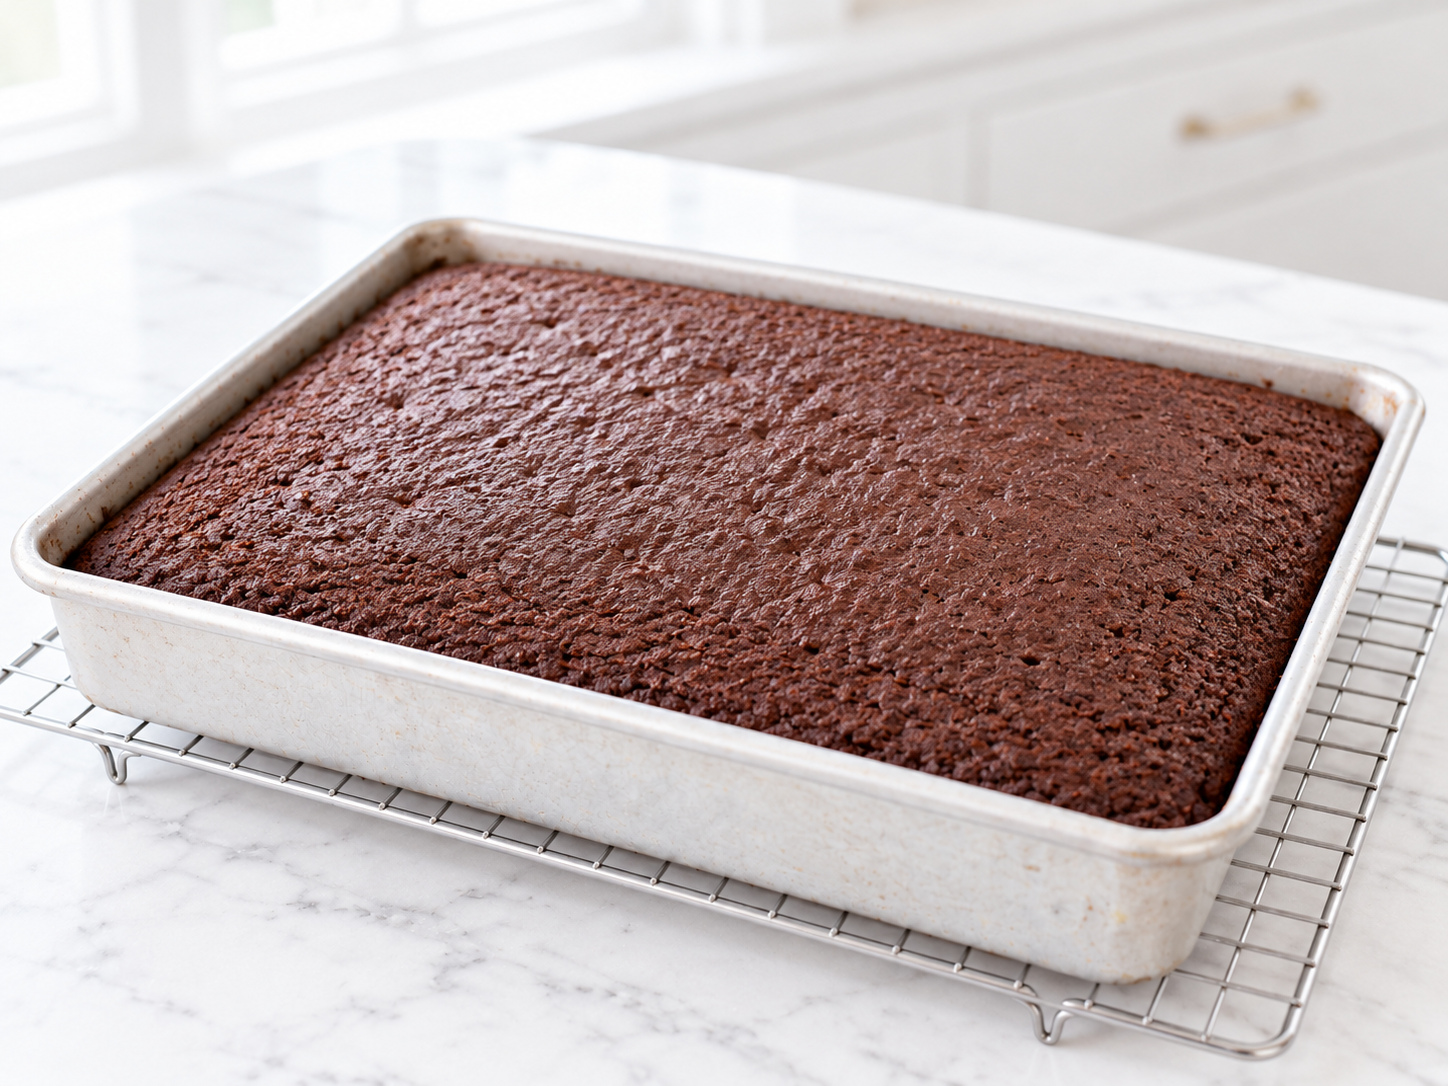
Set the pan on a rack and allow approximately 2 hours for the Graveyard Cake to cool completely. Continue with the tombstones and meringues while the cake cools outside the oven. Do not cover a warm cake or spread buttercream over residual warmth.
What you should see: A stable, mostly level top with no wet center or liquid movement. The cooled Graveyard Cake should feel room temperature at the center, not merely around the edges.
5. Cut and Bake the Tombstones
After removing the cake, reduce the oven to 325°F (165°C) and line a baking sheet with parchment. Remove the top sheet from the chilled dough. Use paper templates about 3 1/2 to 4 inches tall and 1 3/4 to 2 1/4 inches wide to cut eight tombstones, keeping the dough 1/4 inch thick. Gently reroll scraps if needed. Chill the cut shapes for another 15 minutes, and let the oven settle at the lower temperature before baking.
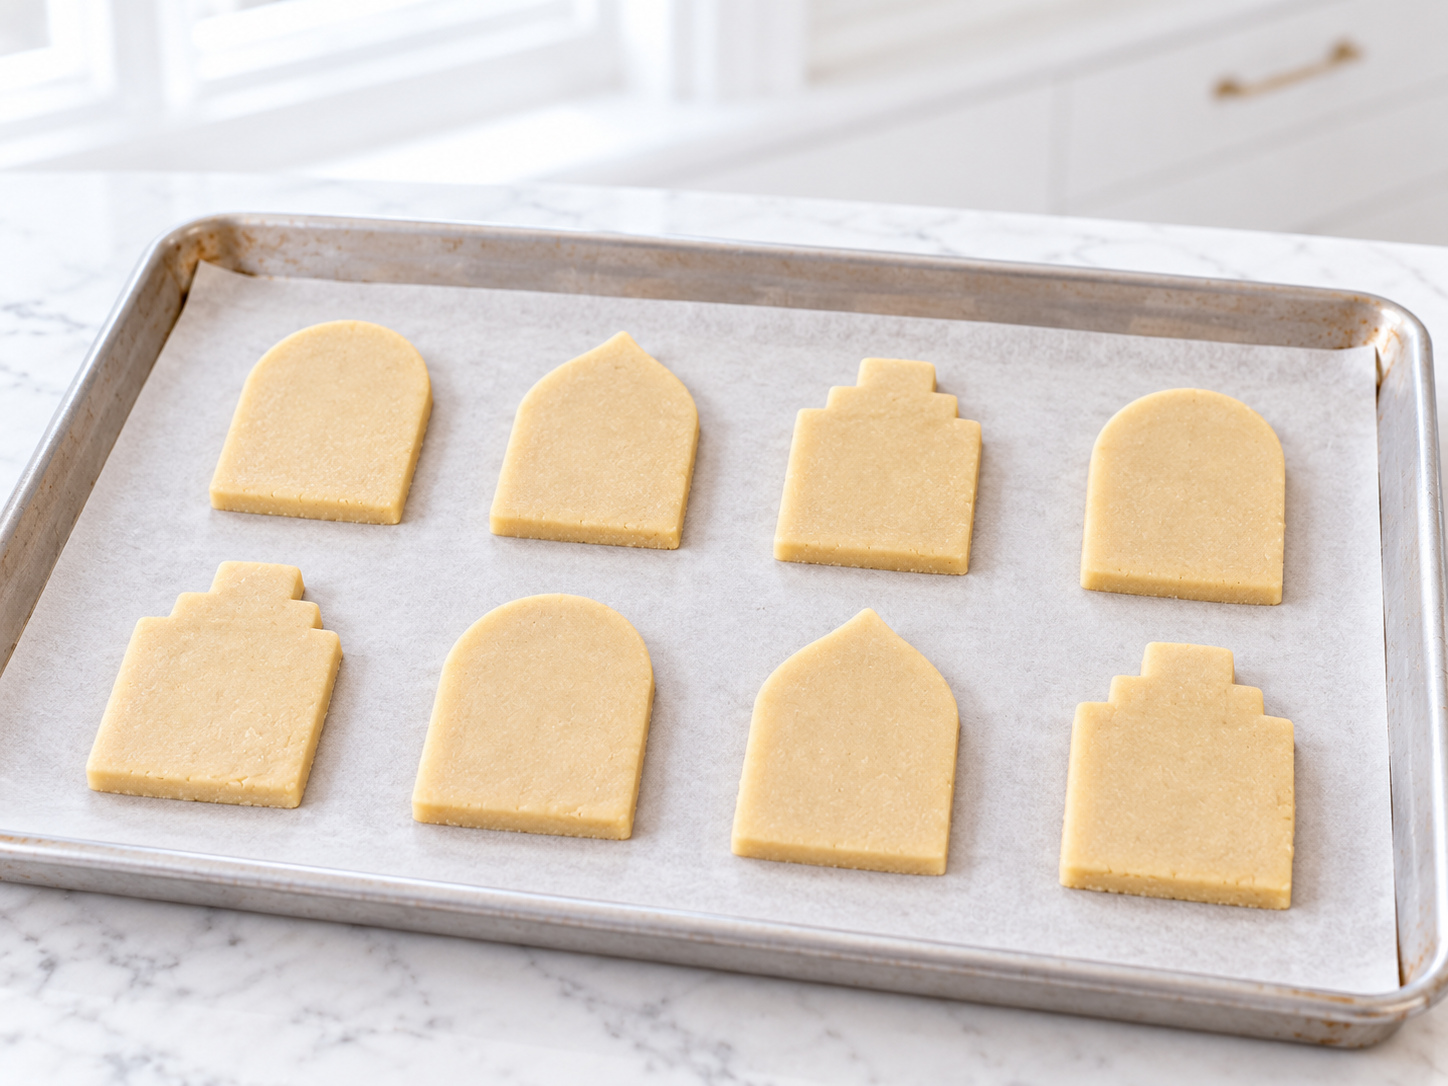
Bake for 15 to 18 minutes, rotating the pan once if the oven browns unevenly. Cool on the baking sheet for 10 minutes, then move the cookies to a rack and cool completely.
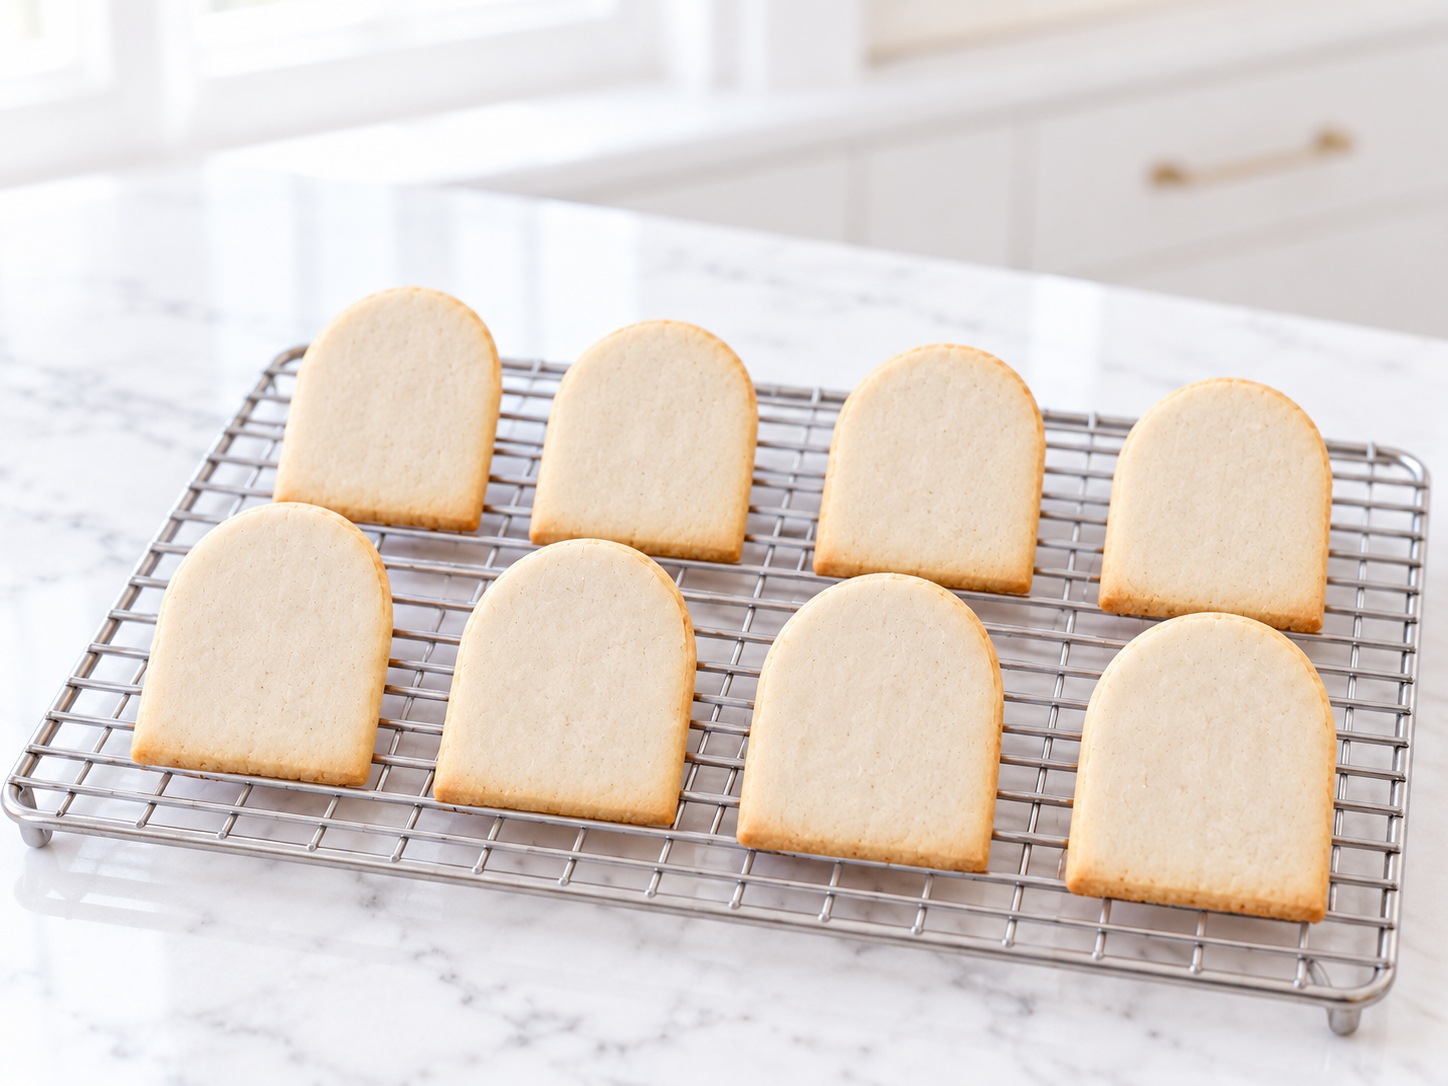
What you should see: Tombstones with dry, pale centers, sharp silhouettes, and only faintly golden lower edges. Dark edges mean the cookies have baked beyond the ideal point.
6. Prepare the Swiss Meringue
After baking the tombstones, lower the oven to 200°F (95°C). Let it cool to that temperature before loading the meringues so they stay pale. Line two cool baking sheets with parchment. Put 3 large egg whites (about 90 g) and 180 g sugar (about 3/4 cup plus 2 tablespoons plus 1 teaspoon) in a clean heatproof bowl. Set the bowl over barely simmering water without letting its base touch the water.
Whisk continuously until the sugar dissolves and the mixture reaches 160°F (71°C). Move the bowl to the mixer, add 1/4 teaspoon cream of tartar, and whip on medium-high until the meringue is glossy, stiff, and close to room temperature. Mix in 1/2 teaspoon vanilla briefly.
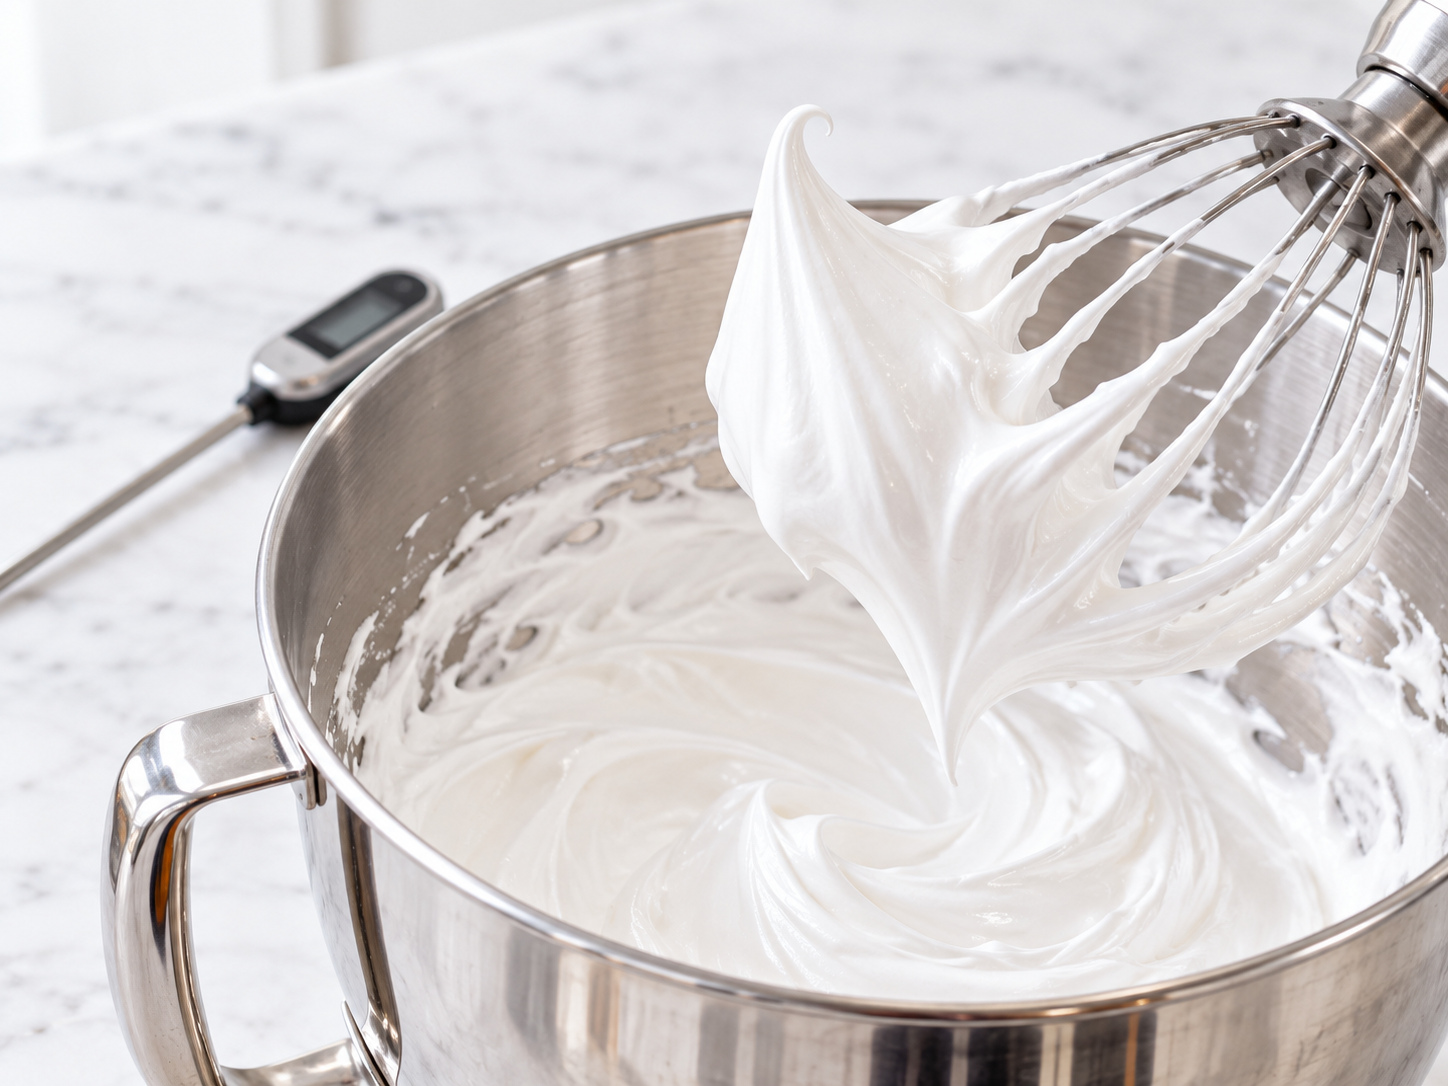
What you should see: Dense, glossy meringue forming a peak that stands upright with only the smallest bend at the tip. Any grease or yolk in the bowl can prevent full volume.
7. Pipe and Dry the Ghosts and Bones
Transfer the meringue to a piping bag with a large plain round opening. For each ghost, pipe a broad base, reduce the pressure as you lift, and stop squeezing before pulling away. Make three ghosts with slightly different heights, keeping each base wide enough to stand securely.
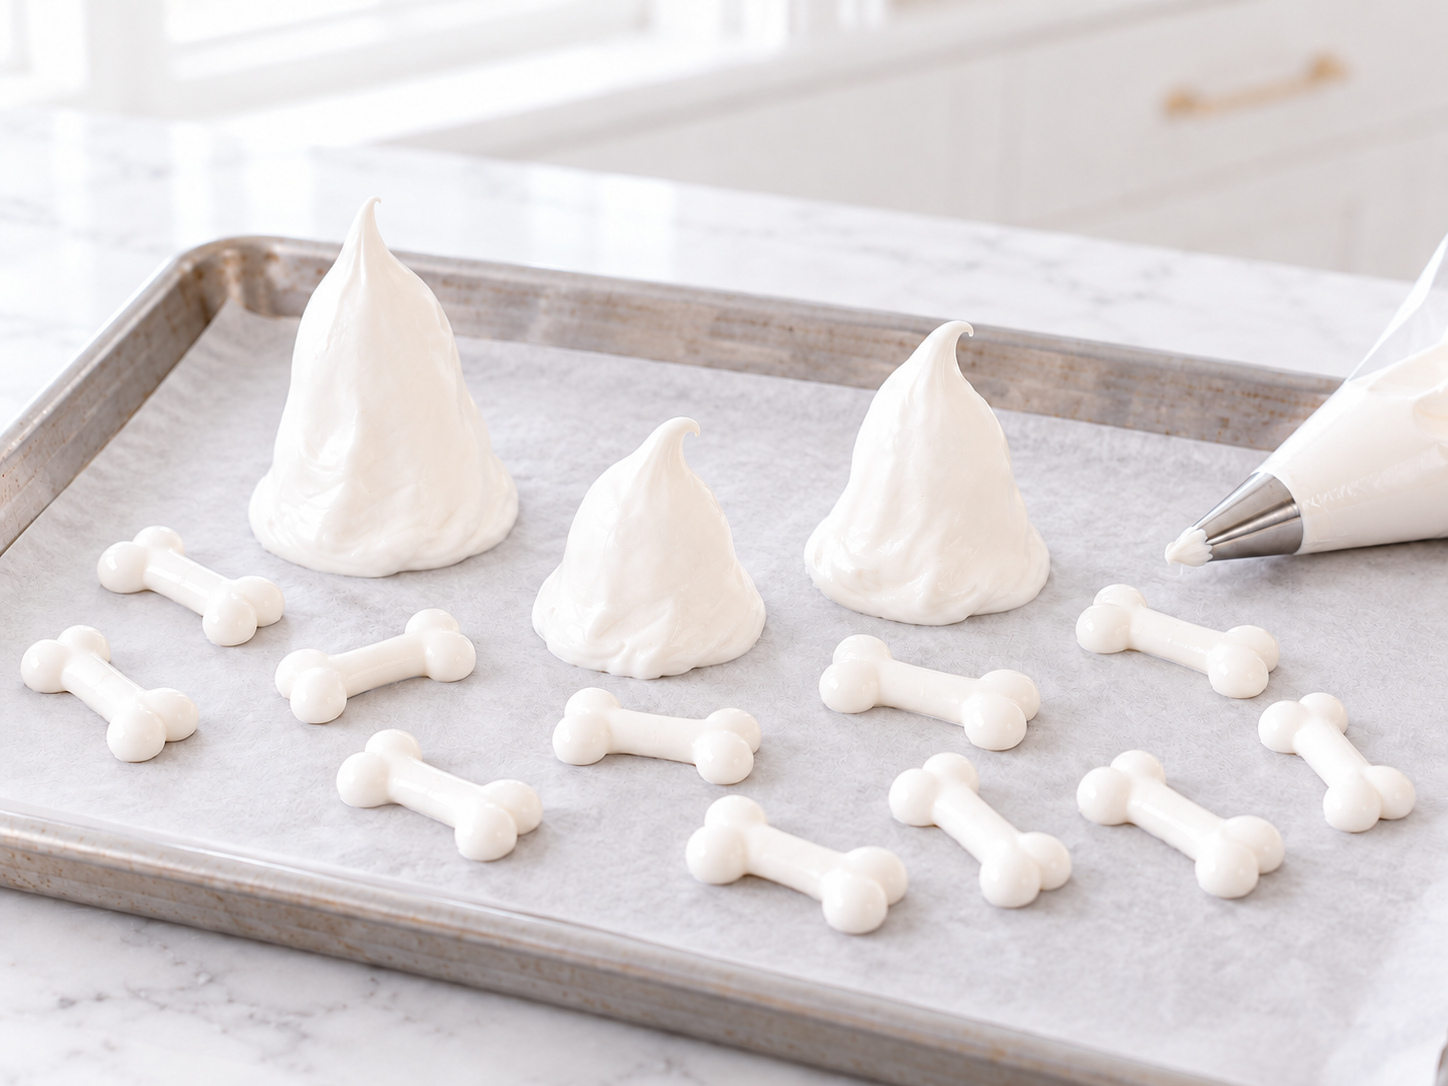
Use a smaller plain opening to pipe 10 to 14 bones, making a narrow line with two small rounded ends at each side. Pipe extra test pieces similar in thickness to the ghosts, and use any remaining meringue for spare kisses. Dry both trays at 200°F (95°C) for about 90 minutes. A test piece should release cleanly and be dry inside; continue drying if its center is still sticky. Turn off the oven and leave the trays inside for another hour, without using the oven for anything else. During this drying and resting period, continue with the tombstone icing, buttercream, and cookie soil. Once the ghosts are fully cool, use the reserved 1/2 oz (14 g) melted dark chocolate to add small eyes and let them set.
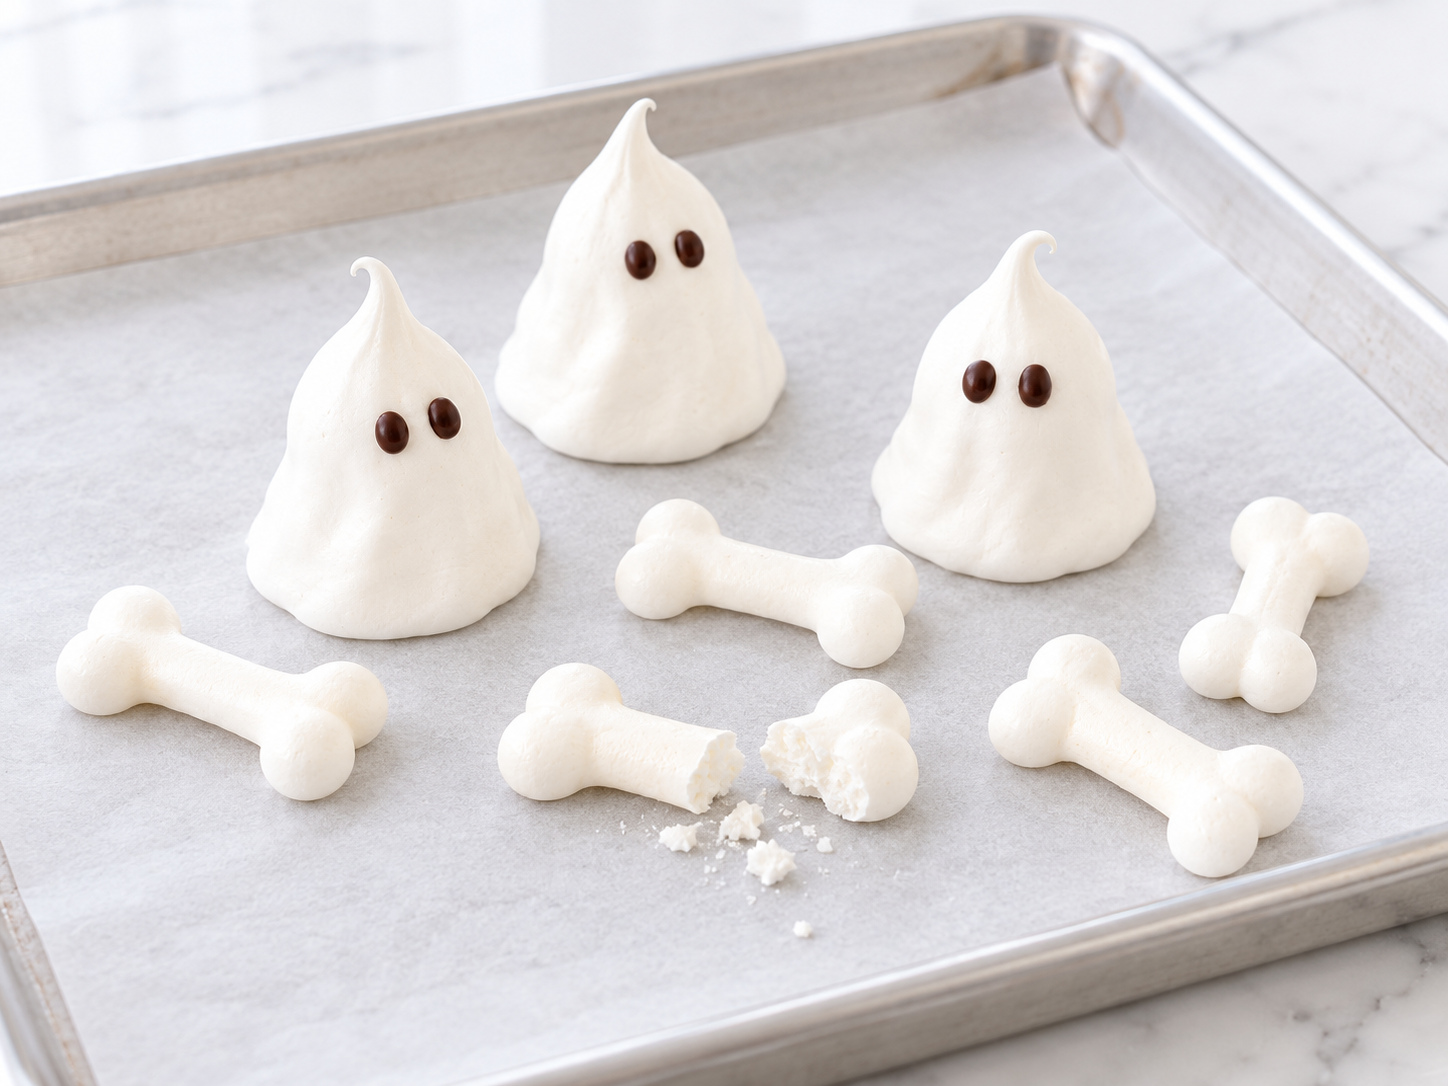
What you should see: Dry white-to-ivory decorations that release cleanly from the parchment. Break one extra piece open. The center should be dry rather than sticky or marshmallow-like.
8. Ice and Decorate the Tombstones
While the meringues dry and the baked tombstones are completely cool, stir 1 cup (120 g) confectioners’ sugar with 1 1/2 tablespoons milk. Add more milk drop by drop only if needed for a thick but spreadable icing. Touch a toothpick to black gel coloring, then stir that tiny amount into the icing. Repeat only until the mixture becomes a pale stone gray.
Spread a thin coat over the fronts of six to eight cookies, leaving the bottom 3/4 inch bare. Leave the cookies flat until the thin coating is dry to a light touch; allow 1 to 2 hours or longer in humid conditions. Pipe or draw RIP, small crosses, and a few narrow cracks with 1 oz (28 g) melted dark chocolate, then let the lettering set before moving the cookies. Keep the lettering simple and leave some gray surface visible.
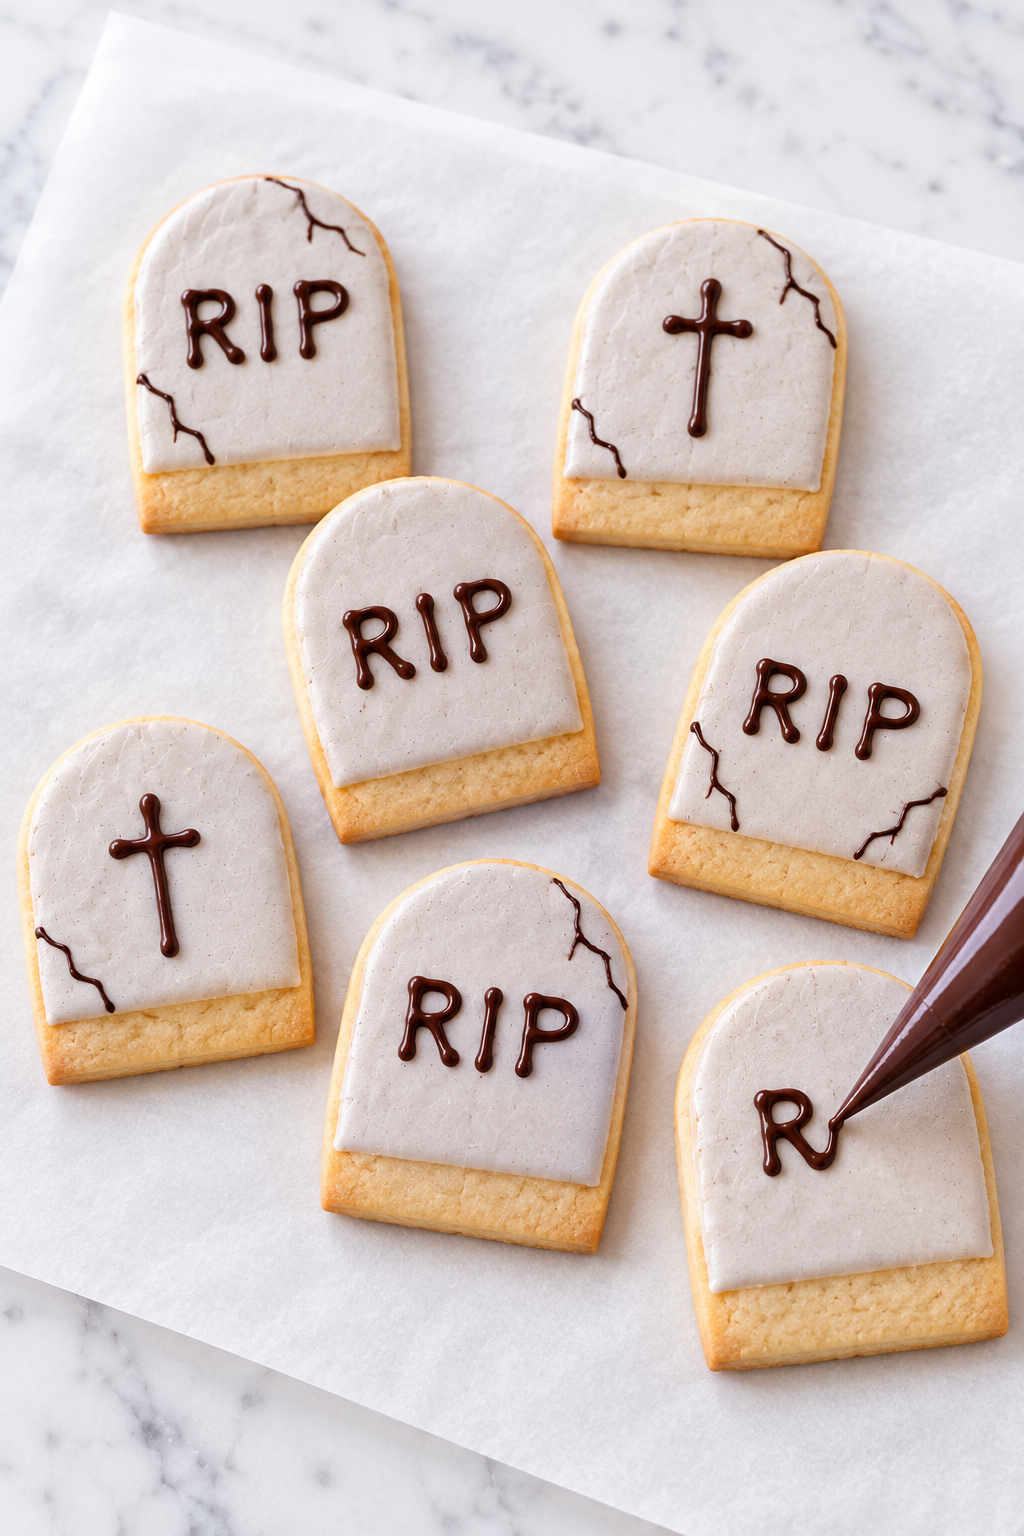
What you should see: Matte gray tombstones with legible dark details and a clean undecorated insertion zone. Thick icing or large chocolate patches make the cookies top-heavy.
9. Make the Dark Chocolate Buttercream
While the decorations finish drying, beat 1 cup (226 g) softened unsalted butter for 2 minutes, until creamy. On low speed, add 63 g sifted Dutch-process cocoa (about 3/4 cup, measured before sifting), 3 cups (360 g) confectioners’ sugar, and 1/4 teaspoon fine salt in several additions.
Mix in 3 oz (85 g) melted and cooled bittersweet chocolate and 2 teaspoons vanilla. Add 1/4 cup (60 ml) room-temperature heavy cream, then beat on medium-low until smooth. Add more cream 1 teaspoon at a time only if the frosting tears rather than spreads. Finish with 1 minute on low speed to reduce large air pockets.
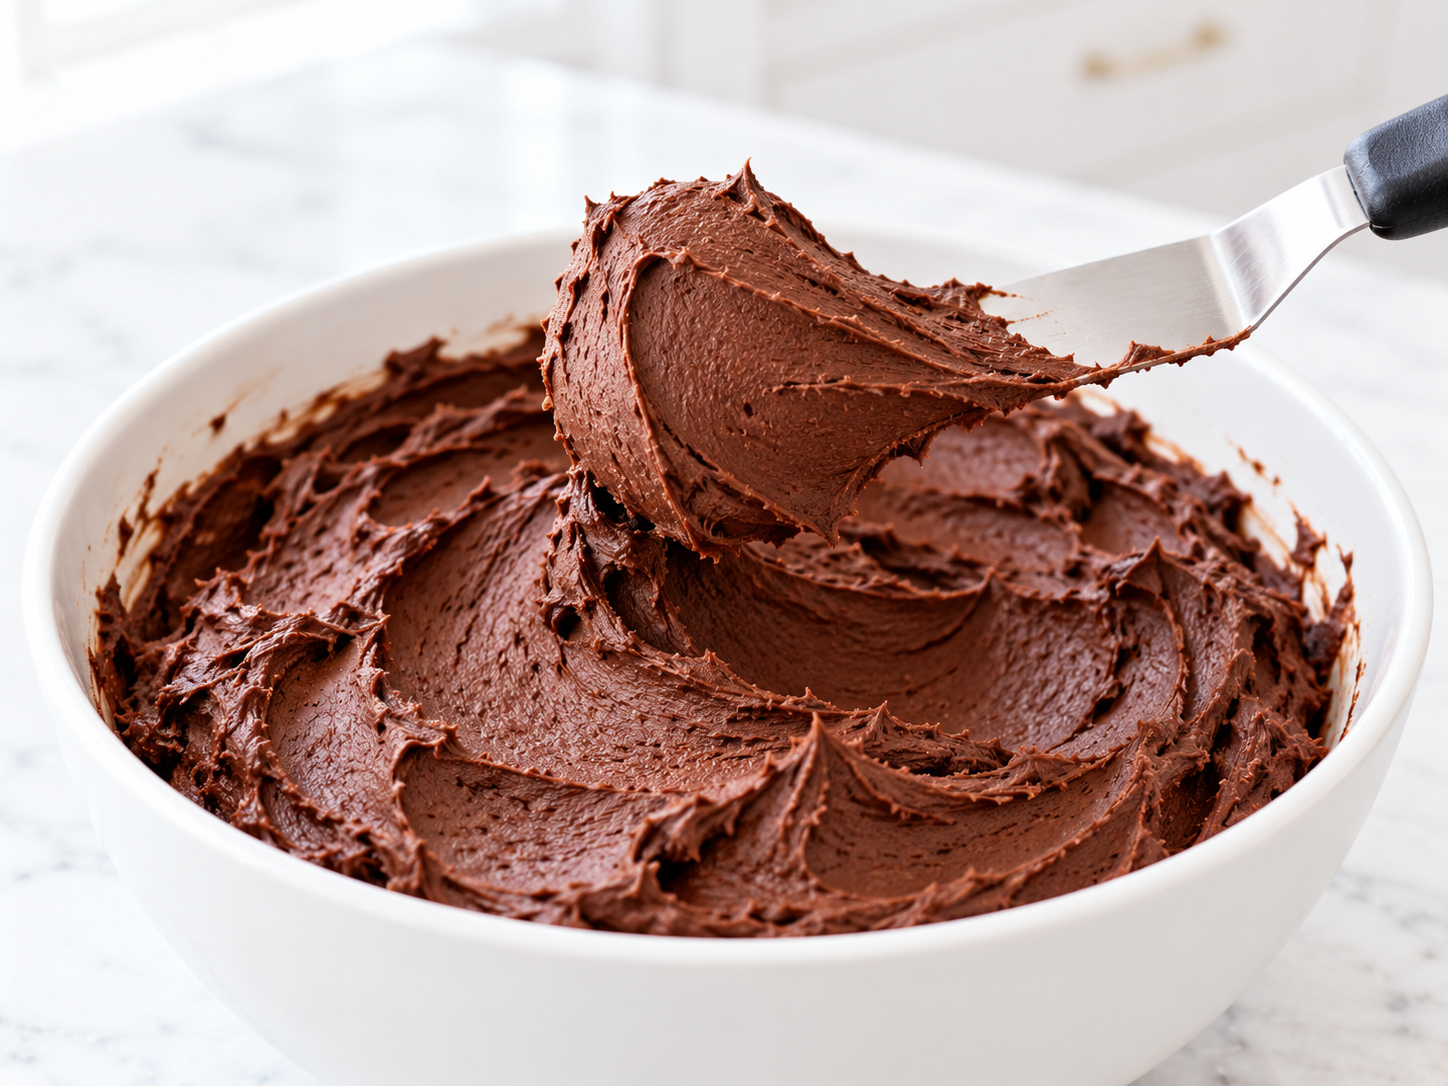
What you should see: Dark, cohesive buttercream that spreads without dragging the Graveyard Cake and holds a soft ridge without looking shiny or loose.
10. Prepare the Oreo Soil
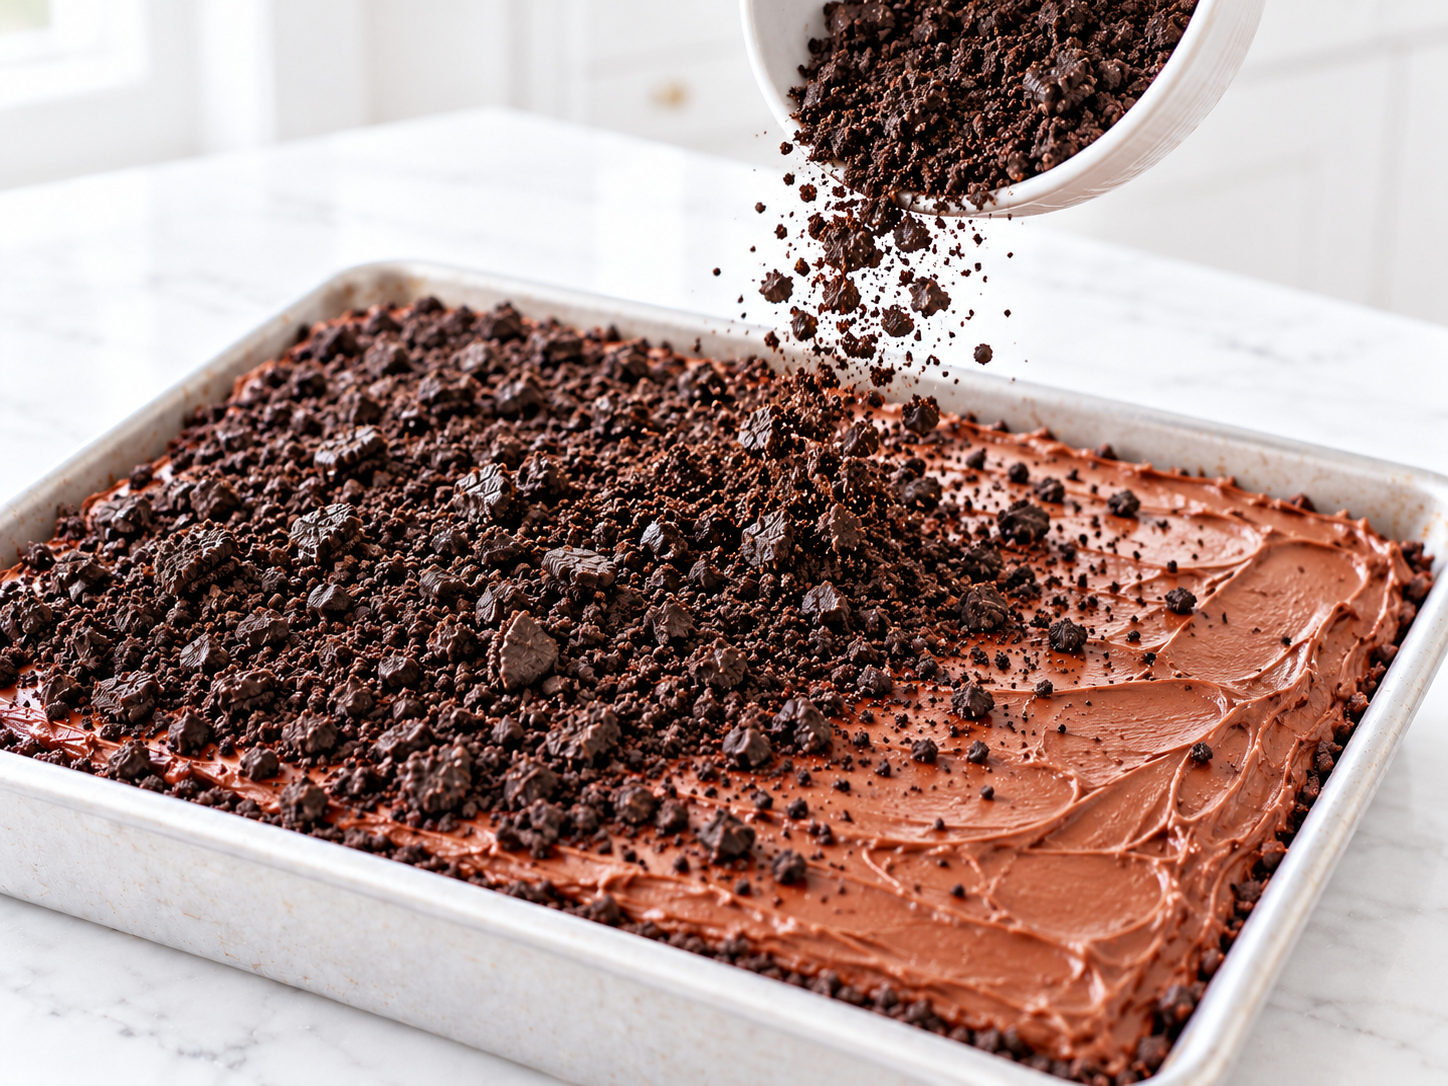
Crush 16 regular filled chocolate sandwich cookies, about 6 1/3 oz (180 g). Process or crush approximately three quarters into fine crumbs. Break the remainder into small, uneven pieces and combine the two textures.
Do not remove the filling. It helps a few crumbs gather into darker clumps, but the mixture should still scatter easily rather than form a paste.
What you should see: Mostly fine dark soil with scattered pebble-like pieces. A uniformly powdered mixture will look flatter after it is spread.
11. Frost the Cake and Add the Soil
Spread the buttercream over the fully cooled Graveyard Cake in an even layer, keeping the surface slightly irregular. Use the spatula to make shallow ridges rather than high peaks. Scatter the crushed cookies across the entire surface and press very lightly so they stay in place.
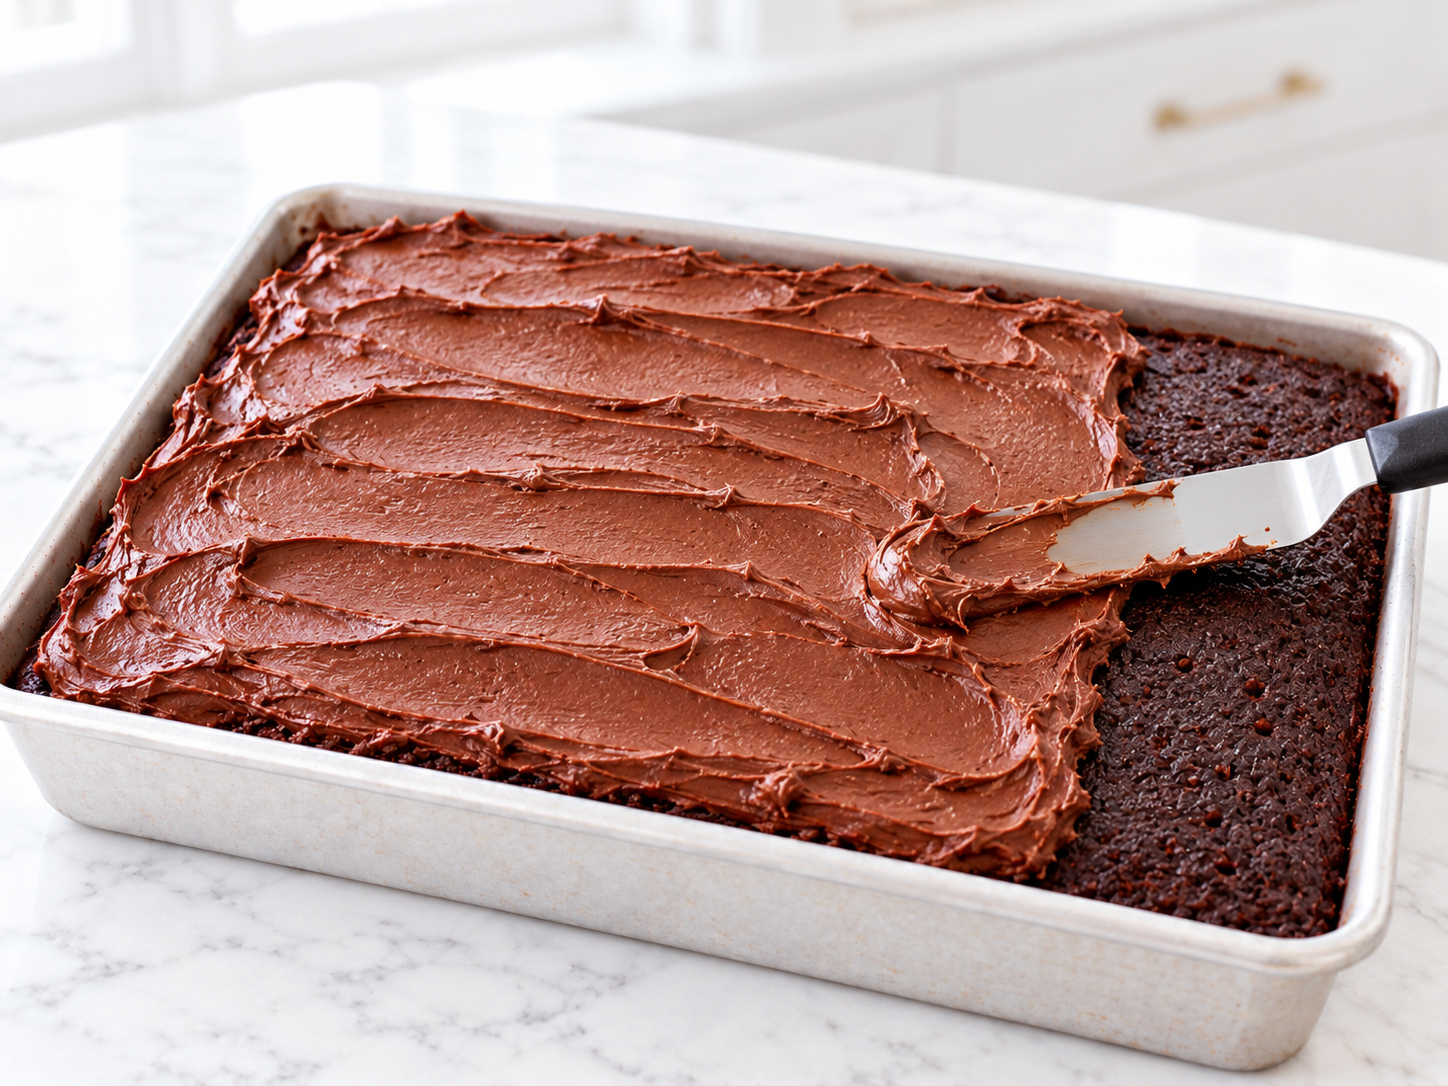
Mark six narrow insertion points by parting the crumbs with the tip of the spatula. The tombstones need direct contact with firm buttercream and cake, not only a loose layer of crumbs.
What you should see: A nearly black soil surface with low natural variation and six subtle anchor points. The frosting should remain hidden beneath most of the crumbs.
12. Build the Graveyard Scene
Arrange six tombstones in three staggered depth rows. Place the tallest cookie slightly behind center and insert the bare lower portion approximately 3/4 inch into the frosting and cake. Avoid a straight grid.
Add three ghosts at different heights, using a small dab of firm buttercream beneath each if needed. Arrange bones in small groups rather than one continuous border. Add two or three candy pumpkins and up to three gummy worms only if desired, leaving visible dark soil around every element.
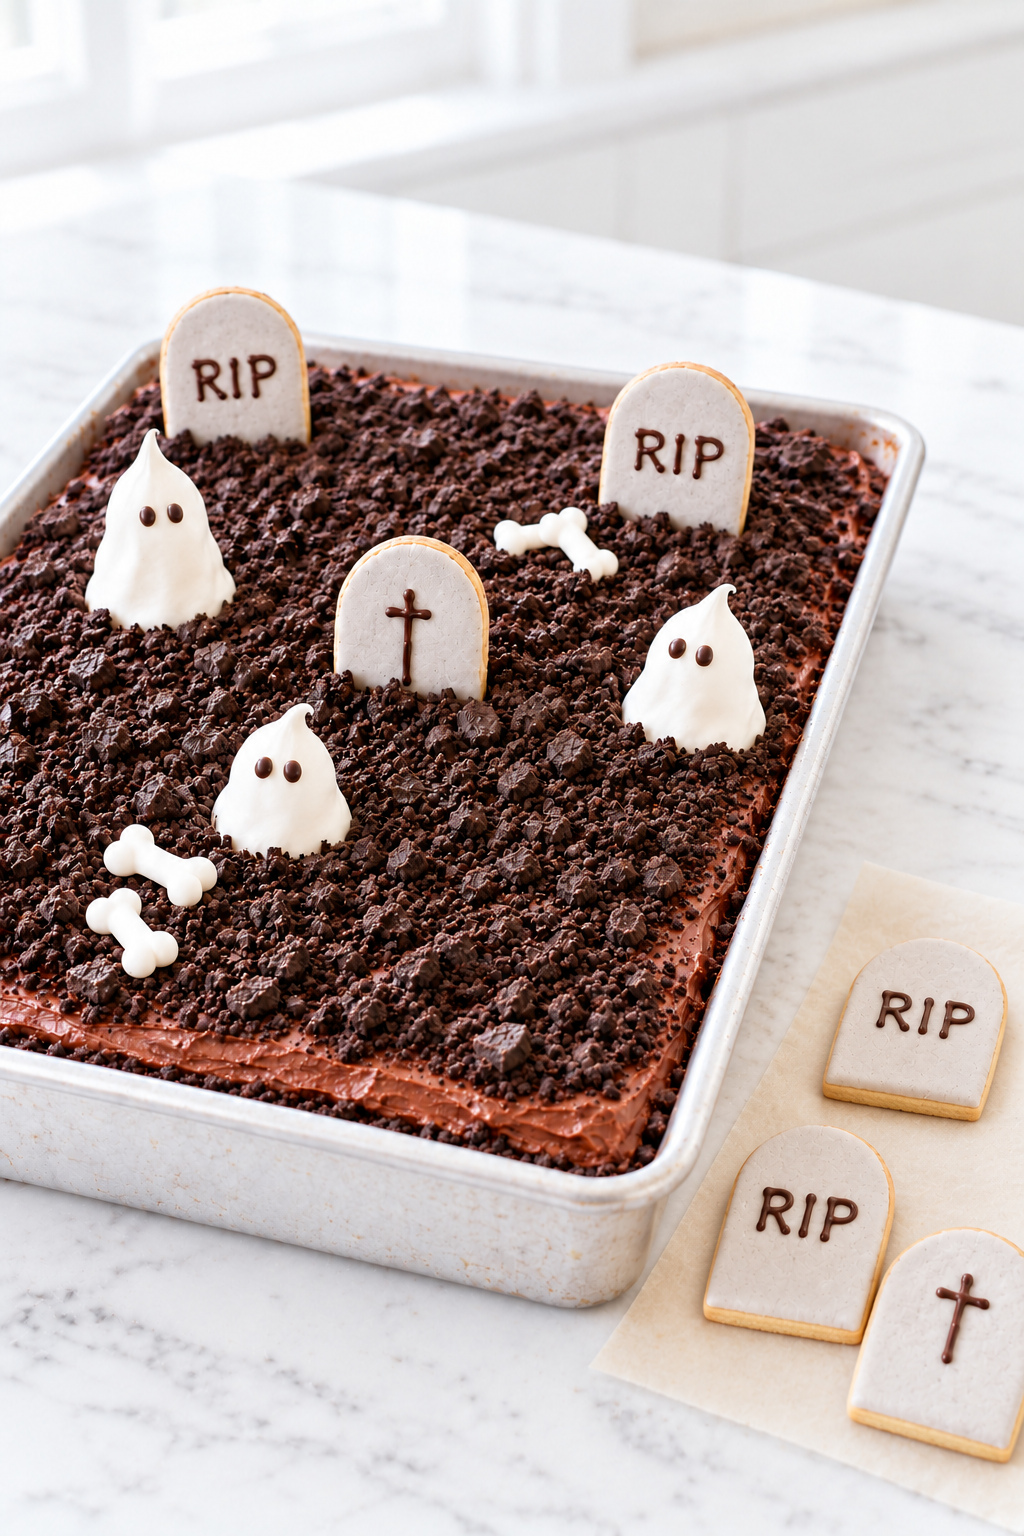
What you should see: A readable graveyard with three clear depth levels, open areas of soil, upright tombstones, and one ghost rising above the surrounding decorations. If an element leans, remove it and deepen or reinforce its anchor rather than pressing against another decoration.
Graveyard Cake Doneness Guide
Use appearance, touch, and structure together. A timer indicates when to start checking, but it cannot account for pan color, oven calibration, or the exact temperature of the ingredients.
| Component | Too early | Ready | Too far |
|---|---|---|---|
| Chocolate cake | Wet center, visible movement, or liquid batter on tester | Set surface, slow spring-back, and a few moist crumbs | Hard surface, dry tester, and edges pulling far from pan |
| Shortbread tombstones | Glossy center and shapes that bend when lifted | Matte pale centers with faintly golden lower edges | Dark edges, brittle texture, or visibly distorted shapes |
| Meringue | Sticky base, bending shape, or marshmallow-like center | Clean parchment release and dry center | Beige color, caramelized flavor, or heavy cracking |
| Buttercream | Shiny, loose, and unable to hold a ridge | Smooth, spreadable, and able to support a soft ridge | Cold, crumbly, or stiff enough to tear the Graveyard Cake |
A Graveyard Cake stays moist when the bake stops as soon as the correct cues agree. Do not wait for a completely dry tester, which usually appears after the crumb has lost more moisture than it needs to lose.
Expert Tips for the Best Graveyard Cake
These small details help keep the cake tender and the decorations neat, sturdy, and easy to serve.
- Map the serving grid first: Visualize a 3-by-5 grid before placing decorations so most cuts pass between the tallest elements instead of through them.
- Rank the tombstones: Reserve the thickest, straightest six cookies for the Graveyard Cake and use thinner or slightly uneven extras as plated accents.
- Build three visual heights: A tall rear element, medium side elements, and low foreground bones create depth without requiring more candy.
- Protect the white contrast: Keep the ghosts against open dark soil instead of clustering them directly beside pale gray stones.
- Review the serving angle: Step back from the side guests will see and remove one accent if it hides an inscription or closes the negative space.
Graveyard Cake Mistakes and How to Fix Them
Most problems come from excess flour, residual heat, trapped moisture, or decorations anchored only in loose crumbs.
| Mistake | What happens | Why it happens | Prevention or realistic fix |
|---|---|---|---|
| Packing flour into the cup | Cake bakes dry or heavy | Too much flour absorbs the available liquid | Weigh 240 g; once baked dry, Graveyard Cake cannot be restored fully |
| Using natural cocoa without adjustment | Color, flavor, and rise change | Natural cocoa has different acidity | Use Dutch-process cocoa as written |
| Pouring coffee in all at once | Batter splashes or keeps cocoa lumps | The liquid enters before the base is smooth | Add it gradually while whisking slowly |
| Frosting a warm cake | Buttercream turns shiny and slides | Residual heat softens the butter | Stop, cool the Graveyard Cake completely, and chill loose frosting briefly |
| Skipping the tombstone chill | Cookies spread and lose their silhouettes | Warm butter melts before the structure sets | Chill both the rolled sheet and the cut shapes |
| Rolling cookies too thin | Tombstones break during icing or insertion | The cookies lack enough cross-section for support | Keep the dough at an even 1/4 inch and use extras if one breaks |
| Underdrying the meringue | Ghosts stick or bend | Moisture remains inside | Return undecorated pieces to a low oven and test an extra piece |
| Storing meringue in humidity | Surfaces become sticky | Sugar attracts airborne moisture | Store airtight and assemble near serving time |
| Making buttercream too loose | Tombstones lean | Too much cream weakens the frosting | Add cream gradually; cool soft frosting before assembly |
| Crushing every cookie to powder | Soil looks flat | There is no size variation | Mix fine crumbs with several small irregular pieces |
| Inserting cookies only into crumbs | Tombstones fall | Loose crumbs cannot hold vertical weight | Clear an anchor point and insert into buttercream and cake |
| Decorating too early | Cookies soften and meringue loses crispness | Dry decorations absorb moisture | Keep pieces separate and assemble 1 to 3 hours before serving |
| Crowding the surface | The design looks busy and hard to recognize | Too many equal-size elements compete | Remove accents until dark soil is visible between decorations |
Beautiful Ways to Serve Graveyard Cake
Serve the Graveyard Cake so guests see the full graveyard first, then portion it in a way that protects the crisp decorations and reveals the dark, moist crumb.
Reveal the Whole Graveyard First
Bring the complete Graveyard Cake to the table in its pan while all six tombstones and three ghosts are still visible. Remove the dry decorations from the first cutting area, then divide the cake into a 3-by-5 grid for 15 clean portions.
Plate a Dramatic Individual Slice
Place one square on a light dessert plate with the chocolate crumb facing the guest. Set one small meringue bone or a spare tombstone beside the slice so the crisp accent stays visible without making the portion unstable.
Anchor a Halloween Dessert Table
Use the Graveyard Cake as the darkest, tallest centerpiece and surround it with smaller desserts in a controlled white, orange, green, or crimson palette. Leave breathing room around the pan so the handmade scene remains the focal point.
Pair the Dark Chocolate Thoughtfully
Black coffee or unsweetened black tea balances the sweet decorations, while cold milk softens the cocoa intensity. For a plated dessert, add a small scoop of vanilla or cookies-and-cream ice cream beside the slice rather than covering the crumb.
How to Store and Make Graveyard Cake Ahead
Store the moist Graveyard Cake and the crisp decorations separately whenever possible, because they have opposite humidity needs.
Store Leftover Graveyard Cake
Lift off any tombstones, ghosts, and bones that release cleanly and keep them airtight at room temperature while still dry. Cover the frosted cake without pressing wrap into the cookie soil, refrigerate it, and enjoy it within four days for best quality. Let each slice stand briefly at cool room temperature before serving so the buttercream softens.
Make the Graveyard Cake Components Ahead
Bake and decorate the tombstones up to three days ahead, allowing the icing and chocolate to dry before stacking them with parchment between layers. Prepare the meringues up to one week ahead and store them airtight away from humidity. This King Arthur Baking guide to storing meringues explains why condensation and humid air matter.
Freeze the Unfrosted Graveyard Cake
Freeze the completely cooled, unfrosted Graveyard Cake for up to two months, wrapped in two protective layers and kept level. Thaw it covered before frosting. Buttercream can be refrigerated separately and remixed on low after returning to a cool room temperature, but the assembled tombstones and meringues should not be frozen on the cake.
Graveyard Cake Make-Ahead Timeline
Work backward from serving time so the dry decorations stay crisp and the Graveyard Cake has enough time to cool before frosting.
| When | What to prepare | Ready when | How to hold it |
|---|---|---|---|
| Up to 1 week ahead | Meringue ghosts and bones | Pieces must be dry through the center | Store airtight in a dry place |
| Up to 3 days ahead | Shortbread tombstones and decoration | Icing and chocolate must be fully set | Store flat and airtight at room temperature |
| 1 day ahead | Chocolate cake | Cake must be completely cool before covering | Cover the pan securely at cool room temperature |
| Serving morning | Buttercream and cookie soil | Melted chocolate must be cool before mixing | Keep buttercream covered; keep crumbs airtight |
| 1 to 3 hours before serving | Frost and assemble the graveyard | Cake must be cool and buttercream firm enough to hold the decorations | Keep covered in a cool place or refrigerate as needed |
| Immediately before presenting | Check the most moisture-sensitive pieces | Meringue surfaces should remain dry | Replace any softened decoration with a dry spare. |
For a same-day Graveyard Cake, use the schedule below as a planning guide, not a deadline. The cake, shortbread, and meringues each have their own oven slot. The cake cools on a rack while the decorations bake; only the icing, buttercream, and cookie crumbs are prepared during the meringue drying and oven-rest stages. Extend the schedule if a component has not reached its readiness cues.
| Elapsed time | Oven use | Work outside the oven |
|---|---|---|
| 0:00 to 0:35 | Preheat to 350°F (175°C) | Make and roll the shortbread dough; refrigerate it. Prepare the cake batter and put it straight into the oven. |
| 0:35 to 1:15 | Bake the cake for 32 to 38 minutes | Keep the dough chilled. Prepare the tombstone templates and clear a rack for the cake. |
| 1:15 to 1:45 | Reduce to 325°F (165°C) | Cool the cake on its rack. Cut eight tombstones and chill them for 15 minutes. |
| 1:45 to 2:05 | Bake the shortbread for 15 to 18 minutes | Keep the cake cooling. Prepare clean bowls and cool trays for the meringues. |
| 2:05 to 2:35 | Reduce to 200°F (95°C); let the oven cool | Cool the cookies, heat and whip the Swiss meringue, then pipe the ghosts, bones, and test pieces. |
| 2:35 to 4:05 | Dry the meringues for about 90 minutes | Ice the fully cooled tombstones early in this window. Leave them flat to set; prepare the buttercream and cookie crumbs. |
| 4:05 to 5:05 | Turn off the oven; leave the meringues inside for 1 hour | Letter the tombstones once their icing is dry. Confirm the cake is cool and the buttercream holds its shape. |
| 5:05 to about 6:00 | No further oven use unless meringues need more drying | Cool the meringues fully, add their eyes, and let the chocolate set. Frost the cake, add cookie soil, and assemble near serving time. |
Graveyard Cake Questions, Answered
Find answers to common questions about substitutions, make-ahead timing, storage, and transporting the cake.
Is Graveyard Cake the Same as Dirt Cake?
No. This recipe is a sliceable chocolate sheet cake with chocolate buttercream and Oreo soil. Dirt cake is usually a scoopable pudding or cream-based dessert layered with crushed cookies. They share the graveyard appearance, but their textures, preparation, storage, and serving methods are different.
Can I Make Graveyard Cake Ahead of Time?
Yes. Make the meringues up to one week ahead, the tombstones up to three days ahead, and the chocolate cake one day ahead. Store the dry decorations separately and assemble the finished graveyard approximately 1 to 3 hours before serving.
Can I Use a Boxed Chocolate Cake Mix?
You can decorate a prepared 9 x 13-inch cake with the same graveyard design, but its bake time, structure, sweetness, and storage instructions come from that product rather than this formula. The result would be a shortcut variation, not the completely homemade recipe developed here.
Can I Replace the Coffee with Hot Water?
Yes. Replace the hot coffee with the same volume of hot water. The cake will still have the intended hydration and structure, but the chocolate flavor may taste slightly less deep. The finished cake should not taste strongly of coffee when the original ingredient is used.
Can I Use Natural Cocoa Instead of Dutch-Process Cocoa?
Do not make a direct swap and expect the same result. Natural cocoa is more acidic and interacts differently with baking soda and baking powder. It also produces a lighter color and a different flavor. Use Dutch-process cocoa to follow the specified formula and preserve its dark appearance and smoother chocolate profile.
Can I Use Store-Bought Cookies for the Tombstones?
Yes. Oval or rectangular cookies can replace the homemade shortbread when time is limited. Choose cookies thick enough to stand upright, decorate them with melted chocolate or firm icing, and insert them shortly before serving.
How Do I Keep the Tombstone Cookies from Falling Over?
Leave the lower 3/4 inch undecorated, clear the loose crumbs from each insertion point, and press the cookie through the firm buttercream into the cake. If a cookie still leans, remove it and deepen the anchor slightly rather than bracing it against another decoration.
Why Did My Meringue Ghosts Become Sticky?
Sticky meringue usually absorbed humidity or remained slightly underdried. Test an extra piece before removing the batch from the oven, cool the decorations completely, and store them airtight. Add them to the cake close to serving because sugar attracts moisture from both the air and frosting.
Does Graveyard Cake Need to Be Refrigerated?
Refrigerate the finished cake for holding and leftovers, especially in a warm kitchen. Remove crisp meringues and tombstones first when practical. Cover the pan without touching the surface, then let individual slices soften briefly at cool room temperature before serving.
Can I Freeze Graveyard Cake?
Freeze the unfrosted cake for the most predictable result. Wrap the completely cooled cake securely and freeze it for up to two months, then thaw it covered before frosting. Freezing the assembled graveyard can soften the cookies and meringues through condensation.
How Do I Transport the Decorated Cake?
Transport the frosted cake in its 9 x 13-inch pan with the lid secured and the surface kept level. Carry the tombstones, ghosts, and bones in separate rigid containers, then insert them after arrival. This protects the crisp pieces and prevents tall decorations from breaking during movement.
When Should I Add the Oreo Crumbs and Decorations?
Add the Oreo soil after frosting the cooled cake. The crumbs can sit on buttercream longer than the crisp decorations, but the best finish comes from completing the entire graveyard 1 to 3 hours before serving. Add meringues last if the room is humid.
Continue Your Halloween Baking Journey
Keep the Halloween baking going with another decorated centerpiece, a rich chocolate dessert, or a smaller treat that can share the same party table.
Make Another Spooky Halloween Dessert
For more Halloween baking, try a tall layer cake, ghost-topped cupcakes, or smaller decorated treats.
- Halloween Cake creates a tall centerpiece with orange buttercream, ganache, and piped ghosts.
- Halloween Cupcakes bring ghost-topped individual cakes to the party table.
- Halloween Cake Pops offer pumpkins, mummies, and monsters in a candy-coated format.
- Halloween Brownies divide one pan into ghost, mummy, and spiderweb squares.
Stay With Chocolate and Oreo Desserts
These chocolate and Oreo desserts bring the same rich flavors to celebrations throughout the year.
- Chocolate Sheet Cake keeps the same practical pan format with a simpler year-round finish.
- Oreo Fluff offers a cool, creamy, and scoopable cookies-and-cream dessert.
- Oreo Cupcakes carry the cookie contrast into individual frosted cakes.
- Oreo Ice Cream makes a cold pairing for a dark chocolate slice.
Build a Complete Fall Party Table
Round out the table with colorful cookies, a pumpkin roll, or red velvet cupcakes.
- Peanut Butter Spider Cookies add another recognizable edible Halloween character.
- Pumpkin Sugar Cookies bring a soft texture and warm pumpkin color to the table.
- Pumpkin Roll offers a polished make-ahead centerpiece with a visible cream spiral.
- Red Velvet Cupcakes add deep crimson color and a moist cocoa crumb.
Why This Recipe Belongs in Your Recipe Box
This Graveyard Cake earns a return visit because it brings the cake and its entire edible decoration plan together in one place.
- Complete Homemade Project: Cake, frosting, tombstones, and meringue decorations are all measured and explained.
- Clear Visual Checkpoints: Every important stage has an observable readiness cue.
- Easy Make-Ahead Preparation: The cake and dry decorations can be prepared on different days.
- Reliable Party Format: One 9 x 13-inch pan provides 15 clearly planned portions.
- Reusable Decorating Skills: Shortbread templates, Swiss meringue, and staggered placement transfer to other seasonal desserts.
- Memorable Halloween Presentation: The finished cake is recognizable without fondant, carving, or specialty molds.
A Final Note on Graveyard Cake
Graveyard Cake turns a familiar chocolate sheet cake into a complete edible Halloween scene while keeping flavor and texture as important as the decoration.
It is worth returning to whenever you need a party centerpiece that can be divided across several days and served in generous, practical squares.
The most memorable seasonal bakes let a little imagination sit on top of solid fundamentals, so the first look creates delight and the first bite still feels like home.

Graveyard Cake
This homemade Graveyard Cake layers moist chocolate sheet cake with dark chocolate buttercream, Oreo soil, crisp shortbread tombstones and meringue ghosts. The make-ahead decorations turn a familiar 9 x 13-inch cake into a dramatic Halloween centerpiece.
Ingredients
Chocolate Cake
- 2 cups (240 g) all-purpose flour
- 75 g Dutch-process cocoa powder (about 3/4 cup plus 2 tablespoons)
- 1 2/3 cups (330 g) granulated sugar
- 2 teaspoons baking powder
- 3/4 teaspoon baking soda
- 1 teaspoon fine salt
- 2 large eggs (about 100 g without shells), at room temperature
- 1 cup (240 ml) whole buttermilk, at room temperature
- 1/2 cup (120 g) full-fat sour cream, at room temperature
- 1/2 cup (120 ml) neutral vegetable oil
- 2 teaspoons (10 ml) vanilla extract
- 3/4 cup (180 ml) freshly brewed hot coffee
- A little extra neutral oil, for greasing the pan
Shortbread Tombstones
- 1/2 cup (113 g) unsalted butter, softened
- 1/2 cup (60 g) confectioners' sugar
- 1/2 teaspoon (2.5 ml) vanilla extract
- 1/4 teaspoon fine salt
- 1 1/4 cups (150 g) all-purpose flour
- 2 tablespoons (16 g) cornstarch
Gray Icing and Tombstone Details
- 1 cup (120 g) confectioners' sugar
- 1 1/2 to 2 tablespoons (22 to 30 ml) milk
- Black gel food coloring, as needed
- 1 oz (28 g) dark chocolate, melted
Meringue Ghosts and Bones
- 3 large egg whites (about 90 g)
- 180 g granulated sugar (about 3/4 cup plus 2 tablespoons plus 1 teaspoon)
- 1/4 teaspoon cream of tartar
- 1/2 teaspoon (2.5 ml) vanilla extract
- 1/2 oz (14 g) dark chocolate, melted, for the ghost faces
Dark Chocolate Buttercream
- 1 cup (226 g) unsalted butter, softened
- 63 g Dutch-process cocoa powder (about 3/4 cup), sifted after measuring
- 3 cups (360 g) confectioners' sugar
- 3 oz (85 g) bittersweet chocolate, melted and cooled
- 1/4 teaspoon fine salt
- 2 teaspoons (10 ml) vanilla extract
- 1/4 to 1/3 cup (60 to 80 ml) heavy cream, at room temperature
Oreo Soil and Optional Accents
- 16 regular Oreo cookies (about 6 1/3 oz or 180 g), filling included
- 2 to 3 candy pumpkins, optional
- Up to 3 gummy worms, optional
Instructions
- Make and Chill the Tombstone Dough. Beat 1/2 cup (113 g) softened unsalted butter with 1/2 cup (60 g) confectioners’ sugar for about 1 minute, until smooth but not highly aerated. Mix in 1/2 teaspoon vanilla and 1/4 teaspoon fine salt. Add 1 1/4 cups (150 g) all-purpose flour and 2 tablespoons (16 g) cornstarch. Mix on low only until the dough gathers into soft clumps. Place the dough between two parchment sheets and roll it to an even 1/4-inch thickness. Transfer the flat packet to a baking sheet and refrigerate for at least 45 minutes. Leave it chilled while you mix and bake the cake in the next three steps.
- Prepare the Pan and Dry Ingredients. While the tombstone dough chills, heat the oven to 350°F (175°C). Lightly grease a 9 x 13-inch metal pan with the extra oil and fit parchment across the bottom. In a large bowl, whisk 2 cups (240 g) all-purpose flour, 75 g Dutch-process cocoa (about 3/4 cup plus 2 tablespoons), 1 2/3 cups (330 g) granulated sugar, 2 teaspoons baking powder, 3/4 teaspoon baking soda, and 1 teaspoon fine salt. Whisk for at least 30 seconds so the cocoa and leaveners are evenly dispersed. Break up every visible cocoa lump before liquid enters the bowl.
- Mix the Chocolate Cake Batter. In a second bowl, whisk 2 large eggs, 1 cup (240 ml) whole buttermilk, 1/2 cup (120 g) full-fat sour cream, 1/2 cup (120 ml) neutral oil, and 2 teaspoons vanilla until smooth. Pour the wet mixture into the dry ingredients and whisk only until no dry pockets remain. Add 3/4 cup (180 ml) freshly brewed hot coffee gradually while whisking slowly. Scrape the bowl once and stop as soon as the batter is even. Transfer it immediately to the prepared pan.
- Bake and Cool the Cake Completely. Bake for 32 to 38 minutes, beginning the doneness check at 32 minutes. The center should spring back slowly, the surface should be set, and a thin tester should show no liquid batter. A few moist crumbs are correct. Set the pan on a rack and allow approximately 2 hours for the Graveyard Cake to cool completely. Continue with the tombstones and meringues while the cake cools outside the oven. Do not cover a warm cake or spread buttercream over residual warmth.
- Cut and Bake the Tombstones. After removing the cake, reduce the oven to 325°F (165°C) and line a baking sheet with parchment. Remove the top sheet from the chilled dough. Use paper templates about 3 1/2 to 4 inches tall and 1 3/4 to 2 1/4 inches wide to cut eight tombstones, keeping the dough 1/4 inch thick. Gently reroll scraps if needed. Chill the cut shapes for another 15 minutes, and let the oven settle at the lower temperature before baking. Bake for 15 to 18 minutes, rotating the pan once if the oven browns unevenly. Cool on the baking sheet for 10 minutes, then move the cookies to a rack and cool completely.
- Prepare the Swiss Meringue. After baking the tombstones, lower the oven to 200°F (95°C). Let it cool to that temperature before loading the meringues so they stay pale. Line two cool baking sheets with parchment. Put 3 large egg whites (about 90 g) and 180 g sugar (about 3/4 cup plus 2 tablespoons plus 1 teaspoon) in a clean heatproof bowl. Set the bowl over barely simmering water without letting its base touch the water. Whisk continuously until the sugar dissolves and the mixture reaches 160°F (71°C). Move the bowl to the mixer, add 1/4 teaspoon cream of tartar, and whip on medium-high until the meringue is glossy, stiff, and close to room temperature. Mix in 1/2 teaspoon vanilla briefly.
- Pipe and Dry the Ghosts and Bones. Transfer the meringue to a piping bag with a large plain round opening. For each ghost, pipe a broad base, reduce the pressure as you lift, and stop squeezing before pulling away. Make three ghosts with slightly different heights, keeping each base wide enough to stand securely. Use a smaller plain opening to pipe 10 to 14 bones, making a narrow line with two small rounded ends at each side. Pipe extra test pieces similar in thickness to the ghosts, and use any remaining meringue for spare kisses. Dry both trays at 200°F (95°C) for about 90 minutes. A test piece should release cleanly and be dry inside; continue drying if its center is still sticky. Turn off the oven and leave the trays inside for another hour, without using the oven for anything else. During this drying and resting period, continue with the tombstone icing, buttercream, and cookie soil. Once the ghosts are fully cool, use the reserved 1/2 oz (14 g) melted dark chocolate to add small eyes and let them set.
- Ice and Decorate the Tombstones. While the meringues dry and the baked tombstones are completely cool, stir 1 cup (120 g) confectioners’ sugar with 1 1/2 tablespoons milk. Add more milk drop by drop only if needed for a thick but spreadable icing. Touch a toothpick to black gel coloring, then stir that tiny amount into the icing. Repeat only until the mixture becomes a pale stone gray. Spread a thin coat over the fronts of six to eight cookies, leaving the bottom 3/4 inch bare. Leave the cookies flat until the thin coating is dry to a light touch; allow 1 to 2 hours or longer in humid conditions. Pipe or draw RIP, small crosses, and a few narrow cracks with 1 oz (28 g) melted dark chocolate, then let the lettering set before moving the cookies. Keep the lettering simple and leave some gray surface visible.
- Make the Dark Chocolate Buttercream. While the decorations finish drying, beat 1 cup (226 g) softened unsalted butter for 2 minutes, until creamy. On low speed, add 63 g sifted Dutch-process cocoa (about 3/4 cup, measured before sifting), 3 cups (360 g) confectioners’ sugar, and 1/4 teaspoon fine salt in several additions. Mix in 3 oz (85 g) melted and cooled bittersweet chocolate and 2 teaspoons vanilla. Add 1/4 cup (60 ml) room-temperature heavy cream, then beat on medium-low until smooth. Add more cream 1 teaspoon at a time only if the frosting tears rather than spreads. Finish with 1 minute on low speed to reduce large air pockets.
- Prepare the Oreo Soil. Crush 16 regular filled chocolate sandwich cookies, about 6 1/3 oz (180 g). Process or crush approximately three quarters into fine crumbs. Break the remainder into small, uneven pieces and combine the two textures. Do not remove the filling. It helps a few crumbs gather into darker clumps, but the mixture should still scatter easily rather than form a paste.
- Frost the Cake and Add the Soil. Spread the buttercream over the fully cooled Graveyard Cake in an even layer, keeping the surface slightly irregular. Use the spatula to make shallow ridges rather than high peaks. Scatter the crushed cookies across the entire surface and press very lightly so they stay in place. Mark six narrow insertion points by parting the crumbs with the tip of the spatula. The tombstones need direct contact with firm buttercream and cake, not only a loose layer of crumbs.
- Build the Graveyard Scene. Arrange six tombstones in three staggered depth rows. Place the tallest cookie slightly behind center and insert the bare lower portion approximately 3/4 inch into the frosting and cake. Avoid a straight grid. Add three ghosts at different heights, using a small dab of firm buttercream beneath each if needed. Arrange bones in small groups rather than one continuous border. Add two or three candy pumpkins and up to three gummy worms only if desired, leaving visible dark soil around every element.
Notes
- Allow about 6 hours with one conventional oven: 1 hour 45 minutes active preparation, 2 hours 25 minutes cooking, and 1 hour 50 minutes additional elapsed time after overlaps. This is a planning estimate, not a guaranteed finishing time; larger meringues, humidity, and slow-setting icing can extend it.
- Use 75 g Dutch-process cocoa in the cake and 63 g in the buttercream. The cup equivalents are approximate; spoon and level without packing, then sift. Weighing is more consistent across brands. The meringue uses 180 g sugar.
- Keep the cake, shortbread, and meringues in separate oven stages. Cool the cake on a rack while preparing the decorations. Do not heat the oven for another bake during the meringues' one-hour rest.
- Cut eight tombstones approximately 3 1/2 to 4 inches tall, 1 3/4 to 2 1/4 inches wide, and 1/4 inch thick. Use the best six on the cake and keep two as spares. Leave the lower 3/4 inch free of icing for insertion.
- Allow the thin tombstone icing 1 to 2 hours or longer to become dry to a light touch before adding chocolate lettering. Let the lettering set before handling.
- Dry meringues until a test piece of similar thickness releases from the parchment and has a dry center. Continue drying if sticky inside, then give the batch its one-hour rest in the switched-off oven. Pipe surplus meringue into spare kisses.
- Store fully dry meringues airtight in a dry place for up to 1 week and fully set tombstones separately for up to 3 days. Bake the cake 1 day ahead if preferred; cool completely before covering.
- Add the crisp decorations close to serving, generally 1 to 3 hours beforehand and closer to serving in humid conditions. Keep them separate from the cake during transport.
- Refrigerate the frosted cake and leftovers, covered, and enjoy within 4 days for best quality. Remove crisp decorations first where practical. Let individual portions stand briefly before serving so the buttercream softens.
- Freeze the fully cooled, unfrosted cake for up to 2 months; thaw covered before frosting. Do not freeze the assembled tombstones and meringues on the cake.
- Optional candy is excluded from the nutrition estimate. Choose vegetarian candy if serving the cake as vegetarian; some gummy candies contain gelatin.
Nutrition Information:
Yield: 15 Serving Size: 1 squareAmount Per Serving: Calories: 790Total Fat: 38gSaturated Fat: 17gCholesterol: 88mgSodium: 470mgCarbohydrates: 106gFiber: 5gSugar: 79gProtein: 9g
Nutrition information is provided as an estimate only and may vary based on specific ingredients, brands, and portion sizes used. This information should not be considered medical or nutritional advice.
12 Sweet Favourites — Yours, Free 🍰
Tiramisù, no-bake cheesecake, the perfect chocolate chip cookie & 9 more reader-loved desserts — gathered into one beautiful free recipe book. From my kitchen to yours.
No spam, just sweet things. Unsubscribe anytime.