Sourdough Bread Recipe (Crisp Crust & Chewy Crumb)
🎁 FREE E-BOOK: 12 Sweet Favorites — reader-loved desserts in one beautiful recipe book.
A deeply baked crust crackles beneath the knife, revealing the moist, tender-chewy center that makes a classic sourdough bread recipe so satisfying. This loaf has rich chestnut color, natural oven spring, and a moderately open crumb that feels substantial enough for toast while still airy enough to pull apart at the table.
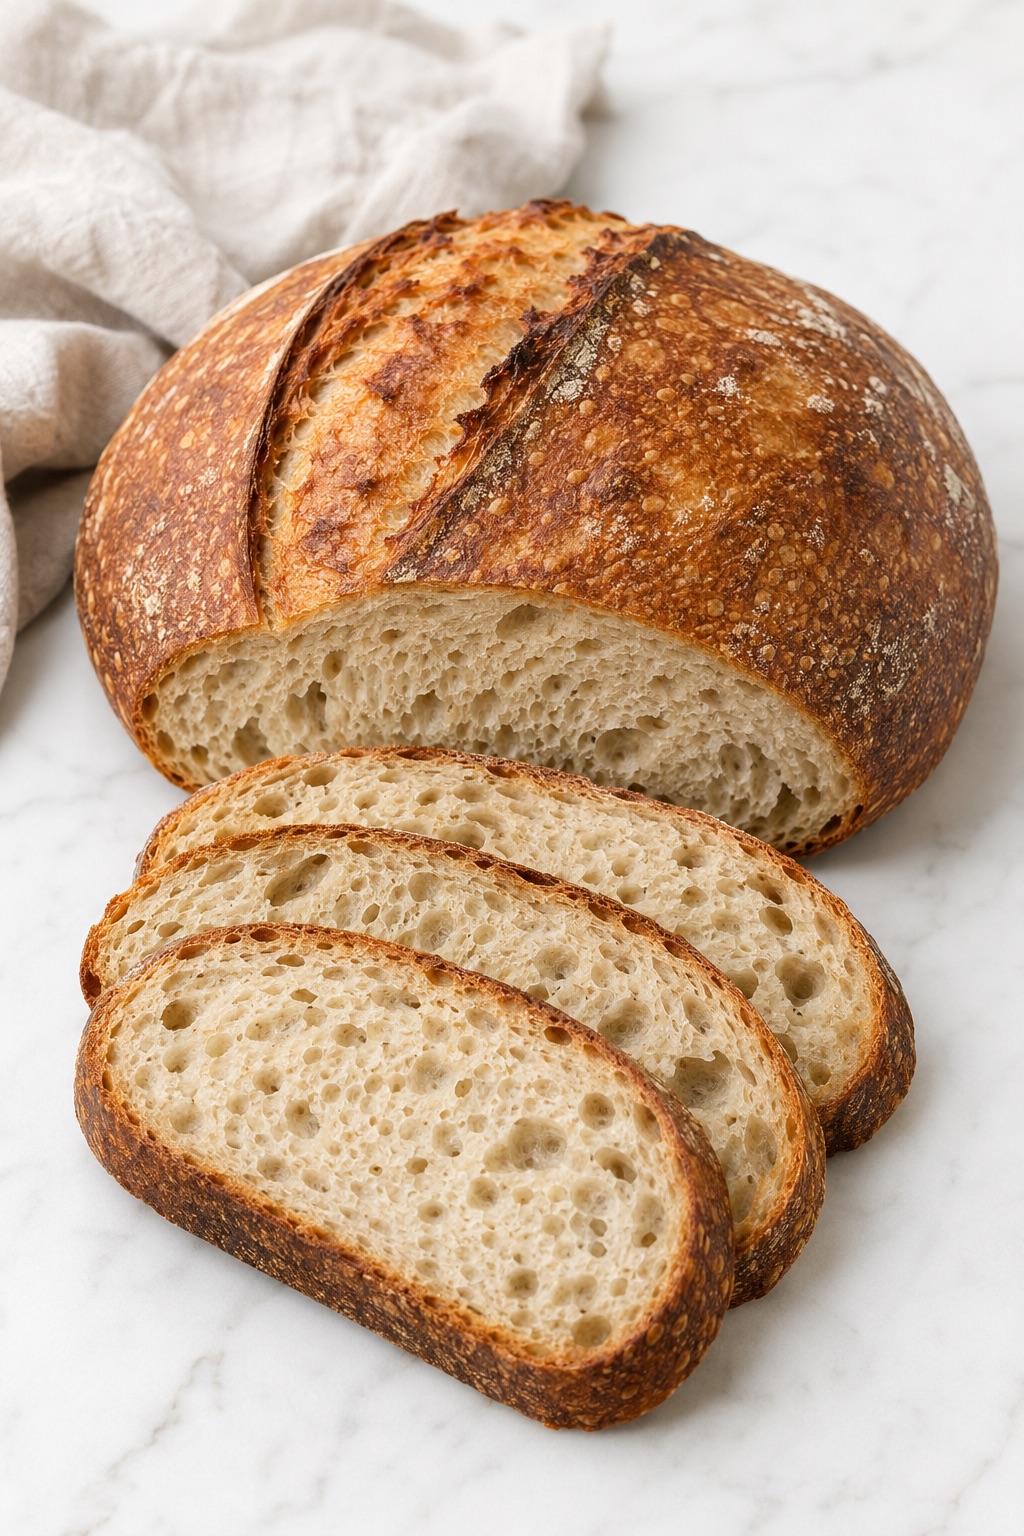
There is a quiet kind of pleasure in having a homemade boule cooling on the counter and knowing it can become tomorrow’s toast, a bowl-of-soup companion, or the foundation for a generous sandwich. The process takes time, but most of that time belongs to fermentation, cold proofing, and cooling rather than constant hands-on work.
This is a recipe worth keeping because it teaches a repeatable way to read living dough. Instead of asking one rigid clock to decide everything, you will use starter activity, dough temperature, measured rise, aeration, elasticity, and movement together—skills that become more useful with every loaf.
The recipe follows a practical two-day rhythm and uses an active wheat starter, a 5- to 6-quart Dutch oven, and a manageable 70–73% hydration range. A small amount of water stays in reserve, so the dough can adapt to the flour in front of you without changing the identity of the loaf.
Your Sourdough Bread at a Glance
This recipe makes one medium 875 g naturally leavened boule with a crisp, deeply colored crust, a moist tender-chewy crumb, and a mild-to-moderate tang. It uses no commercial yeast and follows a cue-led mix, fold, bulk-ferment, shape, cold-proof, bake, and cool sequence.
| Recipe detail | What to plan for |
|---|---|
| Yield | 1 medium boule; about 12 generous or 16 smaller slices |
| Practical hydration | 70% before the reserved water; up to 73% if the flour can absorb it |
| Hands-on time | About 35–45 minutes, divided across two days |
| Bulk fermentation | Often about 4–6 hours at 76–78°F / 24–26°C, but the dough cues decide |
| Cold proof | 10–16 hours at 37–40°F / 3–4°C |
| Bake time | 42–48 minutes after a 45–60 minute Dutch oven preheat |
| Cooling | At least 2 hours; preferably 3 |
| Primary equipment | Digital scale, thermometer, bulk container, shaping basket, and 5- to 6-quart Dutch oven |
Why This Sourdough Bread Recipe Works
This formula works because its hydration, flour strength, fermentation guidance, and baking method support one another. Each design choice protects the intended crisp-crust, moderately open-crumb result without pushing the dough into an unnecessarily advanced range.
- Moderate hydration stays manageable. The dough begins at 70% hydration, while 15 g reserved water can raise it to 73% only when the flour continues to hold structure.
- Bread flour and a small whole-wheat portion balance strength and flavor. Bread flour builds the main gluten framework, while 10% direct whole-wheat flour adds grain character without turning the loaf heavy.
- Dough temperature gives the schedule meaning. Measuring the dough after mixing makes it possible to interpret the rise and fermentation window rather than relying on room temperature alone.
- The bulk endpoint uses several agreeing cues. A 40–50% rise in the target temperature range is paired with bubbles, rounded edges, aeration, elasticity, cohesion, and a gentle jiggle.
- An overnight cold proof improves control. Chilling creates a useful baking window and firms the shaped loaf for cleaner scoring.
- The Dutch oven separates expansion from browning. The covered phase retains the loaf’s own moisture for oven spring; the uncovered phase releases moisture and develops the crust.
Why You’ll Love Making This Classic Sourdough Loaf
This loaf is designed for the home baker who wants real artisan sourdough with enough structure to learn from. It respects the variables that make sourdough biological, yet turns them into visible checkpoints you can actually use.
- It makes one useful home-kitchen loaf rather than an oversized batch.
- The dough is supple and tacky without depending on extreme hydration.
- Observable checkpoints reduce the guesswork around starter readiness and bulk fermentation.
- The workback plan can move with your starter and serving time.
- The crumb works equally well for table bread, toast, sandwiches, and French toast.
- Freezing and dry-heat refreshing help you keep the loaf useful after the first day.
How Fermentation, Dough Strength, and Steam Build This Sourdough Loaf
Sourdough bread is leavened by yeasts and lactic acid bacteria rather than commercial yeast. These microorganisms interact with flour, water, temperature, and time to produce gas, acidity, aroma, and flavor; a peer-reviewed review of sourdough fermentation explains this living ecosystem.
Hydration begins building an elastic gluten network that must hold fermentation gas while remaining extensible. The rest starts that process, and stretch-and-folds strengthen the dough without intensive kneading.
Temperature controls speed: cool dough ferments more slowly, while warm dough advances faster and keeps moving during shaping. Interpret elapsed time beside the dough’s temperature and condition.
In the oven, heat expands trapped gases and turns moisture into steam. The closed Dutch oven keeps the surface flexible during expansion; removing the lid releases moisture so the crust can caramelize and crisp.
Ingredients for a Crisp, Chewy Sourdough Boule
This lean loaf needs only starter, water, flour, and salt, but the exact form and condition of each ingredient matter. Weights lead because small flour-measurement differences can change hydration, handling, and crumb more than they would in a forgiving quick bread.
Ingredient List
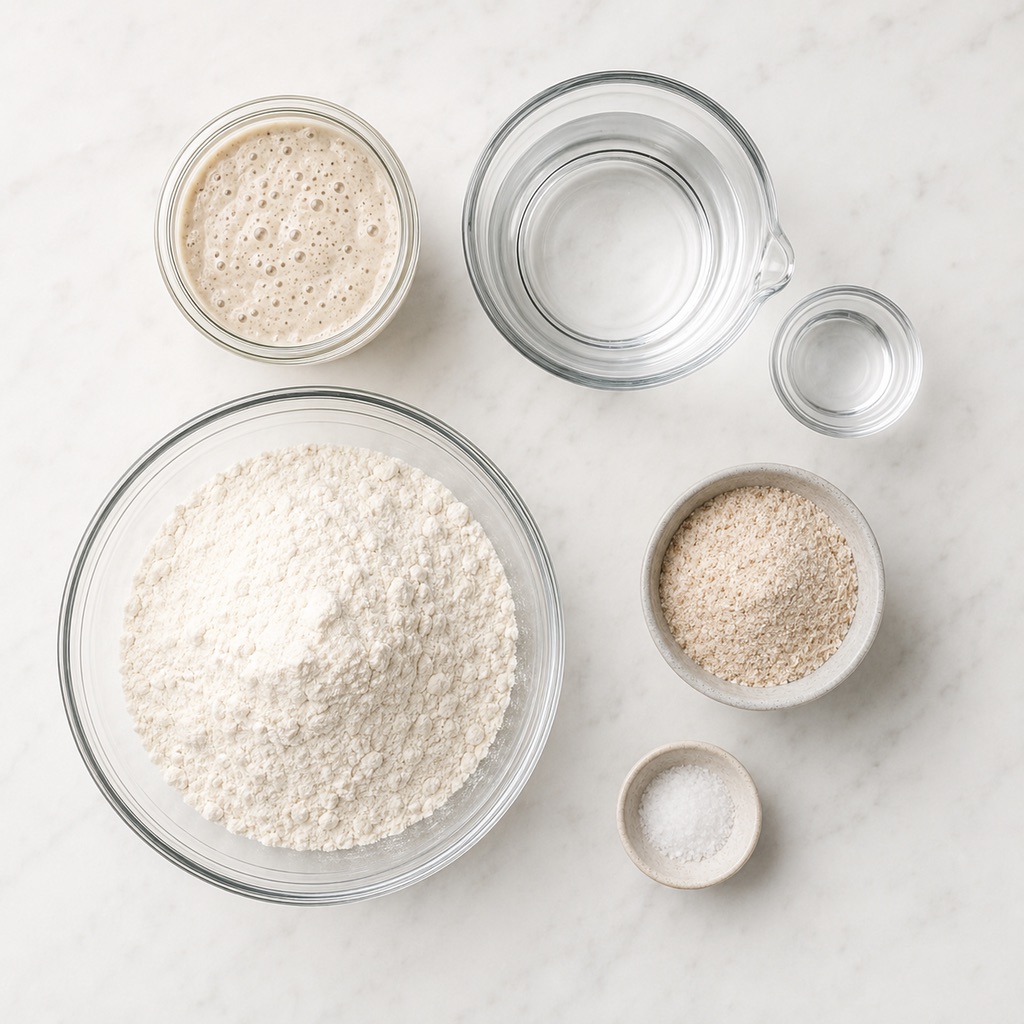
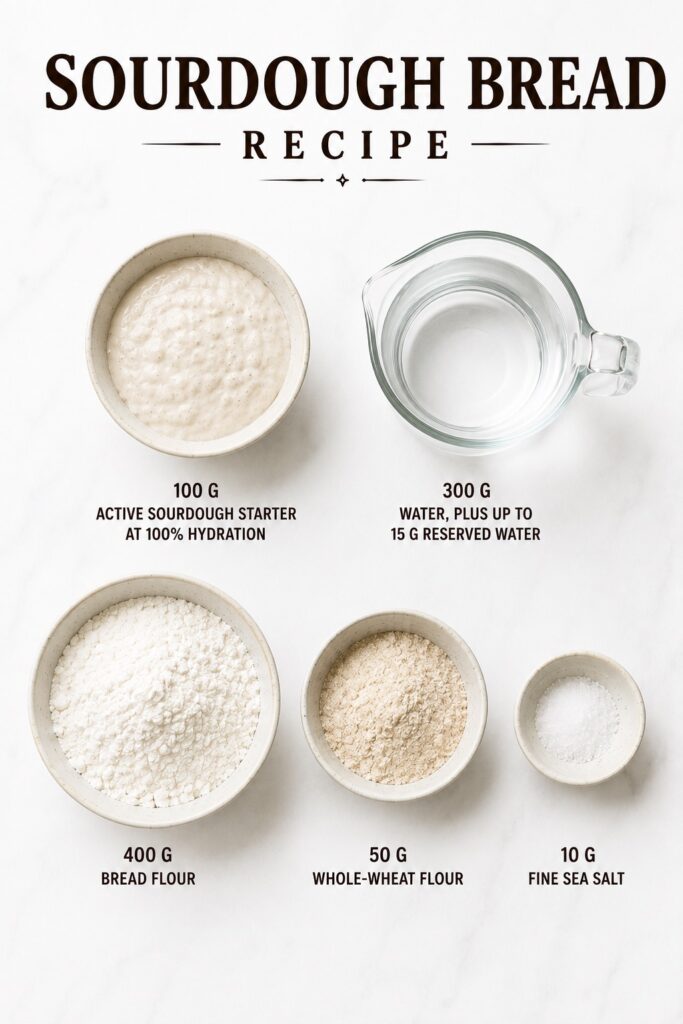
Measure the five loaf ingredients in this order and keep the final 15 g water separate until the dough shows that it can accept it.
- 100 g active sourdough starter at 100% hydration, at peak or just beginning to recede
- 300 g water, plus up to 15 g reserved water
- 400 g bread flour
- 50 g whole-wheat flour
- 10 g fine sea salt
Ingredient Notes for Strong, Predictable Dough
Each ingredient has one clear technical job, and understanding that job makes it easier to adapt the process without casually changing the formula.
- Active sourdough starter: Use a wheat starter that predictably doubles after feeding and has an aerated, webbed interior. A collapsed, solvent-smelling starter is not at the intended readiness point.
- Bread flour: About 12–13% protein is a useful strength range, though protein alone does not guarantee absorption. All-purpose flour may require withholding reserved water and can produce a tighter crumb.
- Whole-wheat flour: This small portion adds grain flavor while bread flour remains dominant. A large whole-wheat increase would change hydration, fermentation, and crumb.
- Water: Adjust its temperature to help the dough reach 76–78°F / 24–26°C. Potable tap water usually works; filtered water is a troubleshooting option.
- Fine sea salt: It supports flavor, strength, and fermentation control. Because crystal size varies, weigh 10 g.
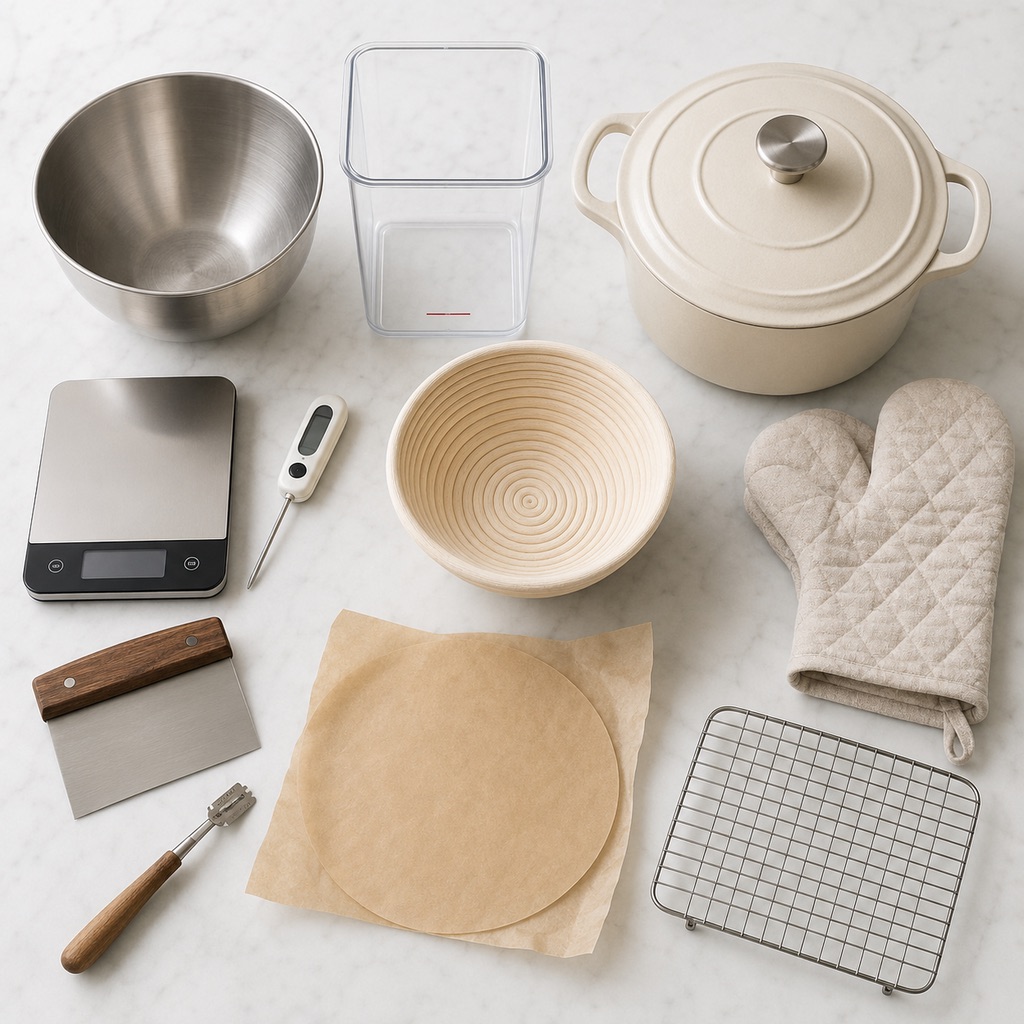
Kitchen Tools Needed
The most useful tools make fermentation measurable, shaping controlled, and the hot-baking stage safer. A banneton is convenient rather than essential, but accurate weighing, a suitable covered pot, and a way to read dough temperature materially improve this recipe.
- Measure and monitor: a digital scale and an instant-read or dough thermometer.
- Mix and ferment: a large mixing bowl, a flexible bowl scraper, and preferably a straight-sided, volume-marked container that makes the starting level and percentage rise visible.
- Preshape and shape: a bench scraper, an 8- to 9-inch banneton or towel-lined bowl, and rice flour for dusting.
- Score and transfer: a bread lame or very sharp razor and a parchment sling.
- Bake and cool: a 5- to 6-quart lidded Dutch oven, heat-safe oven mitts, an optional heavy sheet pan used as a dry bottom-heat shield, and a wire cooling rack.
How to Know Your Sourdough Starter Is Ready
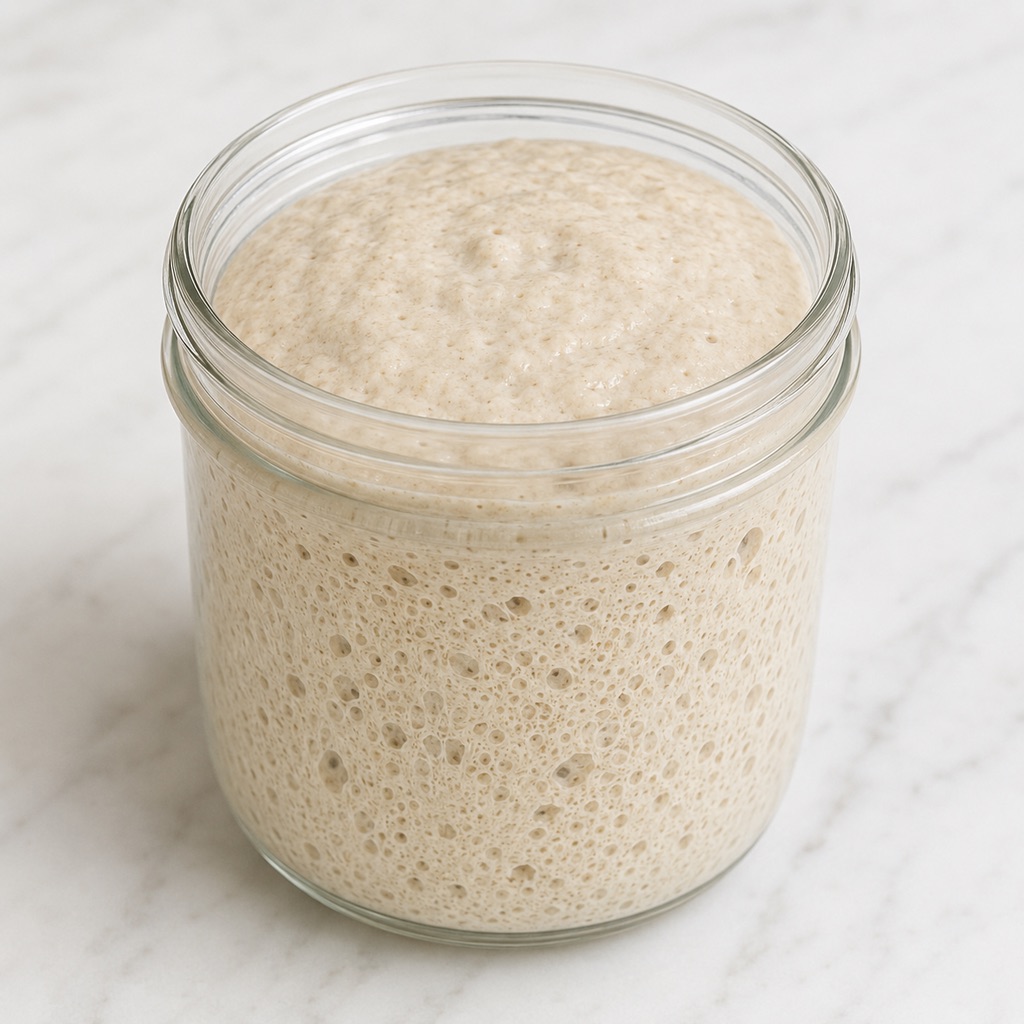
Your starter is ready when it shows repeatable activity after feeding, not simply when a set time passes. It should at least double, look aerated, and have a domed top or one just beginning to flatten.
- Rise: it doubles or more on a predictable schedule in its usual jar.
- Bubbles: the sides, top, and interior show fine and larger bubbles rather than only a few surface spots.
- Shape: the top is domed or has only just started to recede, not fully sunken after a long collapse.
- Texture: a spoonful looks expanded and webbed rather than thin and lifeless.
- Aroma: it smells pleasantly fermented, wheaty, mildly tangy, or yogurt-like rather than harshly solvent-like.
The float test is not decisive: flour, hydration, and handling can make a ready starter sink or a weaker sample float. Use the complete activity pattern.
For a build that leaves maintenance starter, combine 25 g mature starter, 50 g water, and 50 g wheat flour. Keep it at 75–78°F / 24–26°C until ready, often 4–8 hours; use 100 g and retain the rest.
Discard starter with visible mold or unusual pink or orange discoloration. Colorado State University Extension’s sourdough starter guidance emphasizes activity, aroma, consistency, and records. If needed, first make a sourdough starter from scratch.
Plan Your Bake: A Two-Day Sourdough Bread Timeline
Choose when you want to serve the fully cooled loaf, then work backward through cooling, baking, cold proofing, shaping, bulk fermentation, and starter peak. The sample schedule shows the sequence, but starter readiness and the dough’s condition control each transition.
| Sample time | Action | Readiness dependency | Holding or flexibility |
|---|---|---|---|
| Day 1, 8:00 a.m. | Feed starter | Mature starter and clean jar; use the 25:50:50 build if desired | Peak may arrive in roughly 4–8 hours |
| 1:00–3:00 p.m. | Starter approaches peak | At least doubled, aerated, domed or just beginning to recede | Do not mix only because the sample clock says so |
| 2:15 p.m. | Hydrate flour | Starter timing and intended mix time align | Rest 30–45 minutes |
| 3:00 p.m. | Add starter and salt | Starter is ready and dough is mixed evenly | Target 76–78°F / 24–26°C dough |
| 3:30–4:30 p.m. | Complete three fold sets | Dough progressively strengthens | Add a fourth around 5:00 p.m. only if needed |
| About 7:00–9:00 p.m. | End bulk fermentation | Temperature-aware rise plus complete cue set | The endpoint may move earlier or later |
| About 7:20–9:30 p.m. | Preshape, rest, and final-shape | Dough releases with strength and holds form | Bench rest 20–30 minutes |
| About 7:45–9:45 p.m. | Refrigerate shaped loaf | Shape is complete and basket is covered | Cold-proof 10–16 hours at 37–40°F / 3–4°C |
| Day 2, 7:00–11:00 a.m. | Preheat, score, and bake | Loaf remains cold and structured | Preheat 45–60 minutes; bake 42–48 minutes |
| Day 2, roughly 9:00 a.m.–2:00 p.m. | Cool completely | Crust is fully developed and loaf is out of the pot | Wait at least 2 hours, preferably 3, before slicing |
Read the Dough: A Temperature-Aware Bulk Fermentation Guide
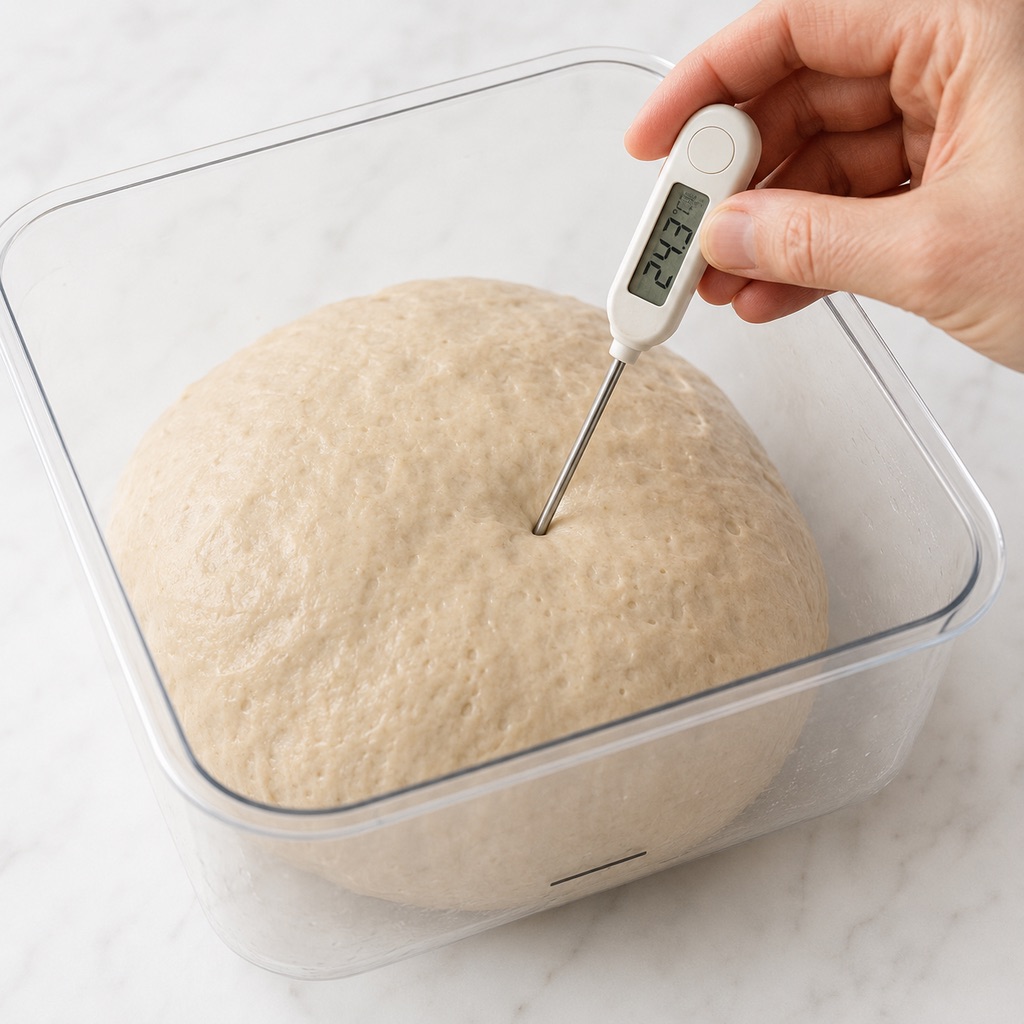
Bulk fermentation is finished when the rise appropriate to the dough’s temperature agrees with its aeration, shape, elasticity, and movement. Measure the dough after mixing, mark its starting level, and use the table as a formula-specific decision guide rather than a universal sourdough timetable.
| Dough temperature | Rise range used as a guide | What receives extra emphasis |
|---|---|---|
| 70–72°F / 21–22°C | Often 50–60% | Allow materially more time and require full aeration, elasticity, rounded edges, bubbles, and jiggle |
| 76–78°F / 24–26°C | About 40–50% | This is the canonical range; use the rise only with the complete cue set |
| 80–82°F / 27–28°C | Often 30–40% | End earlier because fermentation continues aggressively through shaping and the transition to refrigeration |
Important: These percentages are decision aids for this formula, not standalone doneness tests or universal sourdough rules. At every temperature, look for a smoother aerated surface, rounded edges, visible side bubbles, cohesion, elasticity, a gentle jiggle, and dough that releases with strength rather than pouring like batter.
One lesson I learned from working with naturally fermented dough is that the clock can tell you when to start checking, but it cannot tell you when bulk fermentation is finished. The dough’s temperature, rise, aeration, elasticity, and movement have to agree before shaping.
Hydration belongs in the same decision system. If adding the final reserved water makes the dough lose cohesion, smear across the bowl, or stop responding to folds, withhold some or all of it. A strong 70% dough is more useful than a nominal 73% dough that the flour cannot support.
What to Expect from This Classic Sourdough Boule
Expect a biological process with a clear result boundary: the dough will be tacky but should become progressively smoother and more cohesive, while the finished loaf should have natural oven spring, deep crust color, and a moist moderately open crumb.
This is a classic naturally leavened Dutch oven boule with a crisp crust and a moist, moderately open crumb—not a same-day loaf accelerated with commercial yeast.
- The dough should feel supple and tacky, not dry, but it should gain elasticity and shape retention through the fold sequence.
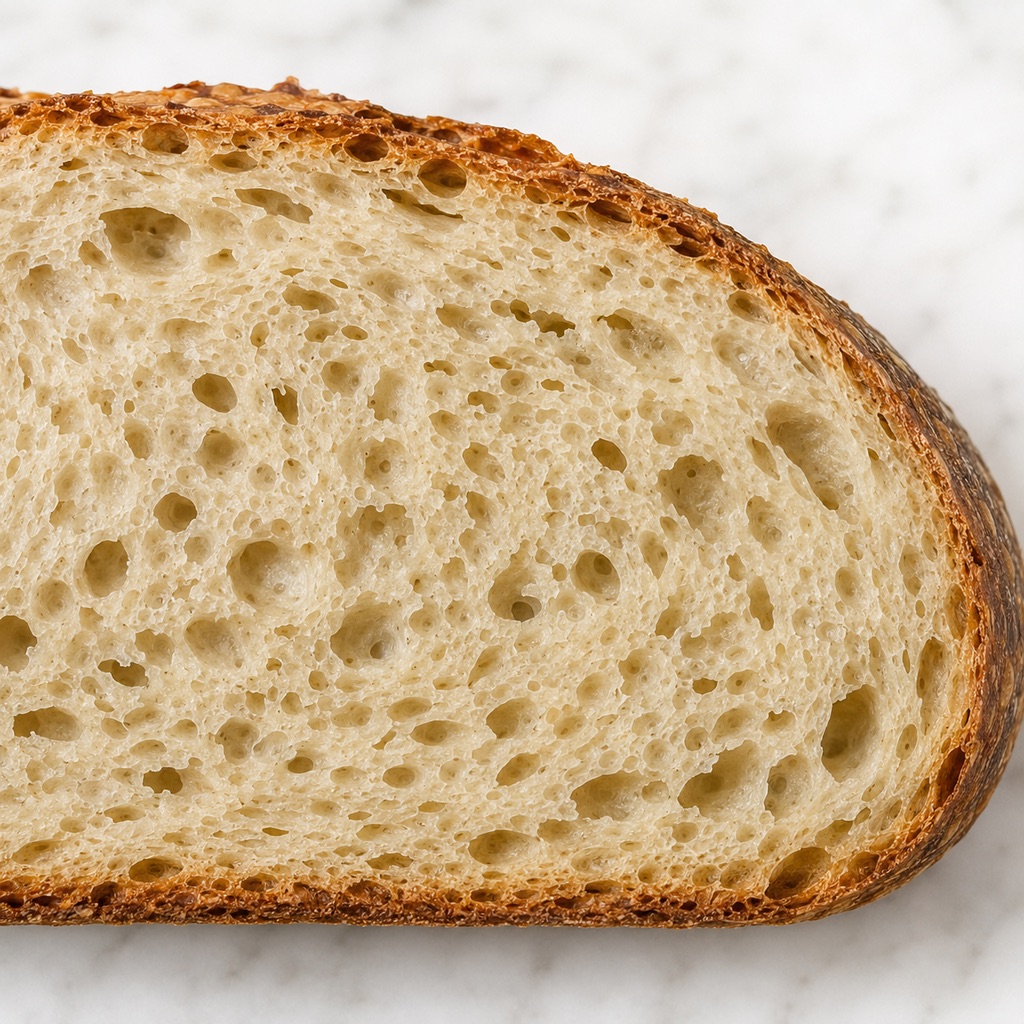
- The crumb should contain irregular small and medium openings rather than dramatic tunnels or a cotton-soft sandwich-bread structure.
- A strong, natural rise is the goal; a tall decorative ear is optional, not proof of success.
- The crust should finish deep golden to chestnut rather than pale blond.
- The flavor should be wheaty and mildly to moderately tangy, without harsh vinegar or solvent notes.
- The schedule may move because starter strength, dough temperature, flour, container shape, and refrigerator temperature all affect fermentation speed.
How to Make Sourdough Bread
Make the loaf in eleven cue-led stages. Keep the formula fixed, record the mixed-dough temperature, and treat each time as a checking window rather than an automatic endpoint.
Build the Starter and Wait for Peak Activity
Strong leavening must come first; later folds or shaping cannot replace a weak starter. Feed your established culture as usual or use the optional 25:50:50 build.
- Combine 25 g mature starter, 50 g water, and 50 g wheat flour in a clean jar.
- Keep it at 75–78°F / 24–26°C until at least doubled and near peak, often 4–8 hours.
- Time the flour hydration rest to finish near starter peak. Use 100 g starter and retain the remainder.
What you should see: The starter has at least doubled, looks aerated and webbed inside, and has a domed top or one that is just beginning to flatten.
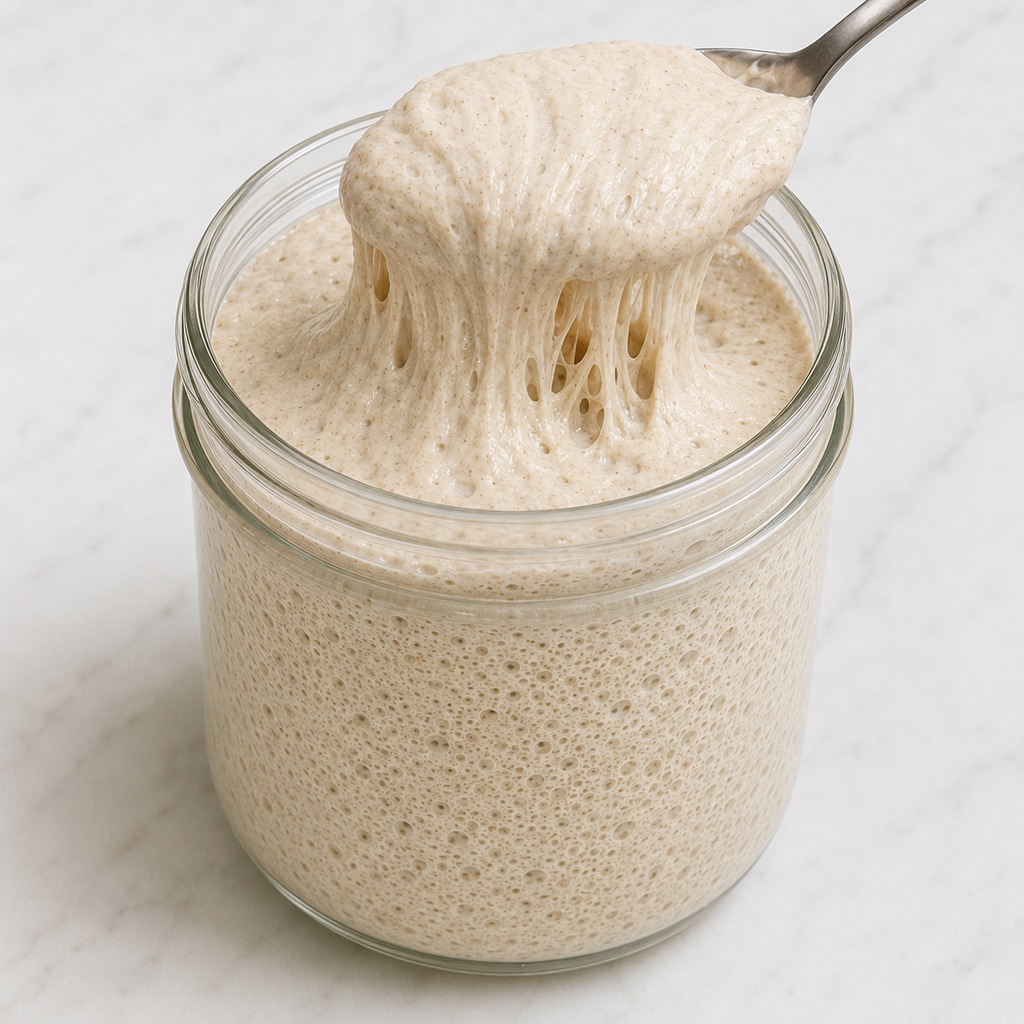
Hydrate the Flour
This rest evenly moistens both flours and begins gluten development before the starter and salt arrive.
- Place 400 g bread flour and 50 g whole-wheat flour in a large bowl.
- Add 300 g water and mix with your hand or a sturdy spoon until every dry pocket is hydrated.
- Cover the bowl and rest for 30–45 minutes.
What you should see: There is no loose dry flour. The mixture is rough, shaggy, and cohesive, but it does not yet look smooth or fully developed.
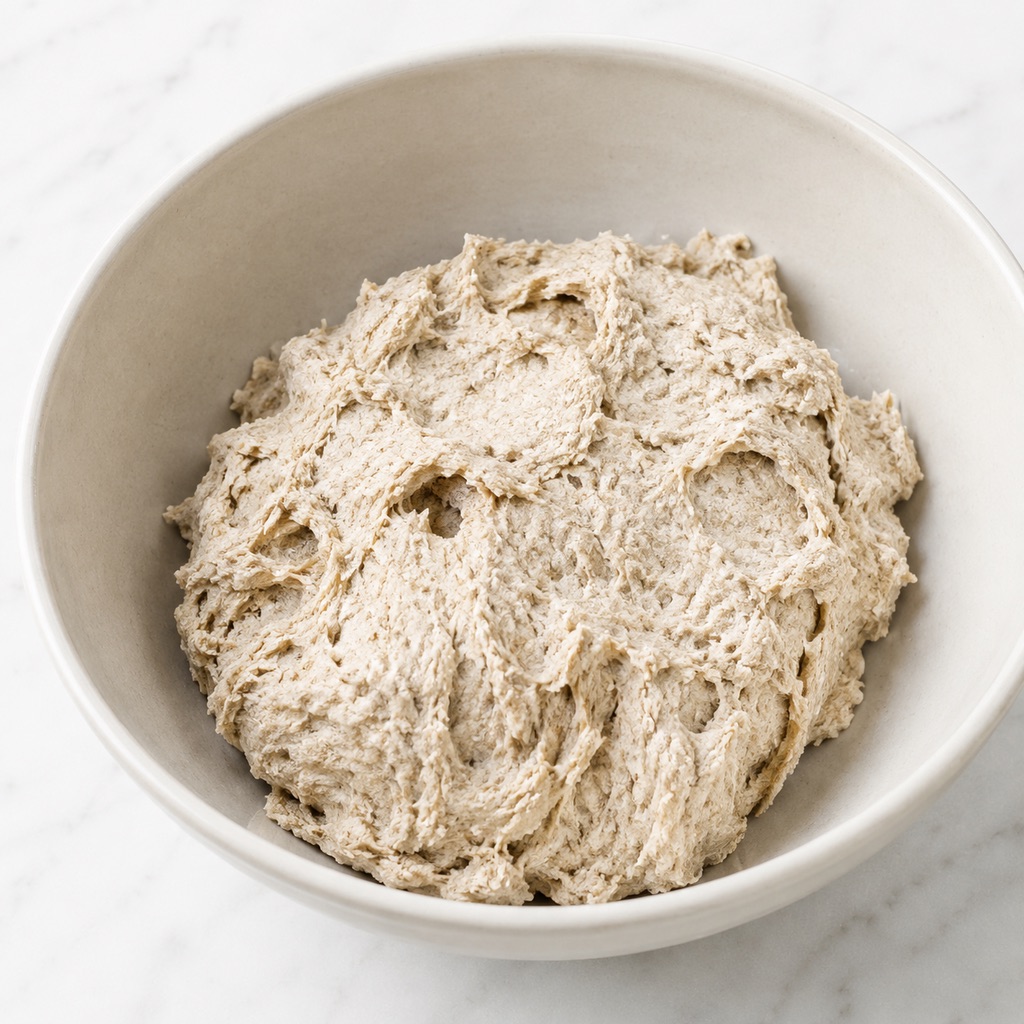
Add the Starter, Salt, and Reserved Water
Bulk fermentation begins when the starter is incorporated. Add salt next, using the reserved water only while the dough maintains cohesion.
- Spread 100 g ripe starter over the hydrated flour and pinch, fold, and squeeze until it is evenly distributed.
- Dissolve 10 g fine sea salt in up to 15 g reserved water.
- Add the salted water gradually. Stop if the dough becomes slack or begins smearing like batter.
- Cover the dough and mark this as the beginning of bulk fermentation.
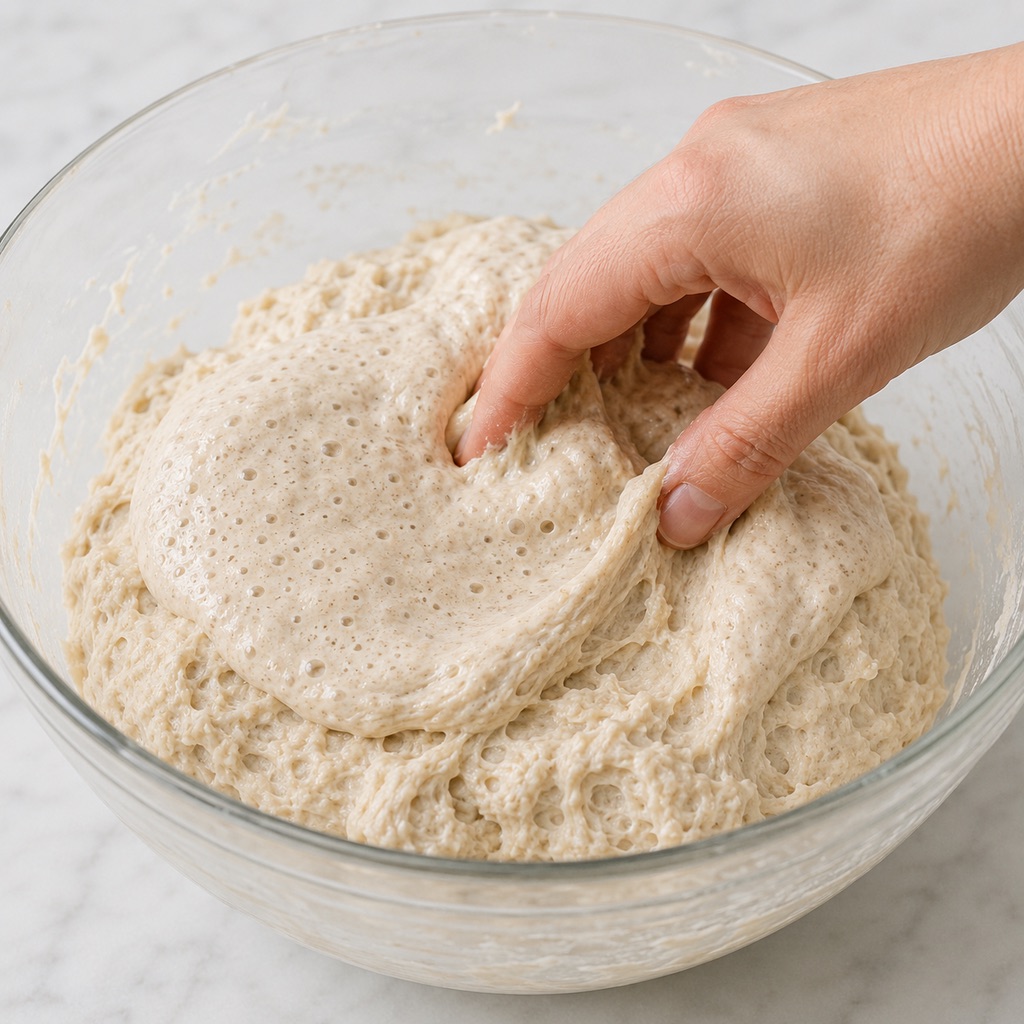
What you should see: The starter and salt are evenly mixed. The dough is tacky and extensible, but it remains a coherent mass rather than pouring or smearing across the bowl.
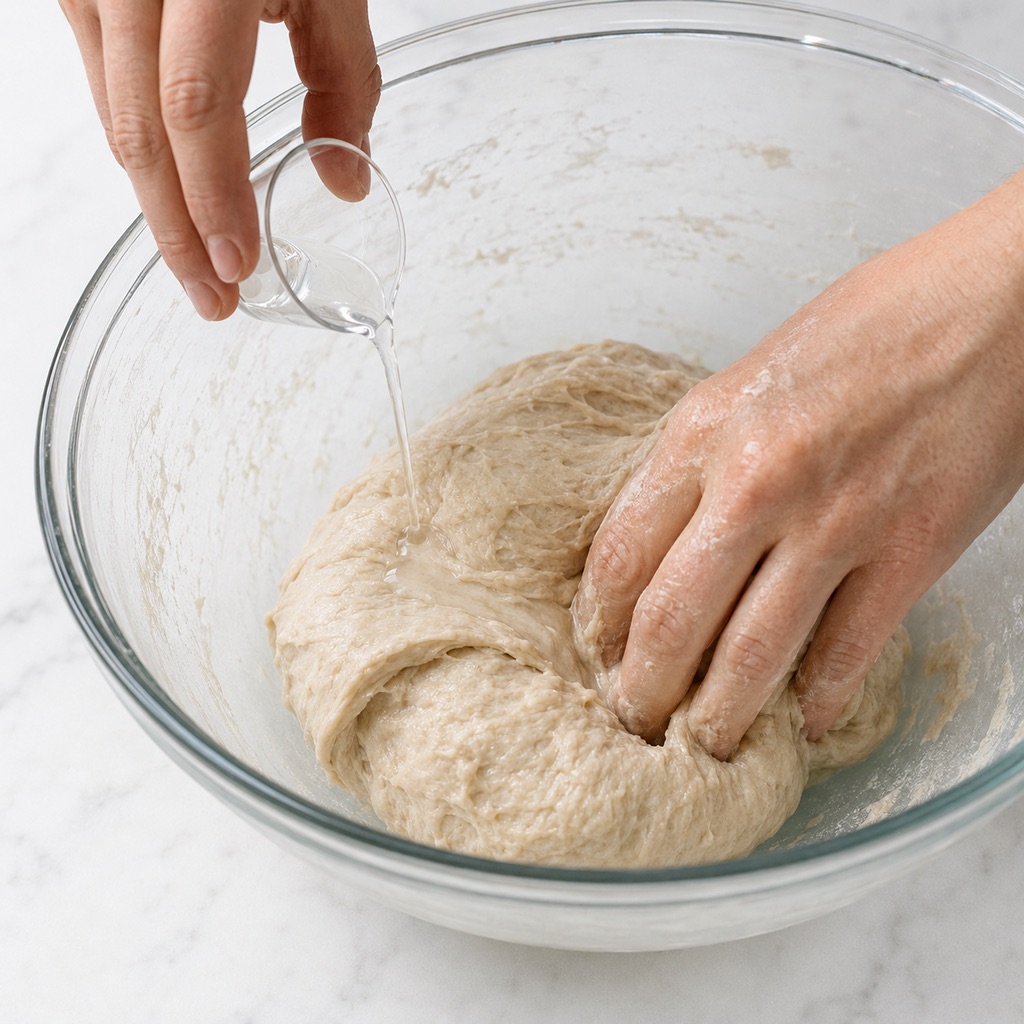
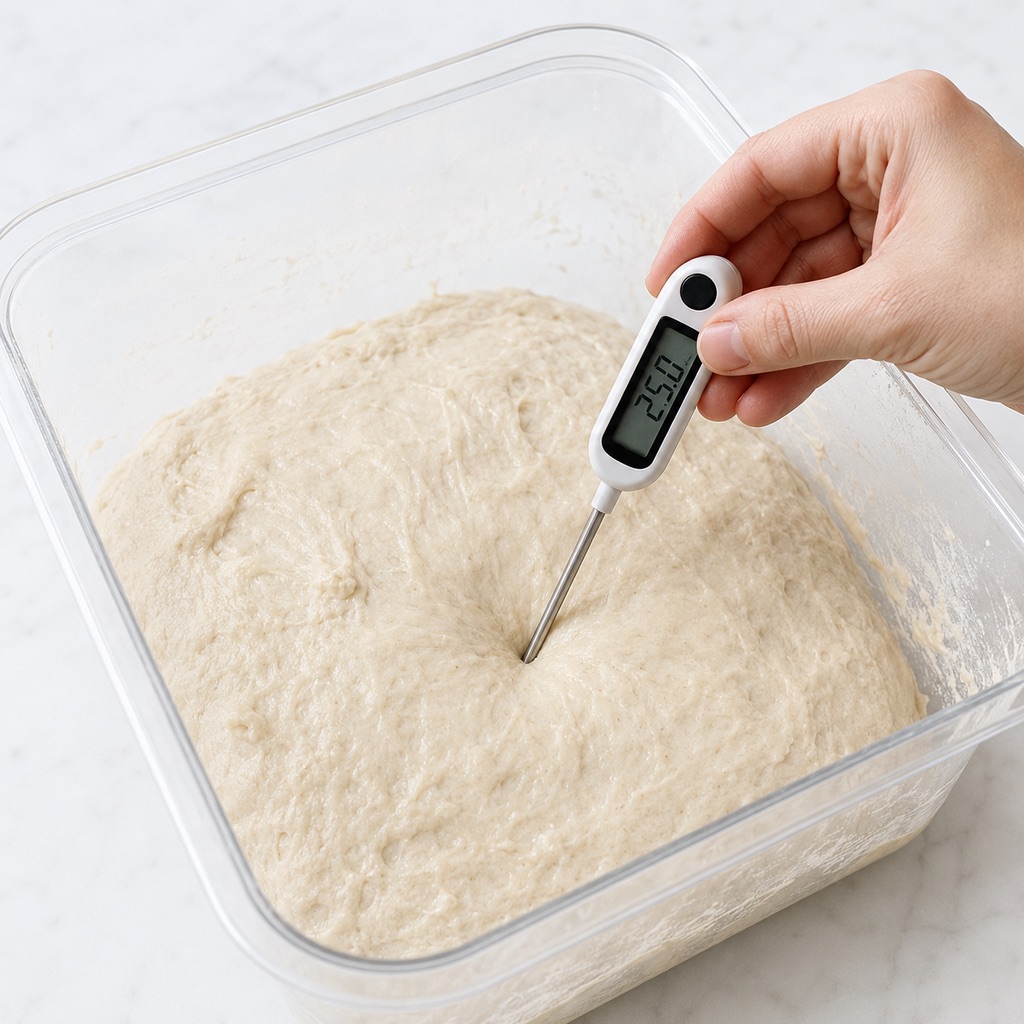
Set the Dough Temperature
Dough temperature determines how to interpret the coming hours. Measure now without changing the formula or heating the dough aggressively.
- Insert an instant-read thermometer into the center of the dough after mixing.
- Record the temperature and the starting dough level in a straight-sided container.
- If it is outside the target, use the temperature-aware guide and avoid direct heat.
What you should see: The target reading is 76–78°F / 24–26°C whenever practical. A cooler or warmer reading is recorded and connected to the appropriate rise range and cue emphasis.
Build Strength with Stretch-and-Folds
Three fold sets build gas-holding strength. A fourth is only for dough that still lacks elastic resistance.
- At 30 minutes, stretch one edge until it resists and fold it over the center; rotate and repeat from four directions.
- Cover and repeat the four-direction fold at about 60 minutes.
- Repeat at 90 minutes, handling the increasingly aerated dough gently.
- Add a gentle fourth set around 120 minutes only if the dough still spreads rapidly.
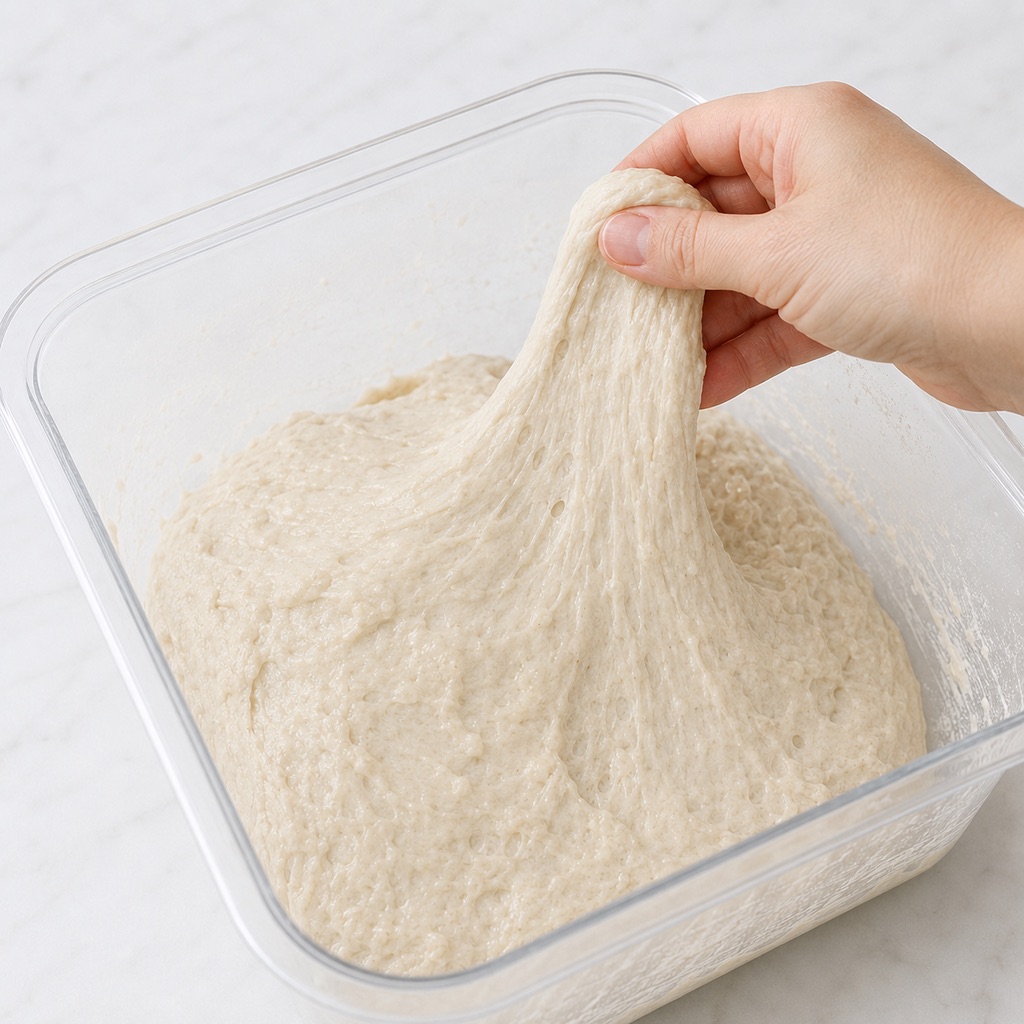
What you should see: The surface becomes progressively smoother, the dough stretches with more elasticity, and it holds a rounded shape longer after each fold.
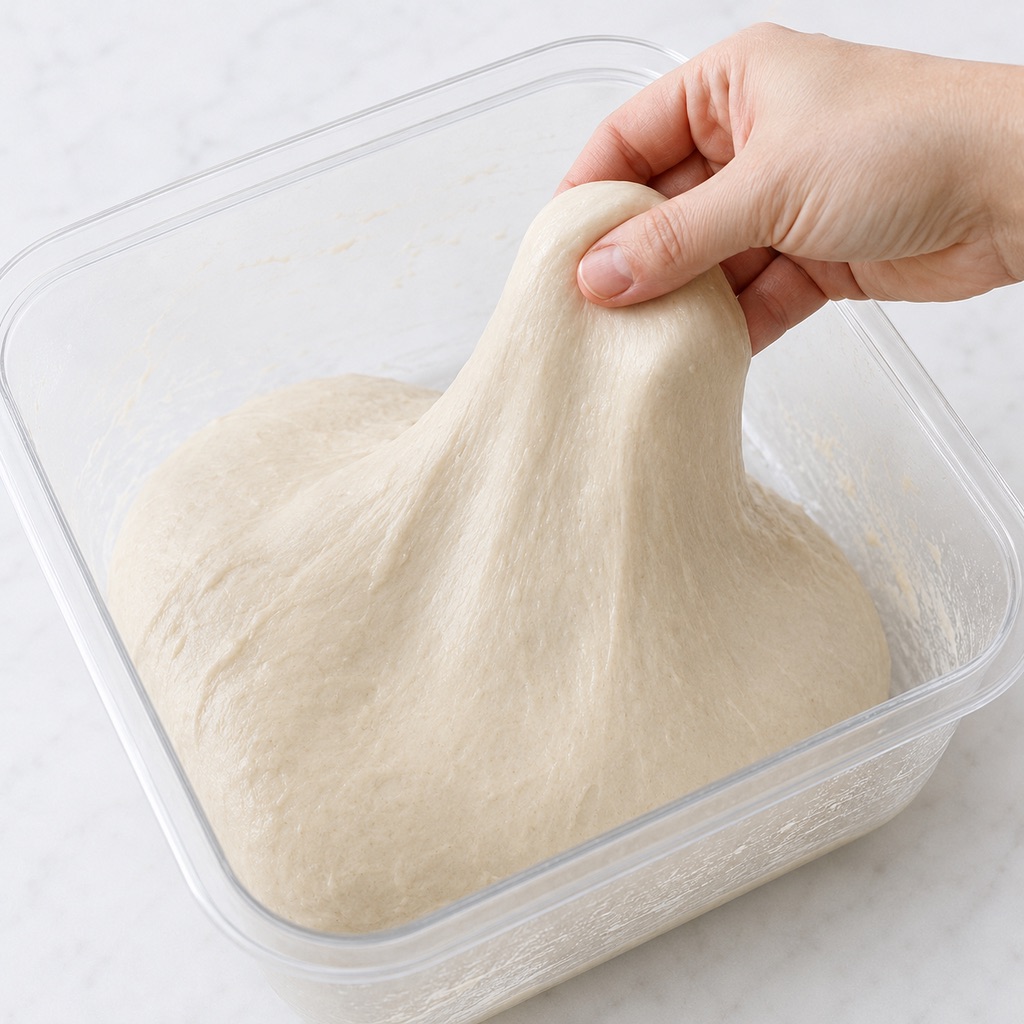
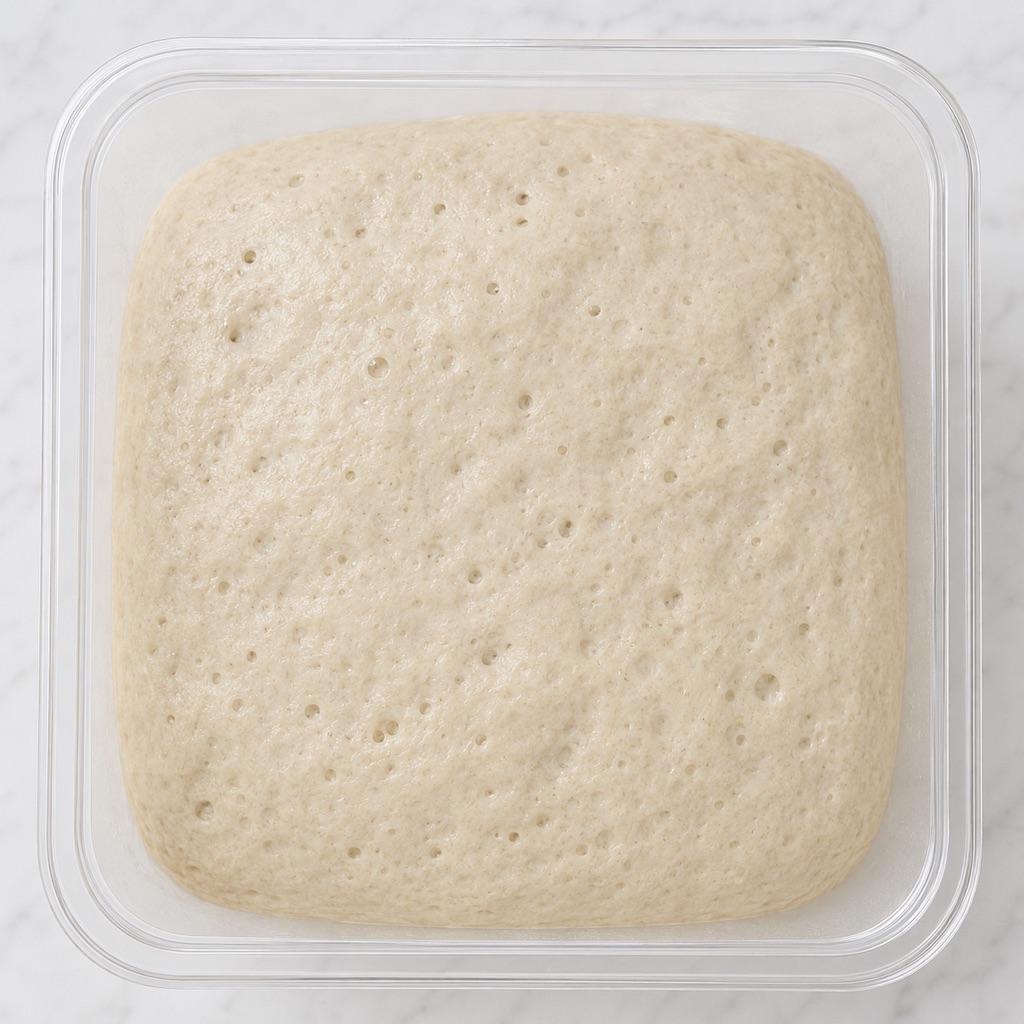
Finish Bulk Fermentation by Cues
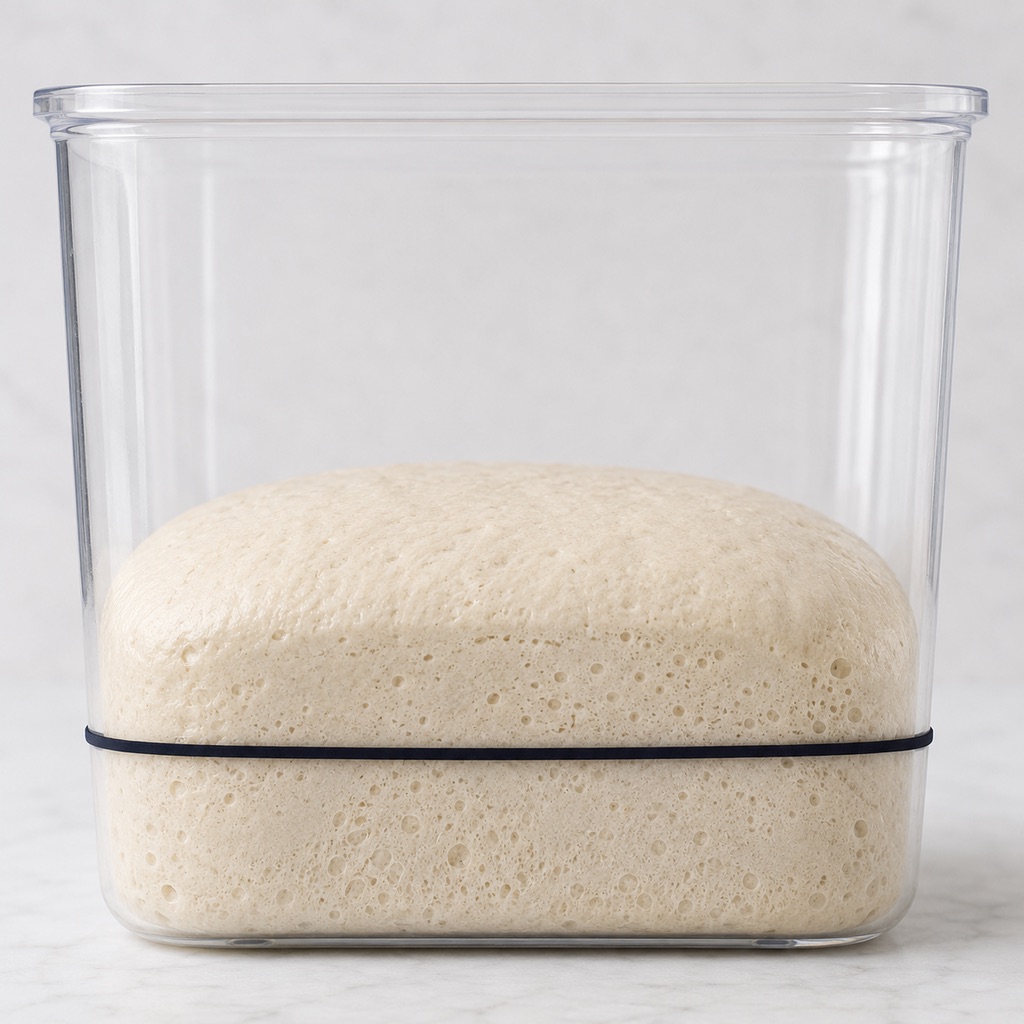
After folding, leave the dough undisturbed until its temperature-aware rise agrees with every endpoint cue. At 76–78°F / 24–26°C, check near 40–50% growth; do not wait for doubling.
- Track the rise from the level marked immediately after mixing.
- Look through the container for side bubbles and a lighter, more aerated interior.
- Observe the top and edges: they should look smoother and slightly rounded instead of flat and dense.
- Move the container gently; finish bulk when the dough jiggles, stays cohesive, and releases with strength.
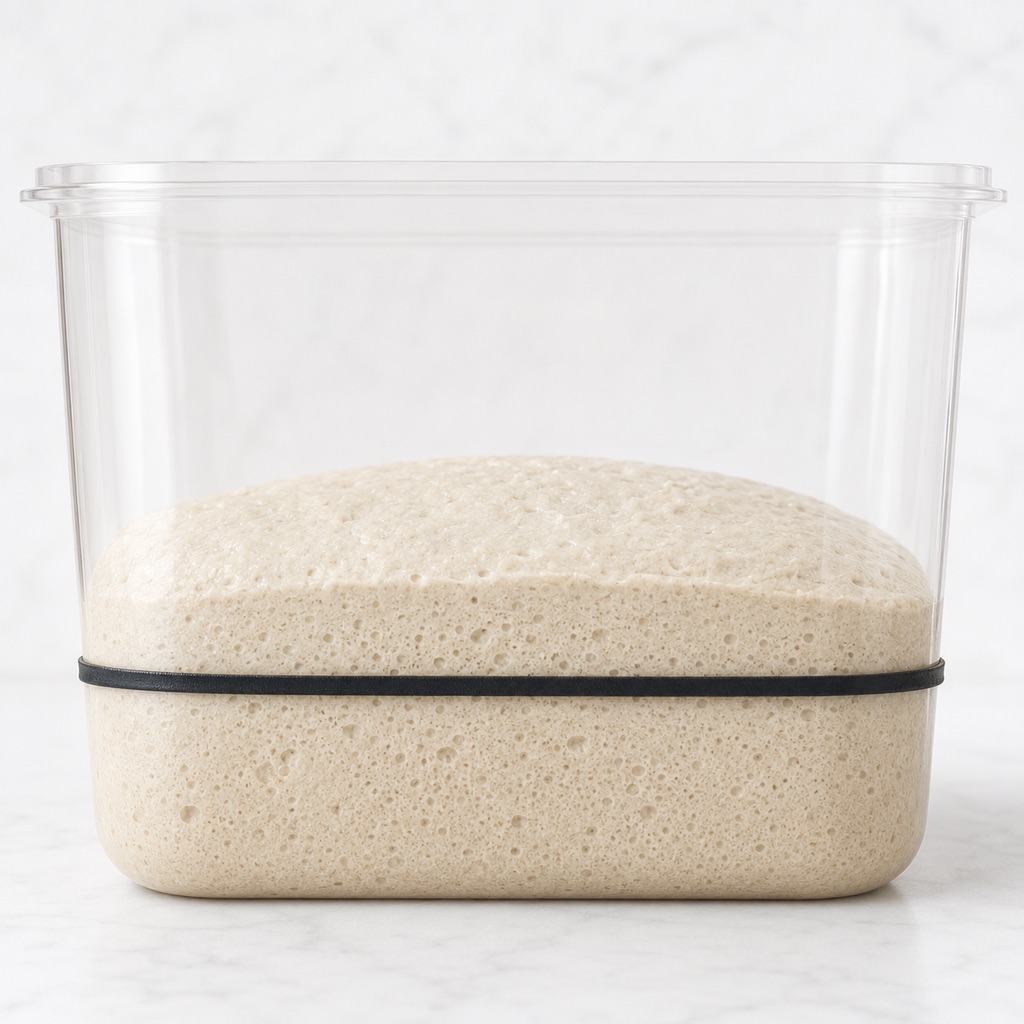
What you should see: The dough is aerated and smoother, with rounded edges, side bubbles, elastic cohesion, a gentle jiggle, and enough strength to come out of the container without pouring.
Preshape and Rest the Dough
Preshaping organizes the dough; the bench rest relaxes it for final shaping. Use little flour and preserve its gas.
- Turn the dough onto a clean, unfloured or very lightly floured work surface.
- Use a bench scraper and gentle drags to form a loose round without pressing out the air.
- Leave it uncovered for 20–30 minutes.
- Final-shape when it can extend without tearing but still holds a round.
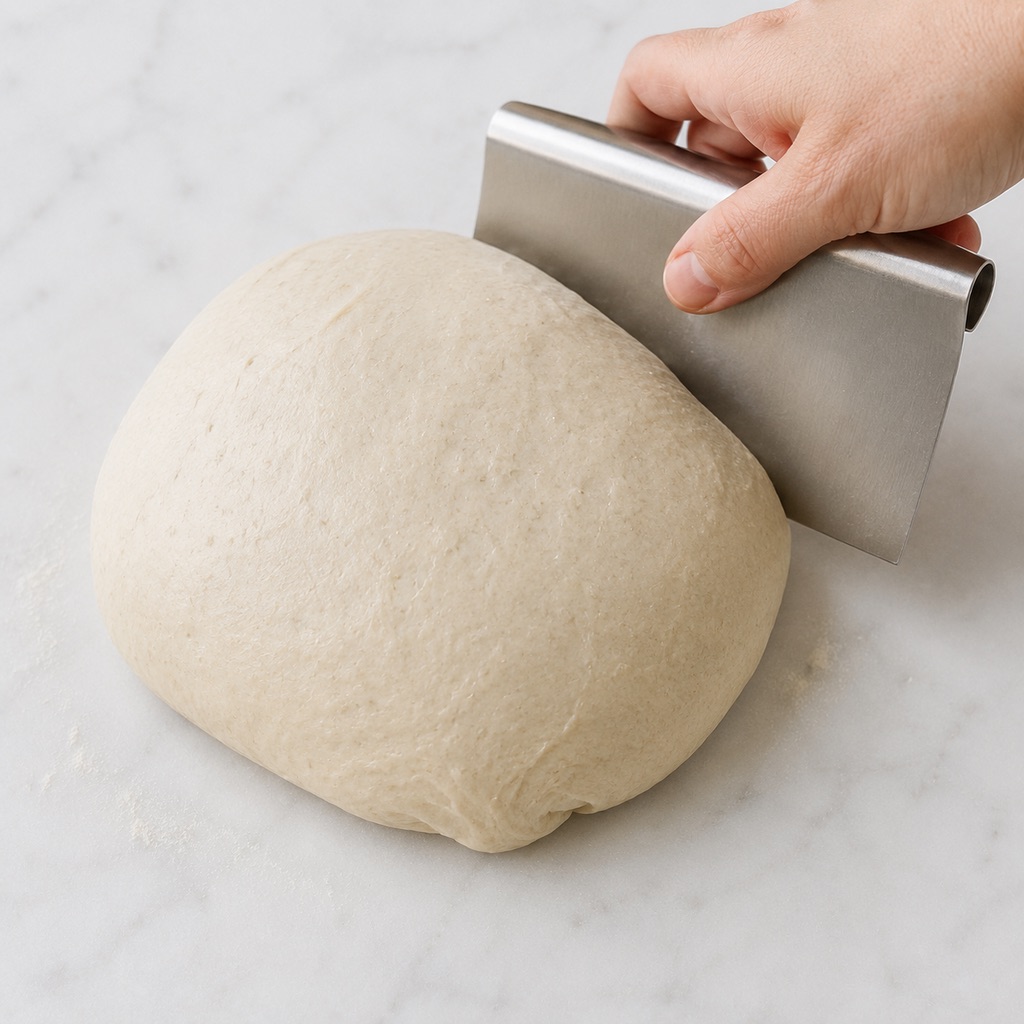
What you should see: The round softens and spreads slightly during the rest, yet it does not flatten into a puddle. Its surface retains some tension and its interior still feels aerated.
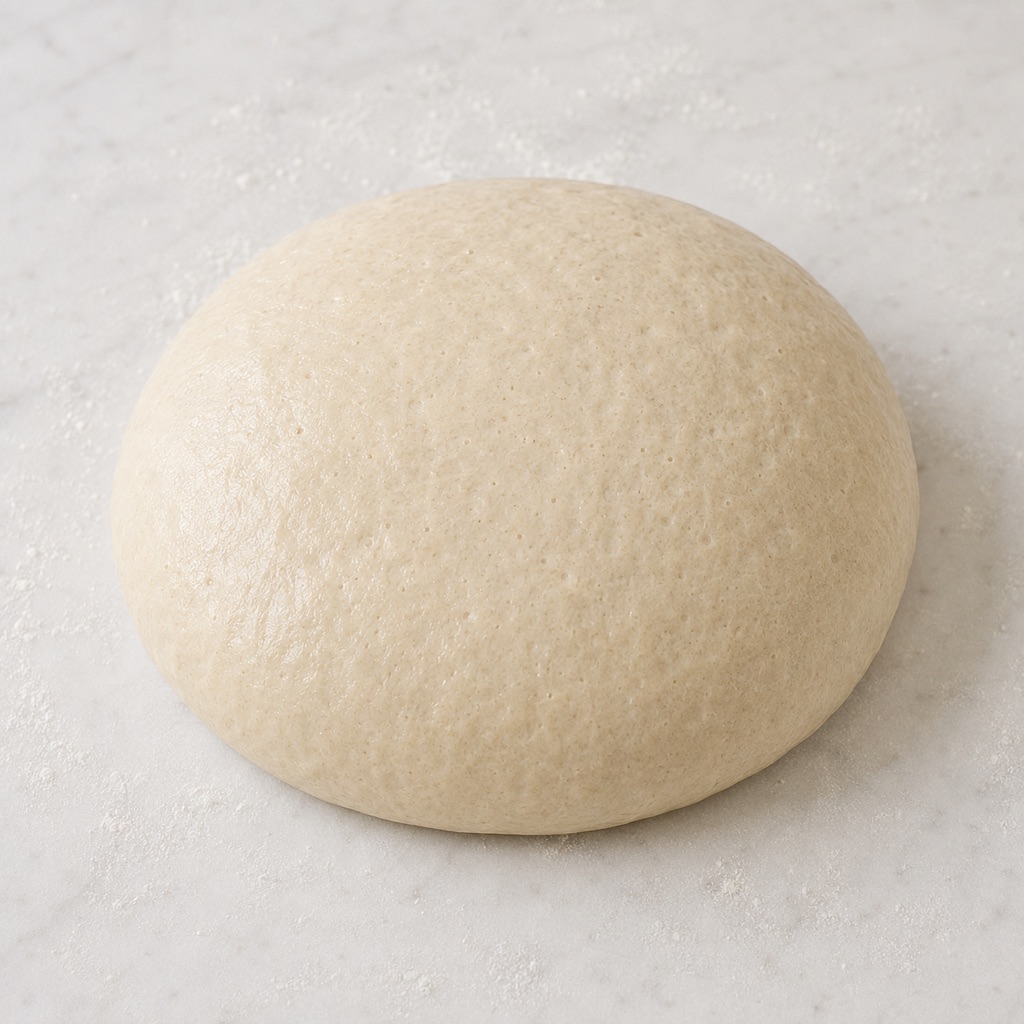
Shape a Taut Boule
Final shaping creates a supporting outer skin. Build tension without tearing the surface or squeezing away every bubble.
- Dust the top of the rested round lightly with flour and turn it over so the floured side faces down.
- Fold the lower edge and sides inward, then bring the top down into a compact parcel.
- Turn seam-side down and use short bench drags to tighten the surface.
- Dust an 8- to 9-inch banneton or towel-lined bowl with rice flour and place the loaf inside seam-side up.
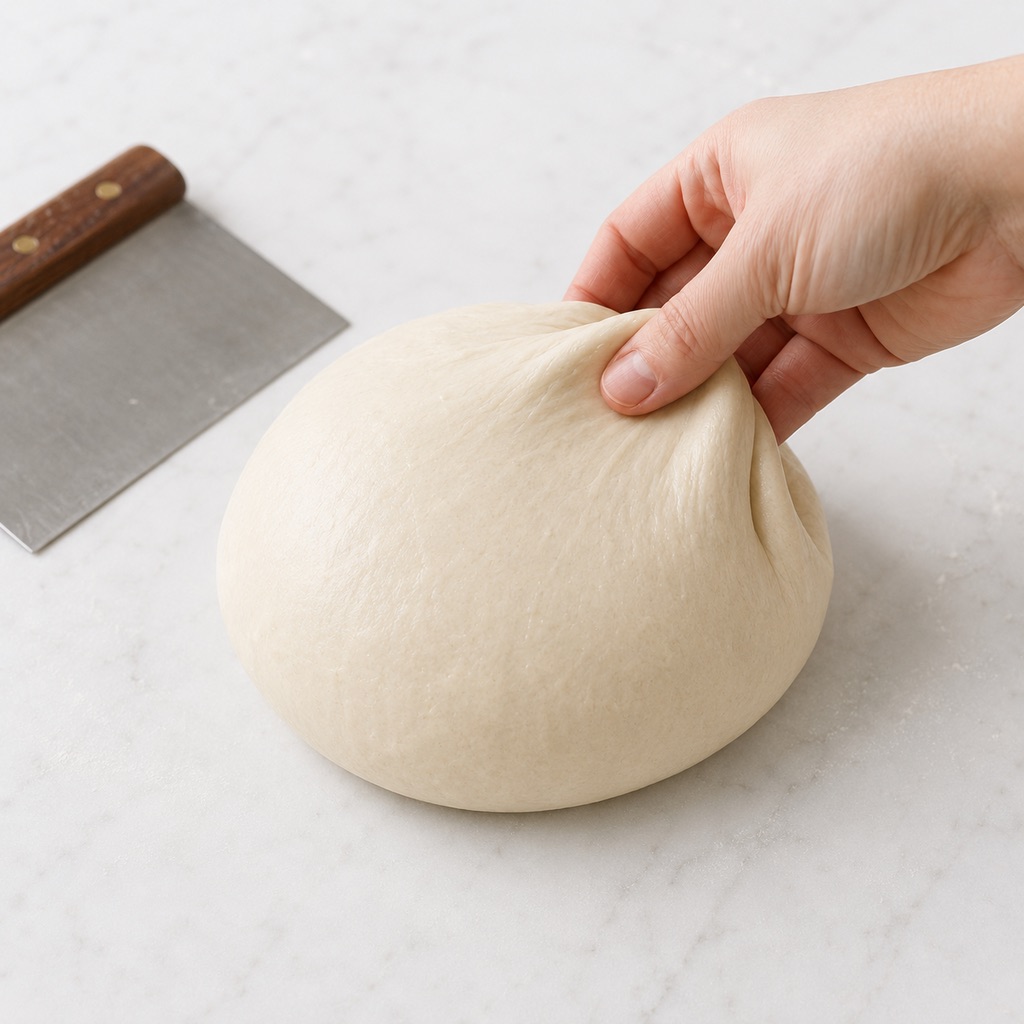
What you should see: The boule has a smooth, taut outer surface, no torn skin, and enough strength to hold a rounded form when you stop moving it.
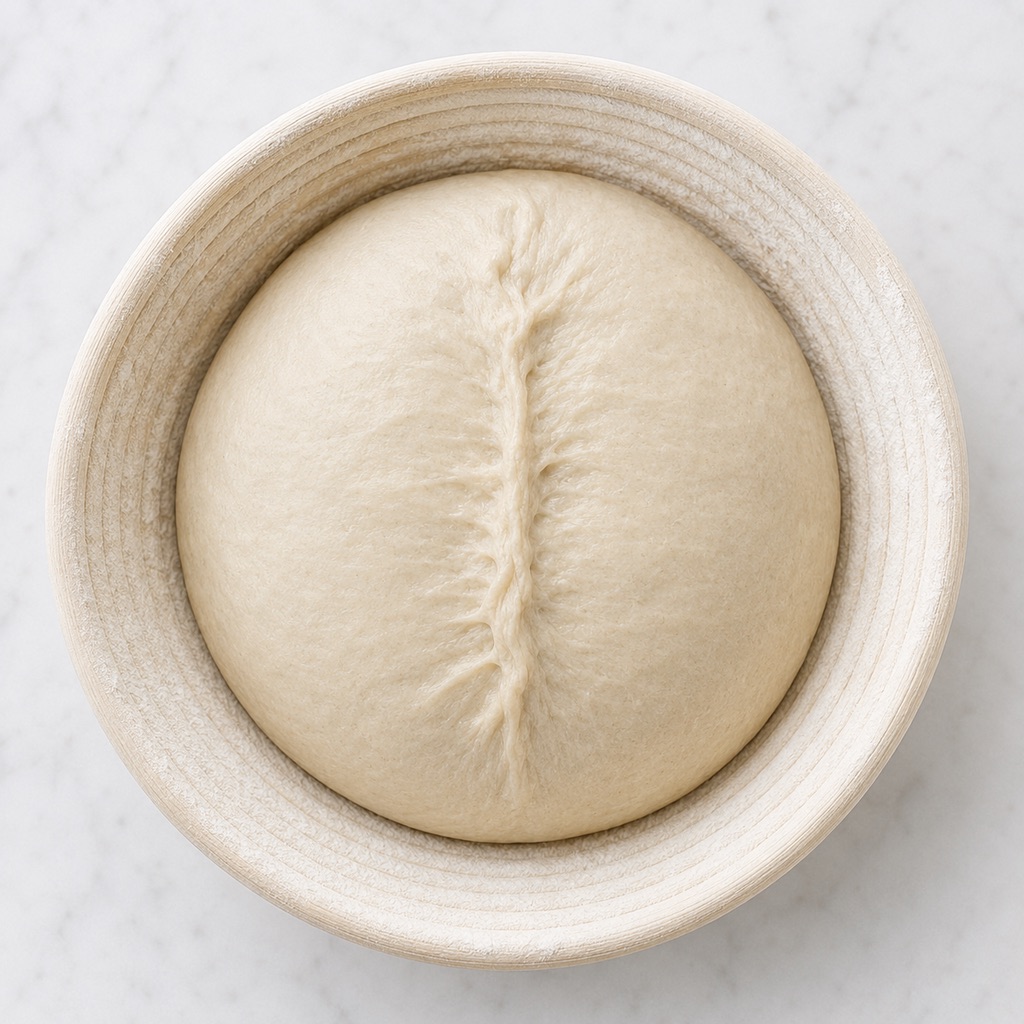
Cold-Proof the Shaped Loaf
The cold proof develops flavor, firms the loaf for scoring, and creates a baking window. A warmer refrigerator advances fermentation faster.
- Cover the basket so the dough does not dry out.
- Refrigerate at 37–40°F / 3–4°C for 10–16 hours.
- Shorten the proof above 40°F / 4°C or when bulk ended at an advanced stage.
- Bake the loaf directly from the refrigerator; do not wait for it to double on the counter.
What you should see: The cold loaf feels structured, releases cleanly from the basket, and retains its shape. It may look slightly expanded, but it does not need to double visibly.
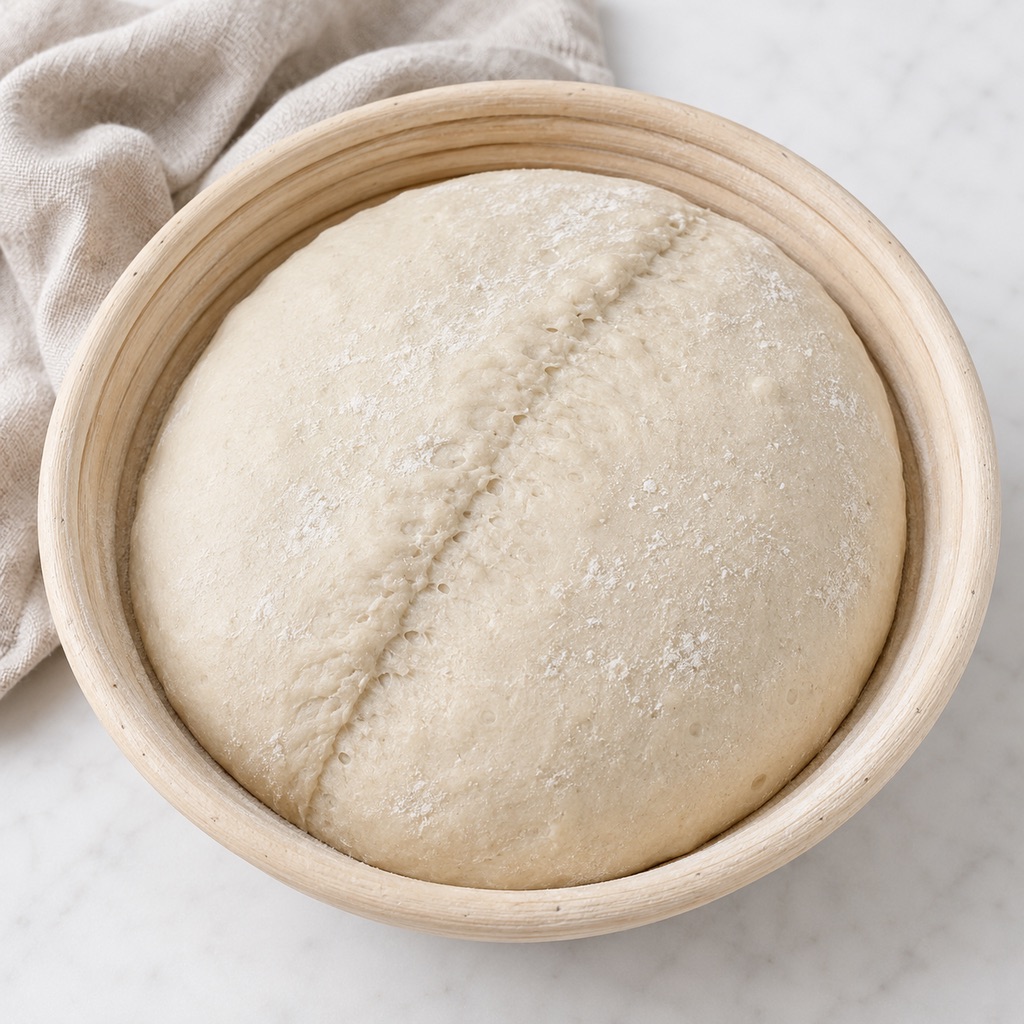
Preheat, Score, and Bake
A thoroughly heated Dutch oven supports expansion, while one angled score controls it. Covered baking builds oven spring; uncovered baking develops crust.
- Preheat a 5- to 6-quart Dutch oven on the center rack at 475°F / 246°C for 45–60 minutes. If bottoms burn, place an empty heavy sheet pan on the rack below.
- Turn the cold loaf onto a parchment sling and brush away excess flour.
- At a 30–45° angle, make one decisive curved score about 1/2 inch / 1.3 cm deep.
- Lower the loaf and parchment into the hot pot. Cover, reduce the oven to 450°F / 232°C, and bake for 20 minutes.
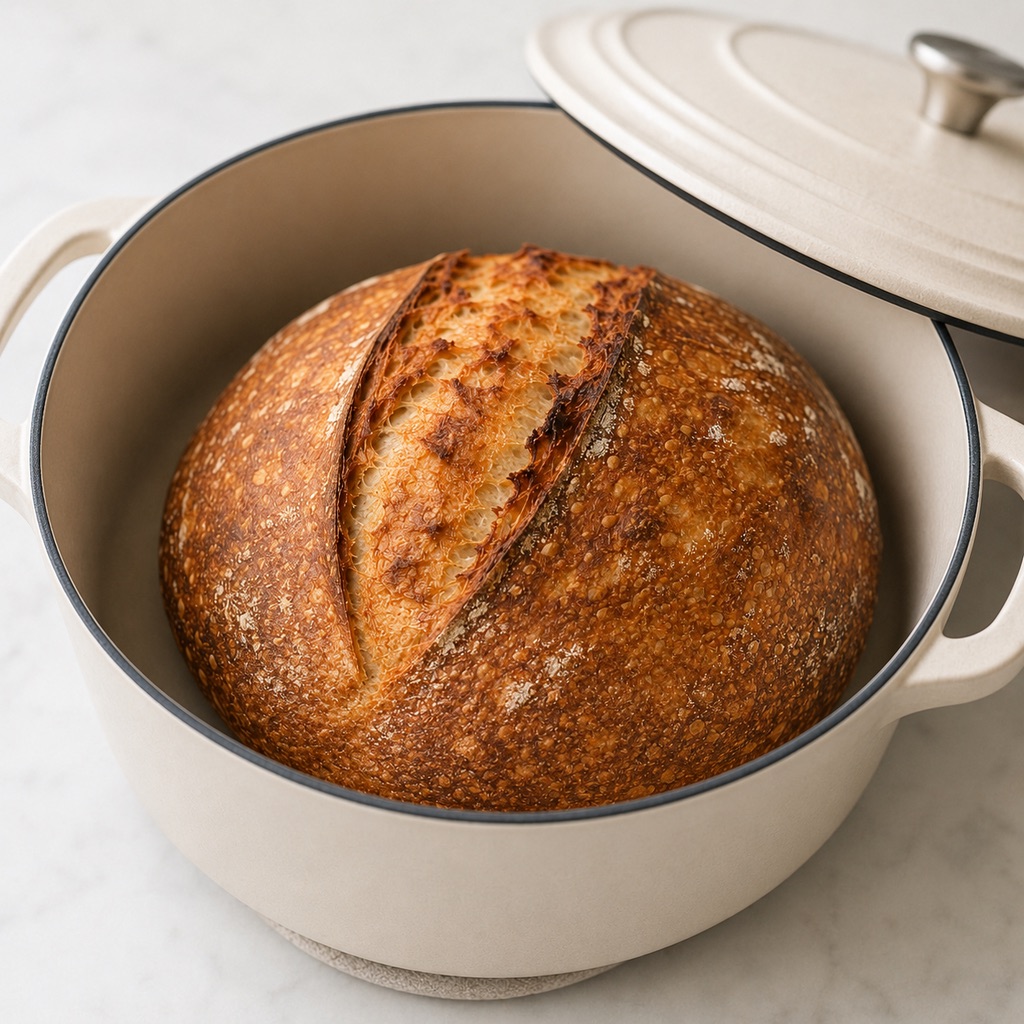
- Remove the lid and bake for another 22–28 minutes, until the crust is deep golden to chestnut and the opened score has no pale, raw-looking line.
- If needed, dry the crust up to 5 minutes in the uncovered pot or on the rack with the oven off and door cracked.
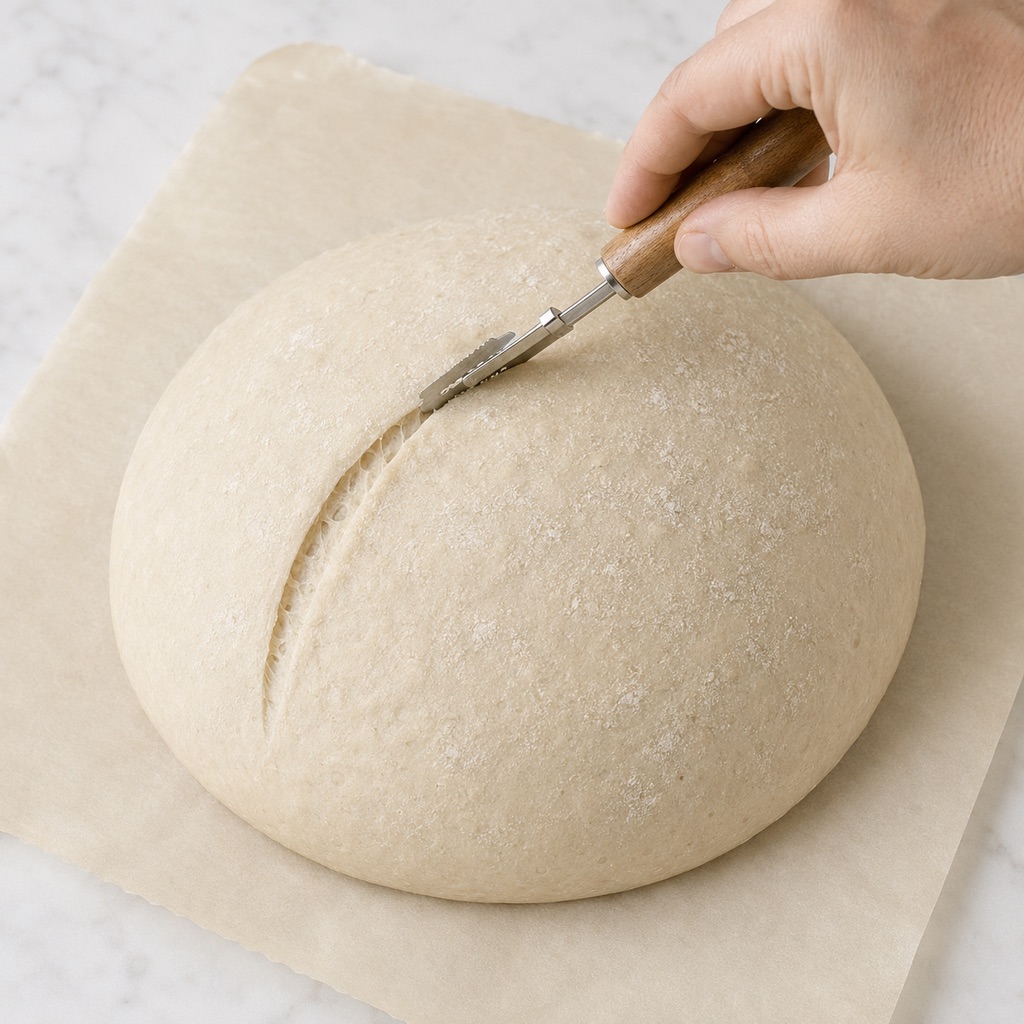
What you should see: The loaf expands through the score during the covered phase, then develops a firm, deep golden-to-chestnut crust during the uncovered phase. The sidewalls and base are set, and the score is fully opened.
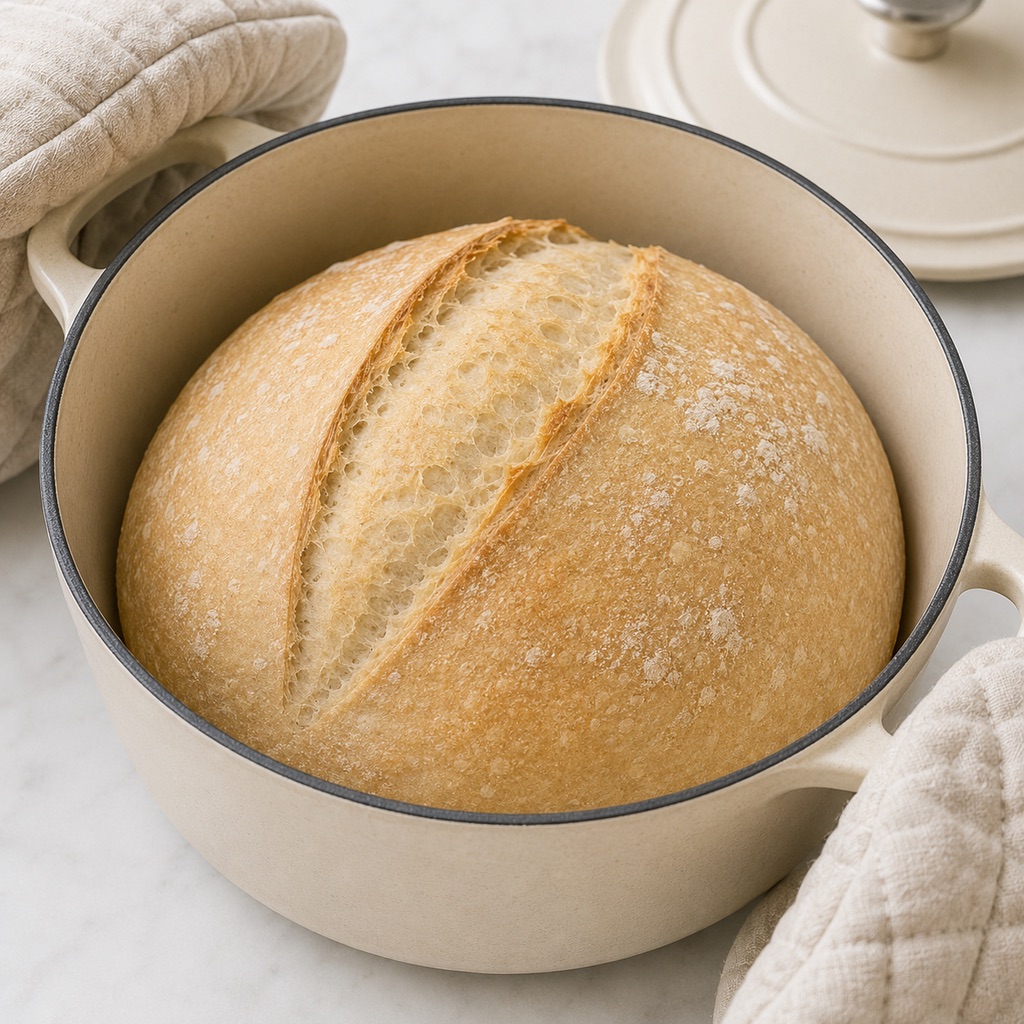
Cool Completely Before Slicing
Cooling finishes the crumb’s set and moisture redistribution. Cutting early compresses the interior and can create a gummy-looking slice.
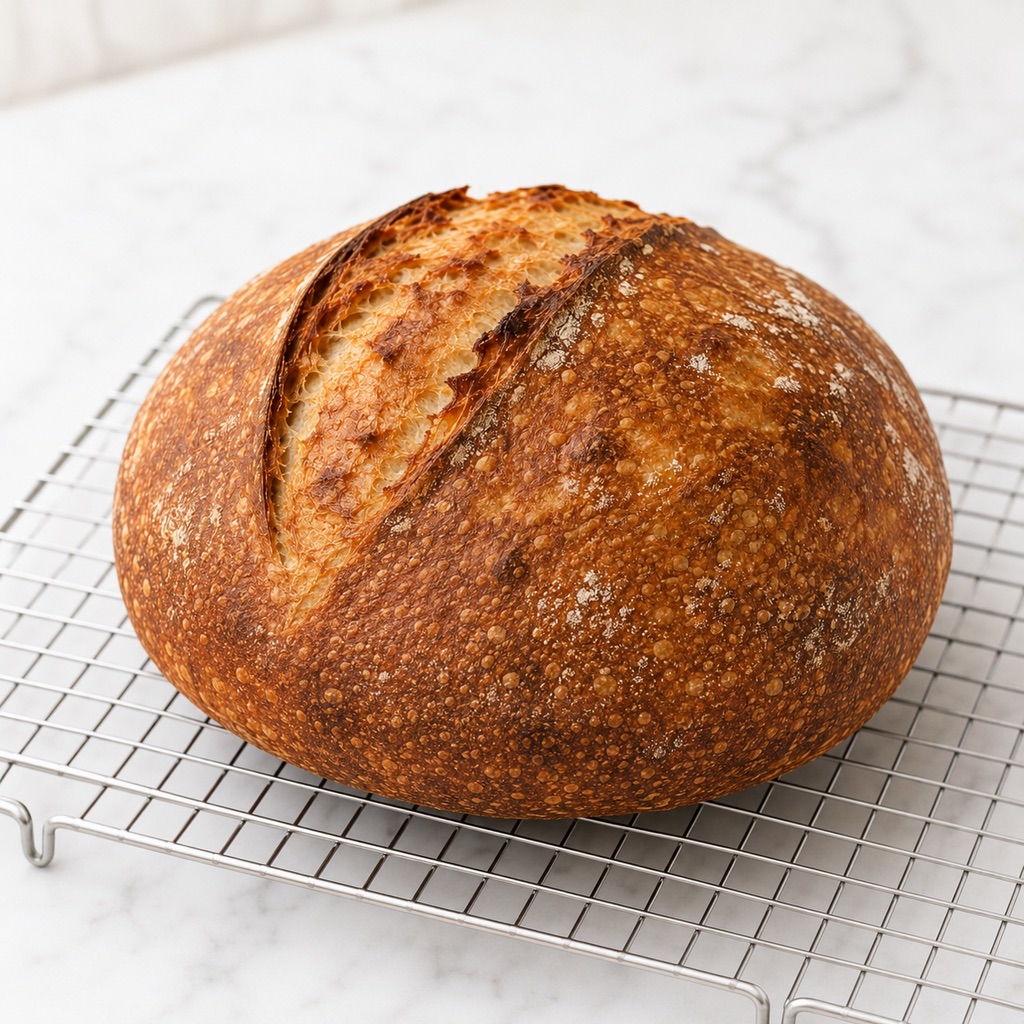
- Lift the loaf out of the Dutch oven and place it on a wire rack with air circulating underneath.
- Cool for at least 2 hours; 3 hours is preferable for the cleanest crumb assessment.
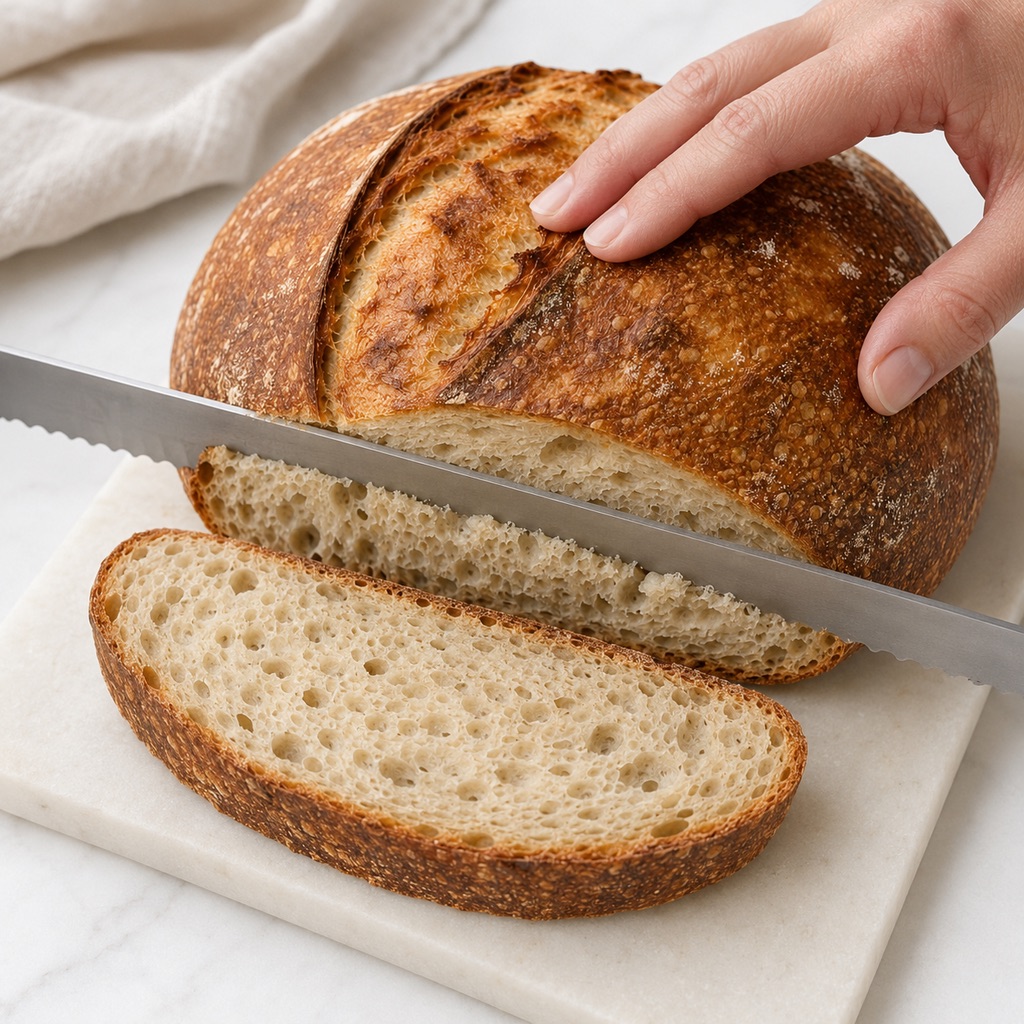
- Slice with a serrated bread knife only after the escaping heat has subsided and the center no longer feels warm.
What you should see: The crust is set, the loaf no longer releases visible heat, and the crumb cuts cleanly without wet compression or a paste-like line along the knife.
How to Read the Crust, Crumb, and Final Doneness
A finished loaf is judged through several agreeing external and internal signs. Temperature can support the decision, but it cannot replace full crust color, a set structure, complete cooling, and the intended resilient crumb.
Crust, Score, and Oven Spring
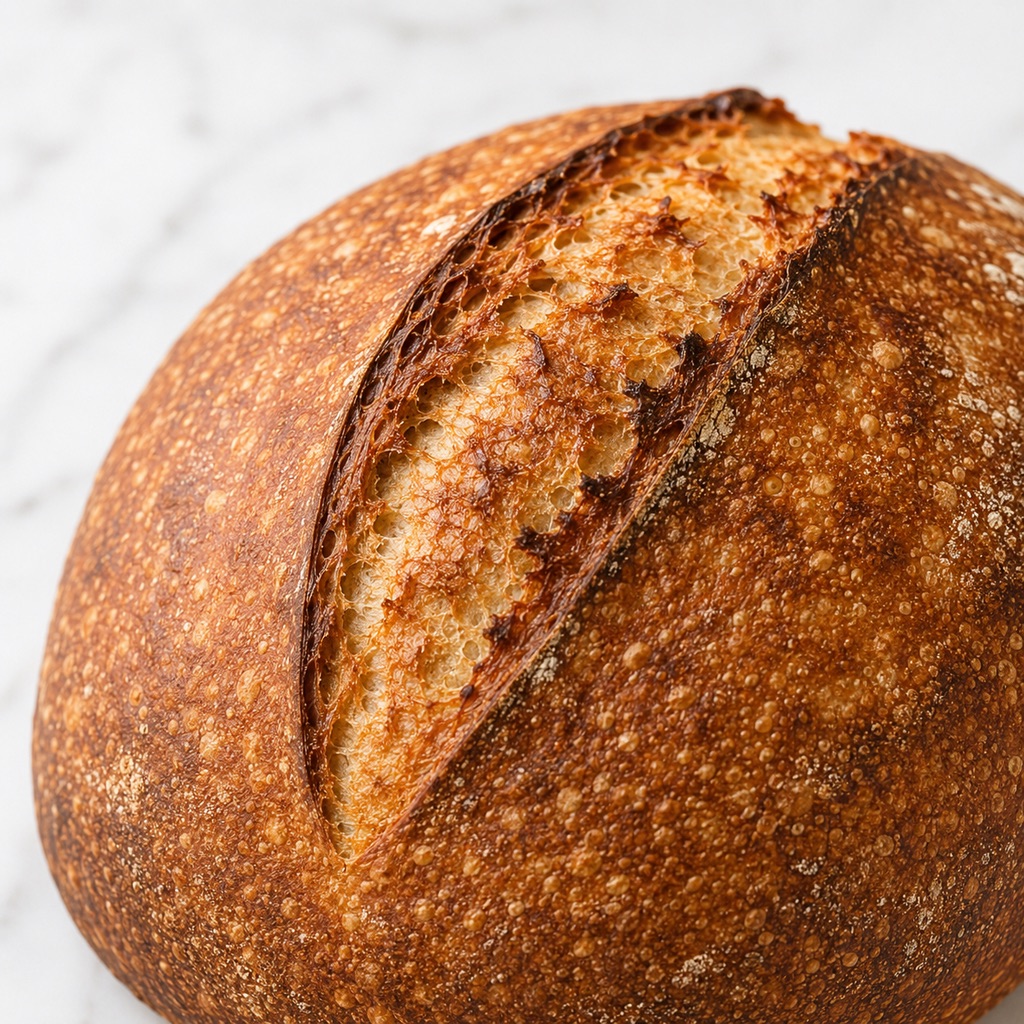
The exterior should communicate both full expansion and enough uncovered baking to drive off surface moisture. A dramatic ear can be beautiful, but it is not a required doneness or quality test.
- The crust is deep golden brown to chestnut rather than pale blond.
- The functional score has expanded and no raw-looking strip remains inside it.
- The sidewalls and base feel firm, and the loaf feels lighter than its size suggests.
- An internal reading around 205–210°F / 96–99°C supports the other cues; it does not excuse a pale crust or a loaf that still feels heavy with moisture.
Crumb, Slice, and Flavor
The cooled interior should feel moist and resilient rather than wet, rubbery, or cotton-soft. Its moderate openness comes from balanced fermentation and retained structure, not from chasing the largest possible holes.
- The crumb contains irregular small and medium alveoli distributed through the slice.
- There is no giant empty tunnel beneath the upper crust and no dense gummy band along the base.
- A slice springs back after gentle compression instead of remaining pasted together.
- The texture is tender-chewy, and the flavor is wheaty with a clean mild-to-moderate tang.
Expert Decisions for Better Fermentation, Shape, and Crust
These decisions make the process more observable and protect fermentation, surface tension, and crust development.
- Measure the dough, not only the room. Ingredients and mixing can shift its temperature, so record the dough itself and interpret the schedule from that number.
- Mark the starting bulk level. A straight container and a simple mark make the rise observable and comparable.
- Stop the reserved water when cohesion declines. Withholding water protects strength when flour absorption is lower.
- Use a fourth fold only when needed. Add it for fast-spreading dough; skip it once three sets create elastic structure.
- Know the refrigerator temperature. Above 40°F / 4°C, shorten the cold proof because fermentation continues faster.
- Dust with rice flour. It supports a cleaner basket release and helps prevent surface tears.
- Make the functional score first. One angled cut creates the expansion path; decorative cuts remain secondary.
- Shield bottom heat without water. An empty heavy sheet pan below the pot diffuses harsh lower heat.
Why Sourdough Bread Turns Out Flat, Dense, Gummy, or Burnt
Most loaf problems begin earlier than they appear. Match the symptom to its likely stage and change one variable on the next bake.
| Symptom | Most likely stage or cause | How to prevent it | What can still be done |
|---|---|---|---|
| Dense, tight crumb | Weak starter, cool dough, or early bulk | Use a doubling starter, record dough temperature, and require every bulk cue | Toast fully baked slices |
| Upper tunnels and dense base | Underfermentation or one trapped air pocket | Complete bulk aeration and degas only obvious oversized pockets | Slice around voids and toast |
| Flat, slack loaf | Overfermentation, warm/long cold proof, excess water, or weak shaping | End warm bulk earlier, check refrigerator temperature, withhold water, and build tension | Bake fully; use sound slices for toast |
| Gummy crumb | Sliced warm, underbaked, imbalanced fermentation, or excess water | Develop full color, cool 2–3 hours, and control reserved water | Toast if fully baked; discard raw interior |
| Sticky dough without strength | Excess water, collapsed starter, or poorly timed folds | Withhold water, use starter at peak, and assess after three folds | Handle with a scraper and record the cause |
| Pale, soft crust | Uncovered bake ended early | Bake to deep golden-chestnut and use the brief drying finish if needed | Refresh with dry heat |
| Burnt base | Excess lower heat | Use the center rack and an empty sheet-pan shield below the pot | Trim after cooling |
| Thick, leathery crust | Low/long bake, poor steam containment, or damp storage | Preheat well, cover for the first phase, and finish efficiently | Toast slices |
| Harshly sour flavor | Starter past peak or overly warm/long fermentation | Use starter near peak and shorten warm bulk or cold proof | Rebalance timing next time |
| Score does not open | Proofing imbalance, weak tension, poor score, or cool pot | Use fermentation cues, shape evenly, score 1/2 inch at 30–45°, and preheat fully | Judge quality by crumb, not the ear alone |
Beautiful Ways to Serve Fresh Sourdough Bread
Serve the loaf only after it has cooled completely, when the crumb can hold a clean cut and the crust has settled into its crisp texture. These simple presentations keep the bread’s color, structure, and wheat flavor at the center.
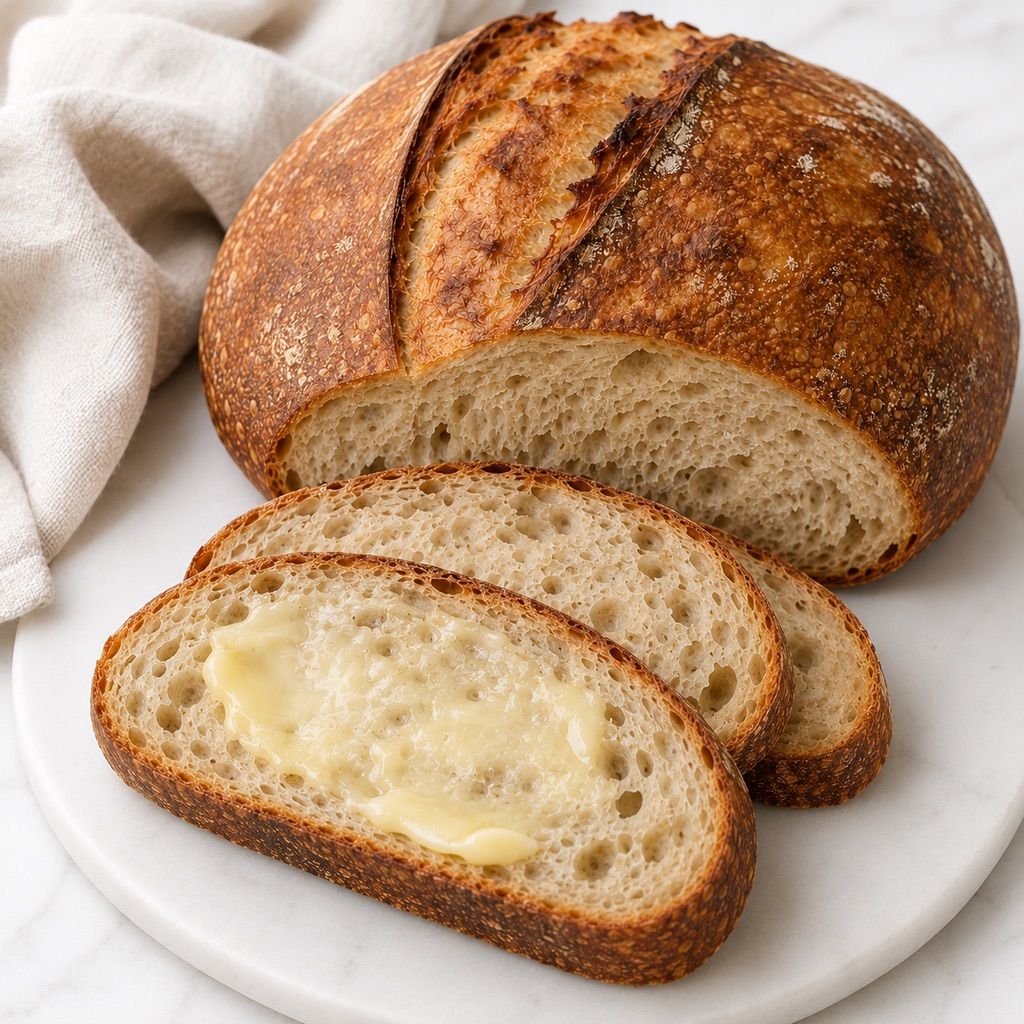
- Generous table-bread slices: Cut the loaf into thick pieces and serve with softened salted butter so the open crumb and caramelized edge remain visible.
- Crisp breakfast toast: Toast medium slices until the edges deepen, then add honey, preserves, or a savory spread.
- A rustic soup-side basket: Arrange diagonal slices beside soup, stew, or a composed salad, with the scored crust facing upward.
- Open-faced sandwiches: Use sturdy slices for toppings that show the moderately open crumb rather than hiding it between two heavy pieces.
How to Store, Freeze, and Refresh Sourdough Bread
Store sourdough only after it cools completely. Trapped moisture softens the crust, while excessive exposure dries the crumb.
Room-Temperature Storage
For the best crust and crumb, keep the loaf at room temperature and use it within about 2–3 days. Discard bread with mold or other spoilage.
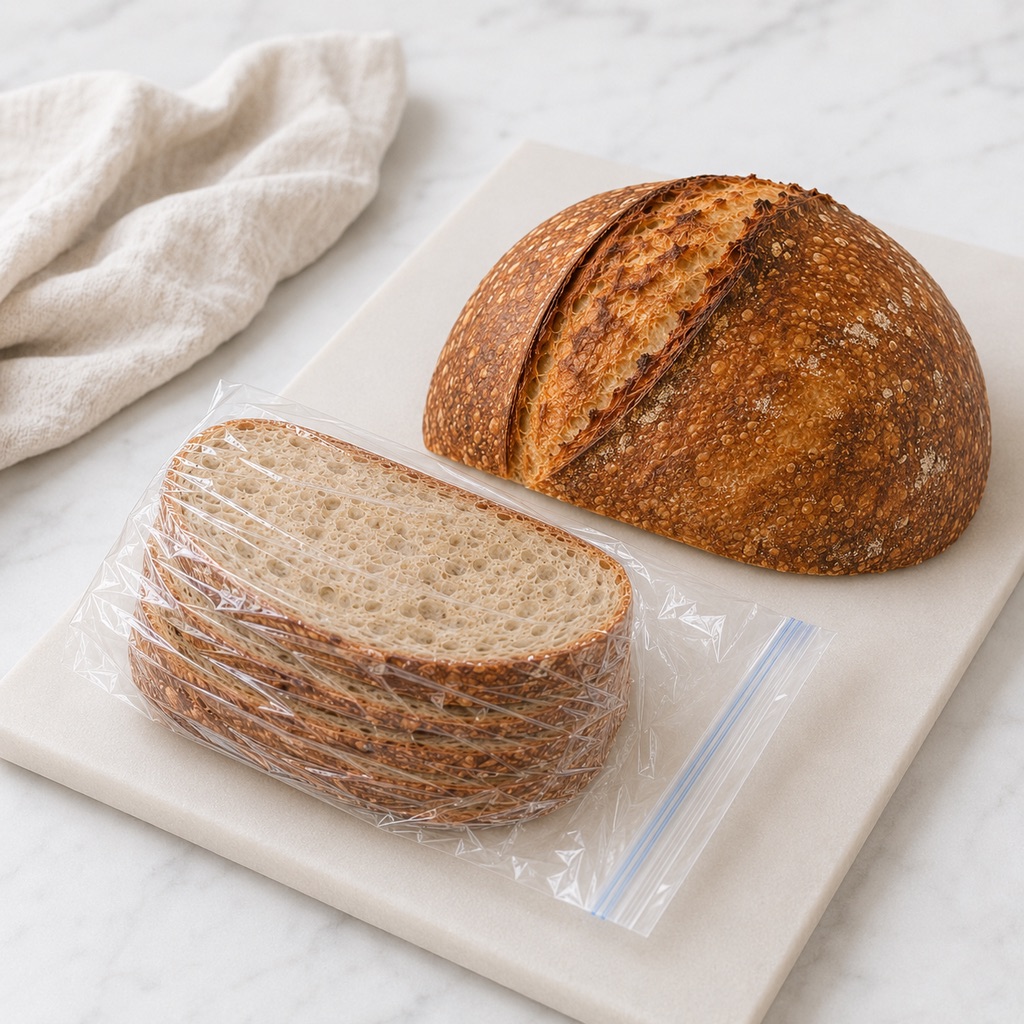
On day one, hold it cut-side down on a clean board. Later, use a bread bag or wrap the cut face. Paper or cloth preserves crispness but dries faster; an airtight bag protects softness but softens the crust. Avoid routine refrigeration because it accelerates staling.
Freezing and Thawing
Freeze bread you will not finish within 2–3 days. Slices suit individual portions; a whole or half loaf refreshes more like table bread.
Wrap cooled bread airtight, press out air, and freeze for best quality up to 3 months. Thaw slices as needed; thaw a whole loaf completely at room temperature before refreshing.
Refreshing Slices and the Whole Loaf
Dry heat restores crispness better than a microwave. Refresh only what you will eat because repeated heating dries the crumb.
- Individual slices: Toast from room temperature or frozen until the surface is crisp and the center is hot.
- Whole or half loaf: Once fully thawed, warm it on an oven rack at 350°F / 175°C for about 10–15 minutes, then cool briefly before cutting.
- Day-old breakfast use: Let sturdy slices absorb custard and turn day-old slices into sourdough French toast.
Keep Baking with Sourdough and Homemade Bread
Continue from this loaf in one of three useful directions: make another starter project, turn sturdy homemade bread into a cozy breakfast, or practice a different style of bread and dough work.
Bake More with Your Starter
Active-starter recipes develop through fermentation, while discard recipes use the portion removed during maintenance for flavor and practical no-waste baking.
- Sourdough English Muffins — choose these when you want naturally fermented dough in a softer, griddle-cooked breakfast format.
- Sourdough Discard Tortillas — use extra discard in flexible skillet flatbreads that do not require an active levain.
- Sourdough Discard Pancakes — turn discard into a quicker, tender breakfast batter.
- Sourdough Chocolate Chip Cookies — move from artisan bread to a sweet, familiar way to use sourdough flavor.
Turn Homemade Bread into a Cozy Breakfast
Sturdy day-old slices are an ingredient rather than waste: their slightly drier crumb can absorb custard while keeping enough structure to hold its shape.
- French Toast Recipe — the classic custardy use for sturdy slices that can absorb without collapsing.
- French Toast Sticks — a crisp-edged, hand-held breakfast route for evenly cut bread.
- Creme Brulee French Toast — choose a richer make-ahead presentation with a caramelized finish.
- Bread Pudding Recipe — rescue bread that is past its table-bread peak in a soft baked custard.
Choose Your Next Bread Project
Move from a lean, naturally fermented boule into a quicker bread, an enriched dough, or a shaped pull-apart project to practice a different part of dough handling.
- English Muffin Recipe — practice yeast fermentation and griddle cooking in a familiar nooks-and-crannies format.
- Buttermilk Biscuits — make a faster laminated bread when there is no time for fermentation.
- Homemade Cinnamon Rolls — move into enriched dough, shaping, spirals, and a soft bakery-style crumb.
- Monkey Bread — build on dough handling with a pull-apart, shareable baking project.
Why This Sourdough Bread Belongs in Your Recipe Box
This recipe earns its place as a long-term reference because it gives you both a classic loaf and a framework for understanding why one bake moves differently from another.
- A true naturally leavened loaf — no commercial yeast changes the identity.
- Hydration you can control — reserved water adapts the dough to real flour behavior.
- Fermentation you can read — temperature, rise, aeration, and movement work together.
- A realistic two-day rhythm — cold proofing turns biological time into a usable home schedule.
- A versatile crumb — the loaf works for the table, toast, sandwiches, and next-day recipes.
- A method that teaches repetition — the same checkpoints help you understand future loaves.
A Sourdough Loaf Worth Learning by Feel
This recipe exists to make classic sourdough technically readable in a home kitchen. It keeps the formula focused and gives each important transition an observable standard, from an aerated starter to a fully cooled, resilient crumb.
The loaf becomes more familiar when you repeat it and keep simple notes about starter peak, dough temperature, bulk rise, refrigerator temperature, and crumb. Those observations turn each bake into useful evidence for the next one.
Good sourdough is not obedience to one clock. It is attention to living dough—learning when strength, air, temperature, time, and movement are finally telling the same story.

Sourdough Bread (Crisp Crust & Chewy Crumb)
Classic naturally leavened sourdough bread with a deeply caramelized crisp crust, a moist tender-chewy crumb, and mild-to-moderate tang. A manageable 70–73% hydration range and temperature-aware fermentation cues make the two-day Dutch oven method precise and repeatable.
Ingredients
- 100 g active sourdough starter at 100% hydration, at peak or just beginning to recede (about 1/2 cup, stirred down)
- 300 g water, plus up to 15 g reserved water (1 1/4 cups plus 1 teaspoon, plus up to 1 tablespoon)
- 400 g bread flour (about 3 1/3 cups, using 120 g per cup)
- 50 g whole-wheat flour (about 7 tablespoons or a scant 1/2 cup)
- 10 g fine sea salt (approximately 1 3/4 teaspoons; weight is authoritative)
Instructions
- Prepare the starter and wait for peak activity. Feed an established wheat starter as usual, or combine 25 g mature starter, 50 g water, and 50 g wheat flour for a practical build. Keep it at 75–78°F / 24–26°C until it has at least doubled, looks aerated and webbed inside, and has a domed top or one that has only just begun to flatten, often 4–8 hours. Use 100 g in the dough and retain the remainder.
- Hydrate the flour. Mix 400 g bread flour, 50 g whole-wheat flour, and 300 g water until no dry flour remains. Cover and rest for 30–45 minutes. The dough should look shaggy but evenly hydrated.
- Add the starter, salt, and reserved water. Work 100 g ripe starter into the dough until evenly distributed. Dissolve 10 g salt in up to 15 g reserved water and work it in. Stop adding reserved water if the dough becomes very loose, smears instead of gathering, or loses cohesion. The bulk-fermentation clock begins when the starter is fully incorporated.
- Check the dough temperature. Measure the dough after mixing; the target is 76–78°F / 24–26°C. Use this reading to interpret fermentation speed rather than heating or cooling the dough aggressively. The mixed dough should be cohesive, tacky, and able to gather into a rough mass.
- Build strength with folds. At 30, 60, and 90 minutes after starter incorporation, perform one set of four directional stretch-and-folds. Cover between sets and handle the dough more gently as it aerates. Add a fourth set around 120 minutes only if the dough still spreads rapidly and lacks elastic resistance. After the final needed set, the surface should be smoother and the dough should hold a rounded form longer.
- Finish bulk fermentation by cues. Leave the dough covered until its temperature-aware rise agrees with the complete endpoint set. At 76–78°F / 24–26°C, this is often about 4–6 hours from starter incorporation and approximately 40–50% growth—not doubling. The surface should be smoother and aerated, the edges rounded or slightly domed, bubbles visible at the sides and beneath the surface, and the dough cohesive, elastic, gently jiggly, and able to release with strength. At 70–72°F / 21–22°C, expect slower fermentation and often about 50–60% rise; at 80–82°F / 27–28°C, end closer to about 30–40% rise because fermentation continues more aggressively.
- Preshape and rest. Turn the dough onto a clean unfloured or very lightly floured surface. Preshape it gently into a round without pressing out all the gas. Rest uncovered for 20–30 minutes. It is ready for final shaping when it has relaxed enough to extend without tearing but has not spread into a flat puddle.
- Shape a taut boule. Lightly flour the top, turn the dough over, fold the edges inward, and roll or drag it into a round with even outer tension. Do not tear the skin or squeeze out all the gas. Place it seam-side up in a rice-floured banneton or towel-lined bowl and cover.
- Cold-proof the loaf. Refrigerate at 37–40°F / 3–4°C for 10–16 hours. Bake directly from the refrigerator. If the refrigerator is warmer than 40°F / 4°C, shorten the proof because fermentation will continue more quickly.
- Preheat, score, and bake. Place a 5- to 6-quart Dutch oven on the center rack and preheat at 475°F / 246°C for 45–60 minutes. If bread bottoms usually burn, place an empty heavy sheet pan on the rack below the pot. Turn the cold loaf onto parchment, brush away excess flour, and make one decisive curved score about 1/2 inch / 1.3 cm deep at a 30–45° angle. Lower the loaf into the hot Dutch oven, cover, immediately reduce the oven to 450°F / 232°C, and bake for 20 minutes. Remove the lid and bake for another 22–28 minutes, until the crust is deep golden to chestnut, the score is fully expanded with no pale raw-looking line, and the sidewalls and base are firm. A center reading of 205–210°F / 96–99°C supports the other cues but does not replace them.
- Cool completely before slicing. Transfer the loaf to a wire rack and cool for at least 2 hours, preferably 3. The loaf should feel lighter for its size, and the completely cooled crumb should be moist, resilient, and moderately open rather than wet or paste-like. Cutting while warm can compress the crumb and make a properly baked loaf appear gummy.
Notes
- Use an established, predictably active starter. Creating a starter from flour and water is a separate multi-day process.
- Do not rely on the float test as the deciding starter-readiness test. Doubling, aeration, a domed or just-flattening top, clean fermented aroma, and a webbed interior are more useful together.
- The 15 g reserved water is part of the 73% maximum-hydration formula, but it is optional in execution. Stopping without it produces a valid 70% hydration dough when the flour absorbs less water.
- All-purpose flour can be used only as a controlled accessibility adjustment. Withhold the reserved water, expect a potentially tighter crumb, and judge strength before adding more water.
- Bulk fermentation is complete only when the rise range agrees with aeration, rounded edges, bubbles, elasticity, cohesion, and jiggle. Do not wait for doubling in the canonical 76–78°F / 24–26°C range.
- A fourth fold is conditional, not automatically required. Skip it once three sets create sufficient elastic structure.
- The canonical proof is 10–16 hours at 37–40°F / 3–4°C. A 24-hour cold proof is not a universally safe extension for this inoculation and temperature range.
- Deep crust color and firm structure are primary doneness cues. Internal temperature is supporting evidence only.
- The recipe makes one 875 g round boule in a 5- to 6-quart Dutch oven. Different loaf counts, shapes, flour architectures, add-ins, or pan formats require separate validation.
Nutrition Information:
Yield: 12 Serving Size: 1 sliceAmount Per Serving: Calories: 150Total Fat: 0.7gSodium: 329mgCarbohydrates: 30.2gFiber: 1.3gProtein: 5.1g
Nutrition information is provided as an estimate only and may vary based on specific ingredients, brands, and portion sizes used. This information should not be considered medical or nutritional advice.
12 Sweet Favorites — Yours, Free 🍰
Tiramisù, no-bake cheesecake, the perfect chocolate chip cookie & 9 more reader-loved desserts — gathered into one beautiful free recipe book. From my kitchen to yours.
No spam, just sweet things. Unsubscribe anytime.